

Azure Multi-Factor Authentication helps to keep your identity safe and secure and it verifies that you are the authorized person to use the Office 365 account. After MFA is enabled, the user must accept a phone call & text message or app notification for the verification. Once it is verified, you can use your O365 mailbox.
Here, we are going to describe how to set-up Multi-Factor Authentication for the Office 365 Account. There are two possible ways for setting up Multi-Factor Authentication in Exchange Online User Mailbox.
Method 1 - Setup multi-factor authentication in Office 365 by the Exchange Admin Center
Here, you can easily set up multi-factor authentication by the Exchange Admin Center. For this, you have to login your O365 with your Admin Account.
Step 1
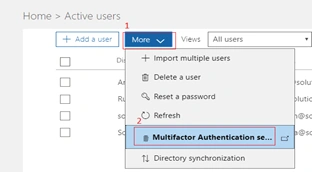
Step 2
If you want to assign the authentication by selecting the user mailbox then check the box and click Enable.
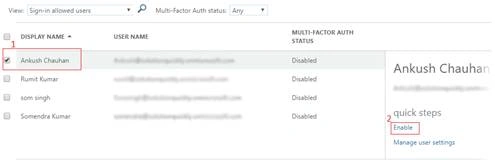
But if you want to provide MFA in bulk form then you need to create a CSV file with the UserName or Multi-factor authentication status.
Note
For the CSV file you need to open the Microsoft Excel and type the following information.
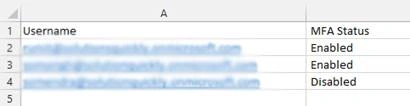
Once your CSV is created, just click hit on bulk update and browse the CSV file >> and click arrow sign>> again arrow>> done. It will automatically enable the Multi-Factor Authentication Status.
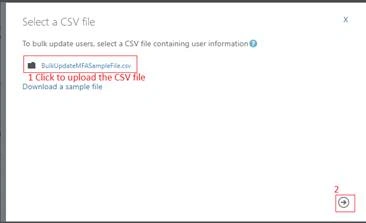
Step 3
Method 2 - Enable Multi-Factor Authentication using PowerShell
You can also use the Windows PowerShell for assigning the MFA in Office 365 users Mailbox.
Step 1
- The Azure AD Module works on the Windows Operation System and Microsoft.Net Framework. So download & install the .net Framework version according to the Windows PowerShell.
- Microsoft Online Service Sign-In Assistant for IT Professionals RTW.
- Azure Active Directory Module for Windows PowerShell (64-bit version)
Step 2
Get-ExecutionPolicy
If the output shows unrestricted then run the given command:
Set-ExecutionPolicy Unrestricted –Scope CurrentUser
Step 3
$UserCredential = Get-Credential
After entering this command you need to log in your Office 365 Admin ID and Password. Once you are logged in with the Admin account import the MSOnline module by the given command.
Import-Module MSOnline
Connect-MsolService –Credential $UserCredential
Step 4
$auth = New-Object -TypeName Microsoft.Online.Administration.StrongAuthenticationRequirement
$auth.RelyingParty = "*"
Step 5
$auth.State = "Enabled"
$auth.RememberDevicesNotIssuedBefore = (Get-Date)
Step 6
For Single User,
Note
In <UserPrincilalName> section you need to type the user name in which you want to enable the MFA. For example:
Set-MsolUser -UserPrincipalName [email protected] -StrongAuthenticationRequirements $auth
For All Users,
Get-MsolUser –All | Foreach{ Set-MsolUser -UserPrincipalName $_.UserPrincipalName -StrongAuthenticationRequirements $auth}
Step 7
Join the conversation! Your thoughts help the community grow.