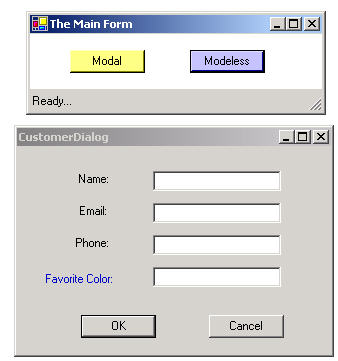
Figure 1 - Dialogs in .NET
This tutorial was written in response to a newbie question in the Forums on how to create a dialog in .NET and extract the information from it. Admittedly, unless you know how to do it, it's not obvious how to create one. The thing to remember about a dialog is that it is just another variation of a Windows Form with certain properties altered and launched with the Show or ShowDialog method of the Form. Show is used for modeless dialogs (dialogs that run inside the application message loop). ShowDialog is used for modal dialogs (dialogs that run in their own message loop).
The first step in creating a new dialog for your application is to right click on the Visual Studio Solution Explorer and Choose Add New Item shown in figure 2 below:
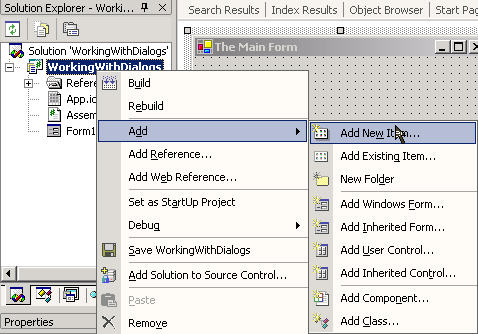
Figure 2 - Adding a new item to the Project
Add New Item will bring up a selection of .NET component and classes from which to choose. Since a dialog is nothing more than a Windows Form, we simply create a new Windows Form and give it the name CustomerDialog.cs.
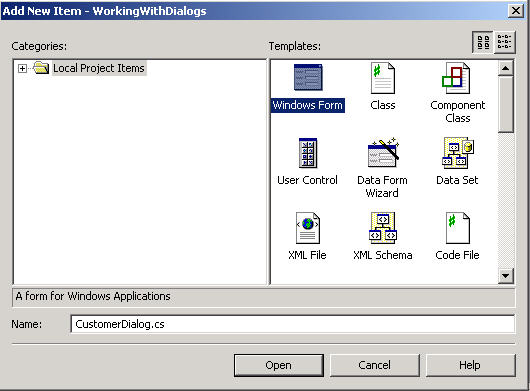
Figure 3 - Choosing the Windows Form to add to the Project
Now the Windows Form should show up in the design view in which we can now alter the properties of the Form. In order to have the Windows Form behave like a dialog, you'll need to change the following properties of the Windows Form: FormBorderStyle, AcceptButton, and CancelButton (I don't know about you, but I kind of wish the CancelButton property was called RejectButton a more appropriate opposite to AcceptButton.).
To make the Windows Form border look like a dialog, change the FormBorderStyle to FixedDialog. In order to set the AcceptButton and CancelButton, we need to create an OK and Cancel button inside the dialog by dragging two new buttons from the toolbox onto the Windows Form as shown in Figure 4:
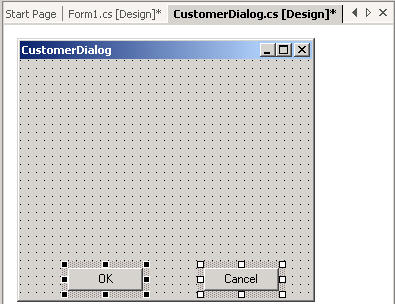
Figure 4 - Adding the Dialog Buttons in the Design View
Now we need to set the AcceptButton and CancelButton properties of the Windows Form based on these two buttons. Visual Studio is nice enough to allow us to select the buttons from a combobox in the property view so we don't have to do any typing here (see figure 5):
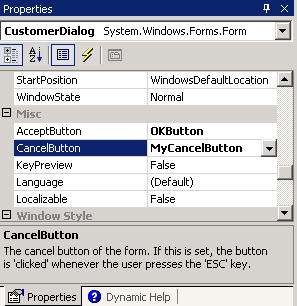
Figure 5 - Choosing Accept and Cancel Buttons in the Properties Window of the Form
Not only do we need to tell the dialog which buttons are the AcceptButton and CancelButton, but we need to tell the buttons what results they will return upon exiting the dialog. Below we change the properties of the OKButton and MyCancelButton to reflect the DialogResults:
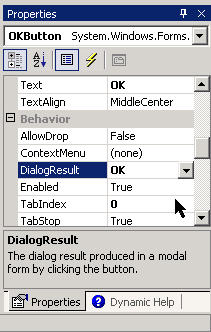
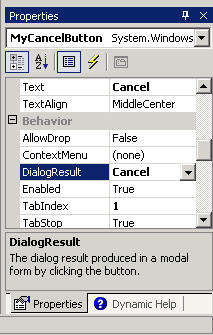
Figure 6 - Setting the DialogResult properties of the buttons
We have finished changing the Windows Form properties in order to make it behave like a dialog. In order to give the sample a little more substance, we'll add a few fields for customer entry as shown in figure 7:
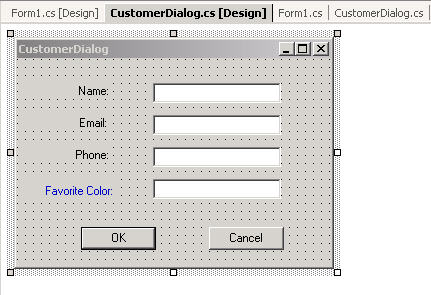
Figure 7 - Adding Fields to the Customer Dialog
Bringing up a modal dialog is no more difficult than constructing the dialog and then calling ShowDialog. By checking the DialogResult returned by the ShowDialog method of the form, we can determine whether or not the user rejected(cancelled) or accepted the information inside the dialog. Below is the simple code for launching the dialog we just created:
Listing 1 - Launching a dialog and checking its DialogResult
// construct a new customer dialog
CustomerDialog myCustomerDialog = new CustomerDialog();
// show the modal dialog until the AcceptButton (OK) or CancelButton(Cancel) is
pressed
if (myCustomerDialog.ShowDialog() == DialogResult.OK)
{
// extract the data from the dialog
MessageBox.Show(myCustomerDialog.Name + " was entered into the database");
}
Note that dialog maintains the data information after the AcceptButton is pressed, so to extract the information, you can simply examine the public properties or fields of the dialog.
Modeless Dialogs
A modal dialog has its own message loop, so while its running, you can't do anything else in the application until the AcceptButton or CancelButton are pressed. A modeless dialog is a dialog you can launch which will still allow you to capture events in the application. That means you can have the modeless dialog running as a separate window and still allow user access to the main application. The Show method of the Windows Form is used to launch a modeless dialog. This method does not return anything simply because once its called, it launches the dialog and returns directly to the application. Unlike ShowDialog it doesn't sit and wait for a DialogResult from the user. So how do you handle the AcceptButton and CancelButton in a modeless dialog? Where and when, and how do you extract the information from this dialog?
One solution to this problem is to deal with everything inside the button event handlers of the modeless dialog. For example if you override the OKButton event handler, you can close the dialog explicitly and call back to the parent or any object that you have made the modeless dialog aware.
Let's say you want to show the customer name entered into the name field as you did in the modal dialog in listing #1. You also want to show the customer name after the user clicks OK in the status bar of the main form. In order to do this in a modeless dialog you need to first make the dialog aware of the parent form. The easiest way to do this is to pass the parent form into the constructor of the modeless dialog.
Listing 2 - Changing the constructor of the modeless dialog to accept the parent object:
// construct a new customer dialog
CustomerDialog myCustomerDialog = new CustomerDialog();
// show the modal dialog until the AcceptButton (OK) or CancelButton(Cancel) is pressed
if (myCustomerDialog.ShowDialog() == DialogResult.OK)
{
// extract the data from the dialog
MessageBox.Show(myCustomerDialog.Name + " was entered into the database");
}Form1 TheParentForm = null;
public CustomerDialog(Form1 parent)
{
//
// Required for Windows Form Designer support
//
InitializeComponent();
TheParentForm = parent; // assign a reference to the parent creating the modeless dialog
}
Now when the user clicks OK in the modeless dialog, we can call a method back to the parent form to display the customer name in the status bar.
Listing 3 - Calling back to the parent object and closing the dialog
private void OKButton_Click(object sender, System.EventArgs e)
{
// assign a dialog result
OKButton.DialogResult = DialogResult.OK;
// Call back to the parent passing the entire CustomerDialog Instance
TheParentForm.ShowCustomerName(this);
// Finished, close the dialog
Close();
}
The Parent Form simply takes an instance of the CustomerDialog in the Parent Form's ShowCustomerName method and extracts the name from the instance as in Listing 4:
Listing 4 - Extracting the customer dialog's customer name into the status bar of the main form
public void ShowCustomerName(CustomerDialog myCustomerDialog)
{
// set the status bar of the main form to the customer name in the customer dialogs edit box
statusBar1.Text = myCustomerDialog.txtName.Text;
}
The cancel button event handler of the dialog does not need to call back to the main form, because the user cancelled the input of information. The only thing necessary to do in the cancel event handler is to close the dialog.
Listing 5 - Handling the Cancel Button on the modeless dialog
private void MyCancelButton_Click(object sender, System.EventArgs e)
{
// user cancelled the dialog, so just close it
Close();
}
(Of course if the cancellation of the dialog is significant to the parent, you can certainly call back to a parent method in the form handling the cancellation.)
Conclusion
Although not as intuitive as a window form running in the main application, dialogs are pretty easy to use once you get the hang of it. I believe Microsoft did us a service in having all the functionality of the dialog in the Windows Form, because really what is a dialog, if not yet another form? One thing that would be nice, however, is to have a Modal Dialog Wizard in the Local Project Items folder. This wizard would simply create a blank form with the OK and Cancel Button Anchored to the bottom of the form and all the appropriate properties set. This could easily using the template wizards in C# and by adding the dialog form information into the ui.vsdir file in the C:\Program Files\Microsoft Visual Studio .NET 2003\VC#\CSharpProjectItems\LocalProjectItems\UI directory. You would also need to create an AddDialogWinForm.vsz file in the C:\Program Files\Microsoft Visual Studio .NET 2003\VC#\CSharpProjectItems directory. For more information on creating template wizards check out my article Creating Custom Project Template Wizards Using C# and .NET.