

Introduction
ListBox presents a list of items the user can select from. ListBox lets users select from a pre-defined list of options presented as a text control. We use a ListBox when you want the options to be visible all the time or when users can select more than one option at a time. ListBox controls are always open, so several items can be displayed without user interaction.
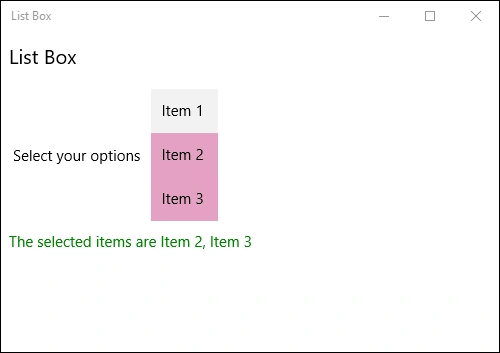
In the following demo, we are listing some items using a ListBox from which the user can select and the selected will be shown in a TextBlock shown below and clicking the selected Item once more will also remove it.
Step 1
Open a blank app and add a ListBox control with some items and a TextBlock control either from the toolbox or by copying the following XAML code into your grid.
- <StackPanel Margin="10,10,0,0">
- <TextBlock Text="List Box" FontSize="20"></TextBlock>
- <StackPanel Orientation="Horizontal" Margin="0,20,0,0">
- <TextBlock Text=" Select your options" VerticalAlignment="Center"></TextBlock>
- <ListBox Margin="10,0,0,0" Name="myListBox" SelectionMode="Multiple" SelectionChanged="myListBox_SelectionChanged">
- <ListBoxItem Content="Item 1"></ListBoxItem>
- <ListBoxItem Content="Item 2"></ListBoxItem>
- <ListBoxItem Content="Item 3"></ListBoxItem>
- </ListBox>
- </StackPanel>
- <TextBlock Margin="0,10,0,0" Name="selectedItems" Foreground="Green"></TextBlock>
- </StackPanel>
SelectionMode defines whether to allow Single or Multiple selections.
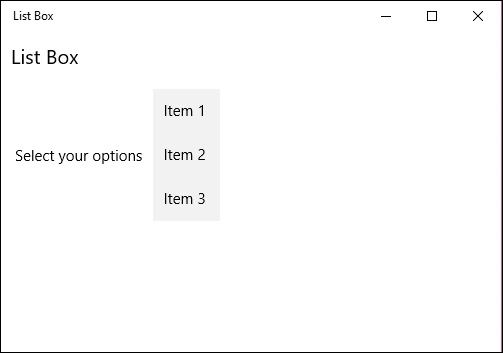
Step 2
Add the following code to your cs page to handle the event while the selection changes.
- private void myListBox_SelectionChanged(object sender, SelectionChangedEventArgs e)
- {
- var selected = myListBox.Items.Cast<ListBoxItem>()
- .Where(p => p.IsSelected)
- .Select(t => t.Content.ToString())
- .ToArray();
- selectedItems.Text ="The selected items are " + string.Join(", ", selected);
- }
Step 3
Run your application and check yourself.
Summary
In this article, we learned about ListBox Control For Windows 10.
??? ????Posted May 7, 2016, 12:06 PM
Hello how can I convert the c# lambda to vb.net thanks eli
Kuppurasu NagarajPosted Feb 11, 2016, 12:35 PM
Nice Ramees..
Sibeesh VenuPosted Nov 4, 2015, 12:26 AM
Nice Share
RameesPosted Nov 3, 2015, 11:04 AM
Thanks :) I will add soon
Former memberPosted Nov 3, 2015, 7:48 AM
Its good article. But, it will be better to add code solution file here also.
Anu VPosted Nov 3, 2015, 7:31 AM
good one