

Introduction
This article explains the HTML 5 meter tag and how to create it.
What is the meter tag?
In my previous article, I explained the Progress Bar in HTML 5 and in this article I am explaining the meter tag. The output of both (progress and meter) tags is the same as we will see but there is the difference that actually the meter tag is used to represent a scalar measurement within a known range. The value can be fractional.
Examples
Disk uses, the relevance of a query result, the fraction of a voting population to have selected a specific candidate.
What is the difference between the progress tag and the meter tag?
In my previous article Progress Bar in HTML 5 I have said that a progress bar is used to display the progress of a specific task. Or a progress element represents the completion progress of a task. Whereas the meter tag is used to represent guages. We can think that a progress tag represents dynamic data whereas a meter tag represents static data.
Note:
- According to the W3C, the meter element should not be used to indicate progress, because to indicate the progress we have the progress tag.
- The meter element also does not represent a scalar value of an arbitrary range; for example, it would be wrong to use this to report a weight, or height, unless there is a known maximum value.
Syntax
The Meter tag is an inline element, the same as a header, progress and so on.
Attributes
- <meter></meter>
Apart from the Global Attributes and Event Attributes, the meter tag have 6 more attributes as shown in the following table:
| Attribute | Value | Description |
| Min | Floating Point Number | Specifies the lower bound, Default value is 0.0 |
| Max | Floating Point Number | Specifies the upper bound, Default value is 1.0 |
| Low | Floating Point Number | This represents the upper bound of the low end |
| High | Floating Point Number | This represents the lower bound of the high end |
| Value | Floating Point Number | Specifies the current value |
| Optimum | Floating Point Number | Specifies that what measurements value is the best value |
- min <= value <= max
- min <= low <= max (if low is specified)
- min <= high <= max (if high is specified)
- min <= optimum <= max (if optimum is specified)
- low <= high (if both low and high are specified)
Note: if you do not specify min or max then the range will be between 0.0 to 1.0 and the value must be in that range.
HTML DOM Meter Object
In the DOM the meter element is defined by METER that represents <meter> for HTML 5.
- How the meter object can be accessed: using the getElementById() method you can access the <meter> element.
- var x = document.getElementById("[Give id of the meter tag here]");
- var x = document.getElementById("[Give id of the meter tag here]");
- Create a meter object: You can also create the <meter> element dynamically using the createElement() method:
- var x = document.createElement("METER");
- Meter object properties: The properties of a meter object are given in the following table:
Property Description labels Returns a list of <label> elements that are labeled for a meter min Gets and Sets min attribute max Gets and Sets max attribute low Gets and Sets the low attribute high Gets and Sets the high attribute value Gets and Sets value attribute optimum Gets and Sets the optimum attribute
Example 1: This example will show you how can you use a meter element in HTML 5.
- <!DOCTYPE html>
- <html lang="en">
- <head>
- <meta charset="utf-8" />
- </head>
- <body>
- <b>Meter without value</b>
- <meter></meter>
- <br/><br/>
- <b>Meter with value but without min and max attribute</b>
- <meter value="0.8"></meter>
- <br/><br/>
- <b>Meter with value, min and max attribute</b>
- <meter min="0" max="100" value="17"></meter>
- <br/><br/>
- <b>Meter (when "min <= value < low")</b>
- <meter min="0" max="100" value="17" low="25" high="75"></meter>
- <br/><br/>
- <b>Meter (when "high < value <= max")</b>
- <meter min="0" max="100" value="80" low="25" high="75"></meter>
- <br/><br/>
- <b>Meter (when "low <= value <= high")</b>
- <meter min="0" max="100" value="50" low="25" high="75"></meter>
- <br/><br/>
- <b>Meter with optimum attribute</b>
- <meter min="0" max="100" value="24" low="25" high="75" optimum="80"></meter>
- <br/><br/>
- <b>Meter with optimum attribute</b>
- <meter min="0" max="100" value="80" low="25" high="75" optimum="20"></meter>
- </body>
- </html>
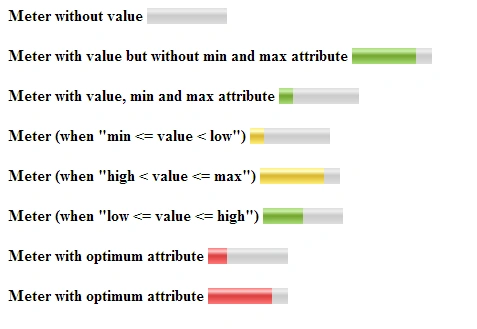
Styling meter element: we can define various types of styles for the meter element using a progress selector.
Example 2: This example will explain how to increase the width and height of a meter element.
Output of the Example 2:
- <!DOCTYPE html>
- <html lang="en">
- <head>
- <meta charset="utf-8" />
- <style>
- meter {
- width: 400px;
- height: 25px;
- }
- </style>
- </head>
- <body>
- <b>Meter without value</b>
- <meter></meter>
- <br/><br/>
- <b>Meter with value but without min and max attribute</b>
- <meter value="0.8"></meter>
- <br/><br/>
- <b>Meter with value, min and max attribute</b>
- <meter min="0" max="100" value="17"></meter>
- <br/><br/>
- <b>Meter (when "min <= value < low")</b>
- <meter min="0" max="100" value="17" low="25" high="75"></meter>
- <br/><br/>
- <b>Meter (when "high < value <= max")</b>
- <meter min="0" max="100" value="80" low="25" high="75"></meter>
- <br/><br/>
- <b>Meter (when "low <= value <= high")</b>
- <meter min="0" max="100" value="50" low="25" high="75"></meter>
- <br/><br/>
- <b>Meter with optimum attribute</b>
- <meter min="0" max="100" value="24" low="25" high="75" optimum="80"></meter>
- <br/><br/>
- <b>Meter with optimum attribute</b>
- <meter min="0" max="100" value="80" low="25" high="75" optimum="20"></meter>
- </body>
- </html>


Join the conversation! Your thoughts help the community grow.