

Introduction
Read my previous two articles "Code First Approach in Entity Framework" & "Database First Approach in Entity Framework" for EF basics. In this article I'm going to directly jump into the Model First Demo Project.
Demo MVC Application
Create a new ASP.NET MVC Project by New > Project > ASP.NET MVC 4 Web Application > "Internet Application" Template because this template contains some necessary js/css bundles and account setup. Even choosing "Internet Application" as a template adds all the necessary binaries for EF developments including "System.Data.Entity".
Use the following steps for further demo.
Step 1: Adding "ADO.NET Entity Data Model" File
For this, right-click on Models > Add > New Item and in the Data section select "ADO.NET Entity Data Model" and click on the Add button. That will show an "Entity Data Model Wizard", in this window select "Empty model" (because we are going to create a "Model First" demo) and click on the Finish button. You will get a "Model1.edmx[Diagram1]" file; this is also known as "Entity Data Model Designer" and here we will design our database tables and also create the relationships.
Step 2: Adding Entity
To add an Entity, right-click on the "Entity Data Model Designer" surface and chose Add New > Entity and it shows the windows type Entity name "Student" and click on ok.

Step 3: Adding Properties for "Student"
Now you have the "Student" mode. Let's add properties for this. There are two different ways to add properties.
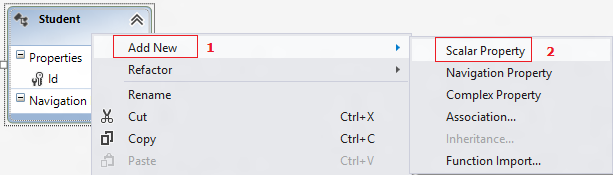
Right-click on "Student" mode and navigate to Add New > Scalar Property.
OR
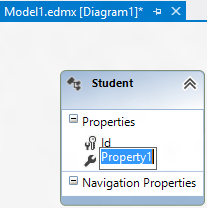
Select "Id" in "Student" mode and press enter key on the keyboard, this will show a new property and prompt for a name.
Step 4: Adding Relationships
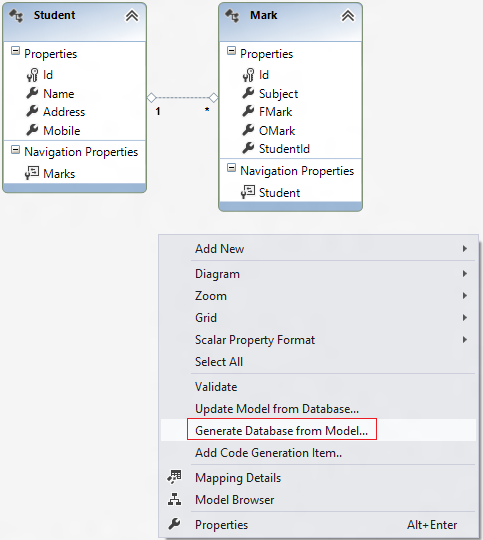
Now, create the following structure (two entities) by repeating steps 2 and 3.

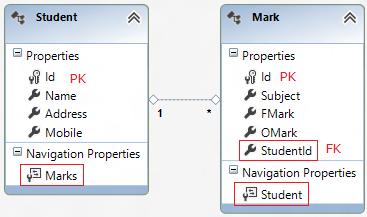
Now we have two different entities on the "Entity Data Model Designer" surface. Here we need a relationship between both entities like for each Student in the "Student" entity there will be many marks in the "Mark" entity. In other words, we don't want/accept any mark in the "Mark" entity which has no relation to the "Student" entity.
Now, for such structure we need to create a relationship by adding an "Association". Right-click on the designer surface and select Add New > Association.

Now, you will get the following window asking to arrange the relationship
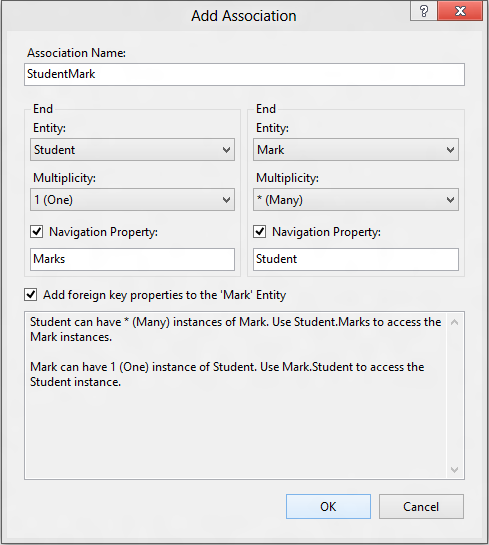
Don't make any changes, because VS is smart enough to have already done everything we want. We just need to understand the options. As I said above, for every Student there will be many marks in the Mark entity. We also have an Association Name (it is just a name of this relationship) and Navigation Property. Let's talk about them in depth.
Navigation Property
Navigation properties in the Entity Framework provide a way to navigate to an association between two entity types. A navigation property is defined by the NavigationProperty Element (CSDL) in the conceptual model. Every object can have a navigation property for every relationship in which it participates. Navigation properties allow you to navigate and manage relationships in both directions, returning either an EntityReference, if the multiplicity is either one or zero-or-one, or an EntityCollection, if the multiplicity is many. You may also choose to have one-way navigation, in which case you can delete the navigation property.
In simple words, the navigation property just shows that there is some relation (it maybe one to many, many to many, zero or one) and displays the graphical line between both entities.
Foreign Key Property
You will also notice a checkbox in the above image. The main characteristic of the Foreign key association is a foreign key property exposed on a dependent entity. The foreign key property must be always exposed when you wish not to accept any entry who's "StudentId" is not available in the "Student" entity.
Note: If you try to delete the "Student" table before deleting the "Mark" table, you will get an error message showing there are dependencies.
Step 5: Configuring Model Properties
Just click on the "Entity Data Model Designer" surface and open the properties window.

In the above image, you can modify the marked properties if you wish or keep the default.
Step 6: Generate Database from above model
Now, we have everything setup to create a database from the above structured model. For this, right-click on the "Entity Data Model Designer" surface and select "Generate Database from Model".
Now, in the window that shows, you can use with the default connection. I'm going to create a new connection.

And click on the next button; it will generate a SQL query and this query will be executed against the previously selected database. Now, click on "Finish" to get the SQL file containing all SQL information, such as how to create the db, the name of the tables and what will be the relations etc.

You can give the preceding query information to the db end person to generate the database for your app. Let's execute this query against the previously selected connection for now by right-clicking on the query file.

After executing the query file, you will notice a database with some tables that we have designed above.
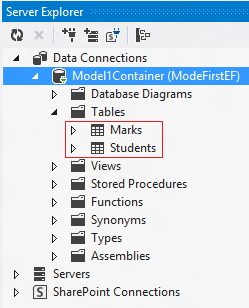
Step 7: Adding Controller and Views
Let's build the solution here Build > Build Solution, this will bring classes (in our case Model1.Designer.cs) in the Add Controller window.
Now, time to add controllers and views for both entities. Let's begin by adding a "Student" controller.
Right-click on Controller > Add > Controller and make the following selection as given in the image
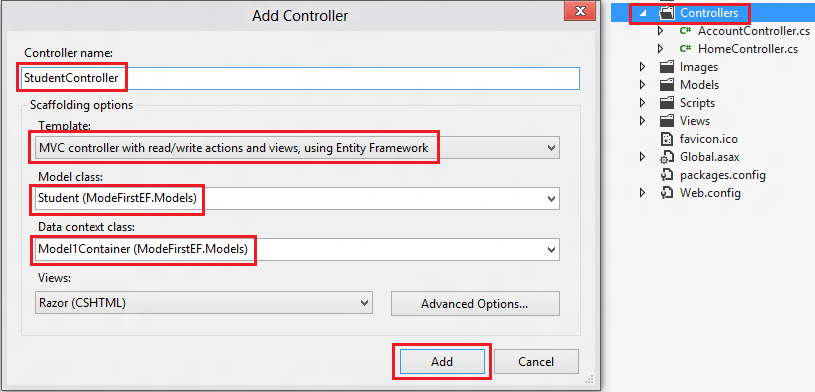
If you click on the Add button as above then the necessary controller will be added with its methods and also various views.
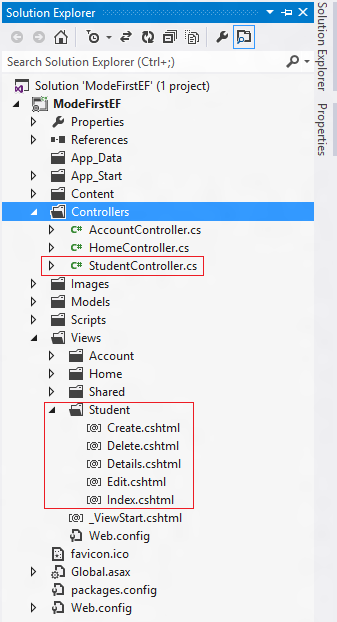
We need to add one more controller for the "Mark" entity. Repeat the above instructions and you will get the following files
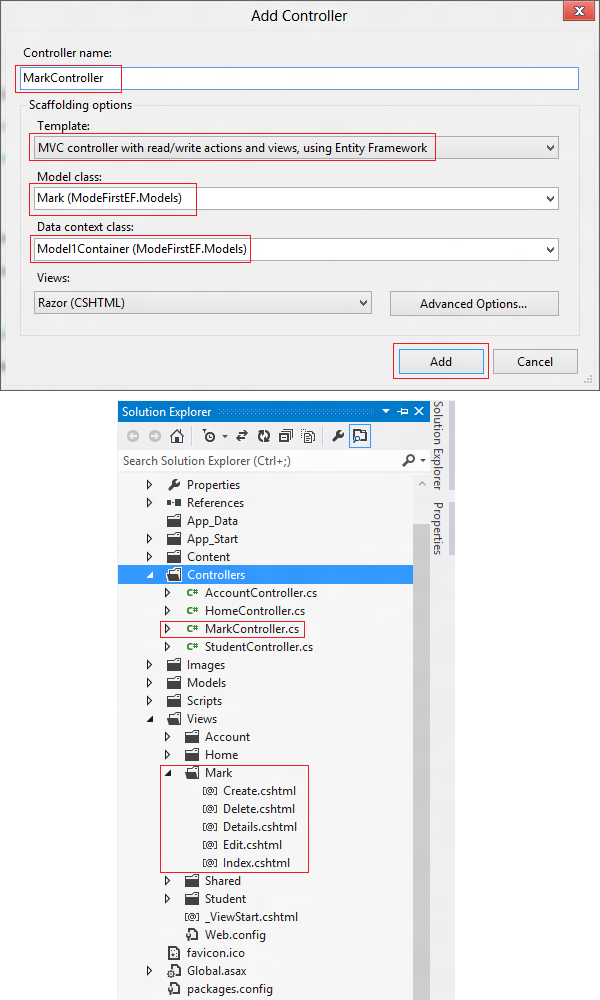
Step 8: Running Application
Now run the apps and try to insert a record in "Mark" without inserting any record in "Student", you will then be asked to select a "Student" yet we still don't have an entry in "Student". So, now we can see the value of a "Foreign Key" here.

Let's go back and make an entry in "Student" and then in "Mark" and you will get the list of Student here

So, that's all about the "Model First" approach in Entity Framework. Thanks.
Santhakumar MunuswamyPosted Oct 18, 2015, 2:48 AM
Good one
Sibeesh VenuPosted Oct 15, 2015, 4:13 AM
Thanks for sharing
Sameer RajigarePosted Oct 15, 2015, 1:39 AM
Very useful article Jeetendra... really nice one...thanks for sharing
Ankit BansalPosted Oct 15, 2015, 12:47 AM
nice..thanks for sharing
Humayun Kabir MamunPosted Oct 15, 2015, 12:18 AM
Nice...
Jeetendra GundPosted Oct 14, 2015, 1:59 PM
Yes, Kanhaiya Sharma Sir
Kanhaiya SharmaPosted Oct 14, 2015, 1:04 PM
The Entity Framework is capable of handling large entity data models but you can run into performance problems if the data model is very inter-connected. In general you should start thinking about breaking up a data model (into multiple .edmx files) when it has reached an order of 100 entities.
Kanhaiya SharmaPosted Oct 14, 2015, 12:58 PM
performance point of vies entity framework is not that much good in compare to hibernate in java.
Priyaranjan K SPosted Oct 14, 2015, 12:26 PM
Great Article ...
RakeshPosted Oct 14, 2015, 11:56 AM
Good share sir
Suman VermaPosted Oct 14, 2015, 9:42 AM
wow article..
Mukesh KumarPosted Oct 14, 2015, 9:37 AM
Great Job
Harshad PansuriyaPosted Oct 14, 2015, 8:17 AM
Nice one
Nilesh JadavPosted Oct 14, 2015, 8:08 AM
Nice one sir !!!
Rajeesh MenothPosted Oct 14, 2015, 8:01 AM
Good One!