

Here, you will learn about multilingual MVC application implementation flow, the creation of customized JavaScript bundles with translated alert messages based on user language, custom HTML helper classes, how to set user language in a cookie based on his login, displaying resource translation values in a form and how to maintain names and values in resource files.
Scenario
You will implement an MVC application to be displayed in various languages based on the user selected language. The form content is being displayed from the resource file based on the name and respective language and it would need to display the alert kind of information from customized bundled JavaScript based on user language whenever the user has done a form submission or input validation and so on.
RoadMapWhen implementing the previous sample MVC application, you will learn the following concepts.
- Resource File creation with key, value pair combination for required language.
- Resource Key value display in a form based on user language.
- Cookie implementation in MVC.
- Bundling and Minification.
- Custom HTML helper class.
- Customized Bundle creation.
- Translate the JavaScript alert messages into user selected language.
- Localized JavaScripts minified and bundled, It helps to increase the performance of form.
Step 1
Create a new project named “MultilingualMVCApp” and choose the template “MVC” then it creates an MVC template project.
Step 2
Add a new application folder named “App_GlobalResources” to maintain the resource files with key/value pair combinations for various languages. Right-click on the Project “MultiLingualMVCApp” and select on “Add” and then select “Add ASP.NET Folder” and then click on “App_GlobalResources” like the following.

Step 3
Create a resource file named “Notifications.resx” for the default language English by following the following screenshots. Right-click on the “App_GlobalResources” folder, select “Add” and then click on “Resource file” and specify the name as “Notifications” and then click on the “Ok” button.


In the similar way, create another resource file named “Notifications.fr.resx” under the App_GlobalResources file. After completion of these aforesaid procedure, the Solution Explorer looks like the following.

Step 4
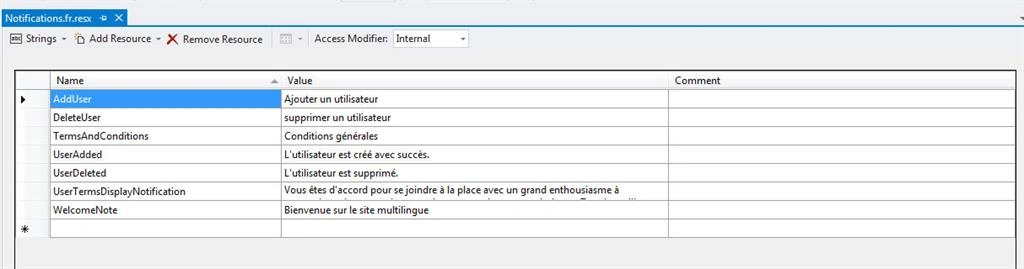
In this step, you will add sample resource keys with translation values for English and French languages. For that double click on the “Notifications.resx” file, then the displayed file has three columns named Name, Value and Comments.
Name: This name field is treated as the Resource Key value and it should be unique in the file and not be empty.
You can now enter the sample key and respective values as shown in the following screenshot for the default language (English).


Step 5
You can now create one controller named “DemoController” with the following procedure. Right-click on the “Controllers” folder and select the “Add” option and click on the “Controller” link.
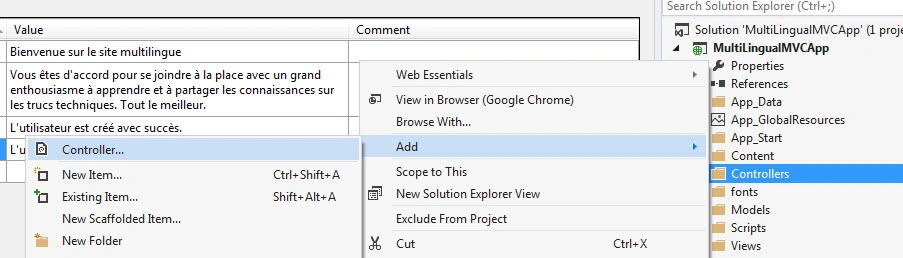
Then, specify the name as “DemoController” then click on the “Add” button.
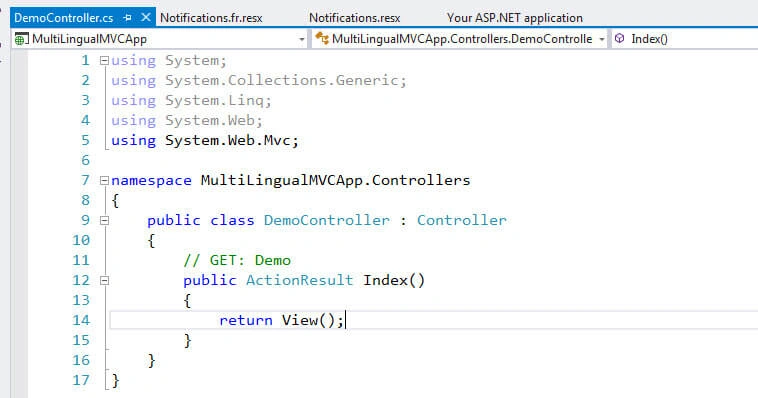
Now, the controller is created with the default action named “Index” like the following.
Add a view to the Index action method by right-clicking on the View function and click on “Add View” and then click on the Ok button. The following screenshots help you do that.
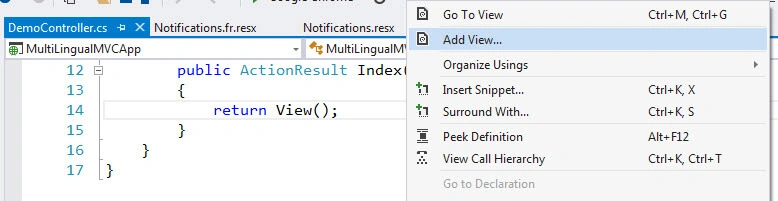
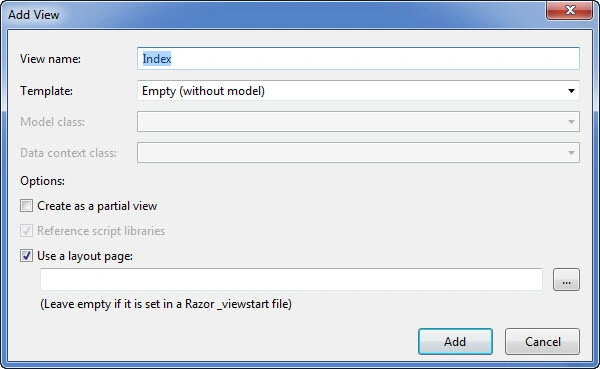
Now, click on the "Add" button and then it will create an Index.cshtml file.
Step 7
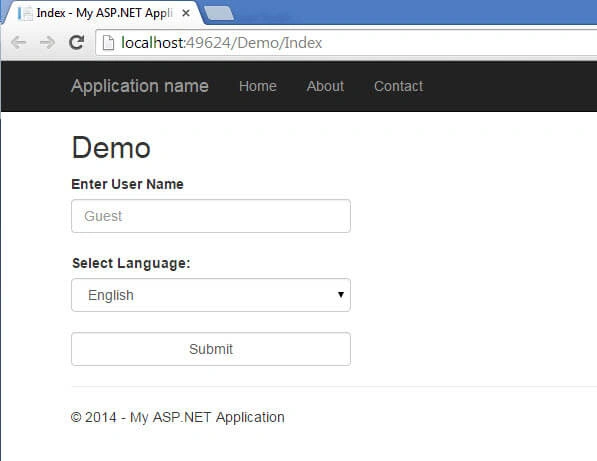
Replace the existing design with the following design format that contains a sample form to enter the user name, select the user preferred language and the submit button.
- @{
- ViewBag.Title = "Index";
- }
- <h2>Demo</h2>
- <div>
- @using (Html.BeginForm("Index", "Demo", FormMethod.Post))
- {
- <label>Enter User Name</label>
- <input type="text" name="txtName" placeholder="Guest"
- class="form-control" />
- <br/>
- <label>Select Language:</label>
- <select name="ddlLanguage" class="form-control">
- <option value="en">English</option>
- <option value="fr">French</option>
- </select>
- <br />
- <input type="submit" name="Submit" class="form-control" />
- }
- </div>
- [HttpPost]
- public ActionResult Index(FormCollection collection)
- {
- TempData.Add("LoggedInUser", collection["txtName"]);
- string language = collection["ddlLanguage"];
- SetCulture(language);
- return RedirectToAction("Home");
- }
- /// <summary>
- /// Set the culture based on culture code and set the
- /// value in cookie
- /// </summary>
- /// <param name="cultureCode"></param>
- private void SetCulture(string cultureCode)
- {
- var cookieCultureLanguage = new HttpCookie("UserLanguage")
- {
- Value = cultureCode
- };
- Response.Cookies.Set(cookieCultureLanguage);
- //Sets Culture for Current thread
- Thread.CurrentThread.CurrentCulture =
- System.Globalization.CultureInfo.CreateSpecificCulture("en");
- //Ui Culture for Localized text in the UI
- Thread.CurrentThread.CurrentUICulture =
- new System.Globalization.CultureInfo(cultureCode);
- }
The cookie that you have set in the previous code using the method “SetCulture” helps to display the respective user-selected language translated values in a form from the resource file.
Step 9
In this step, add one controller action method named “Home” to the "DemoController.cs" file with the respective view named “Home.cshtml” file.
- /// <summary>
- /// Home Action Controller Method
- /// </summary>
- /// <returns></returns>
- public ActionResult Home()
- {
- return View();
- }
Then, right-click on the View() method in the Home action and then click on "Add View..". After clicking on “Add View” it opens a template then click on the “Add” button then it creates a “Home.cshtml” page with default design. You can leave the design as it is, in later steps you can add the respective design changes.
Step 10
Add a method named “Application_AcquireRequestState” to the Global.asax.cs file that helps to set the culture based on the user-selected language if the cookie exists else it sets the default culture to English.
- /// <summary>
- /// Application AcquireRequestState
- /// </summary>
- /// <param name="sender"></param>
- /// <param name="e"></param>
- protected void Application_AcquireRequestState(object sender,
- EventArgs e)
- {
- string culture;
- HttpCookie cookie = Request.Cookies["UserLanguage"];
- if (cookie != null && cookie.Value != null
- && cookie.Value.Trim() != string.Empty)
- culture = cookie.Value;
- else
- culture = "en";
- //Default Language/Culture for all number, Date format
- System.Threading.Thread.CurrentThread.CurrentCulture =
- System.Globalization.CultureInfo.CreateSpecificCulture("en");
- //Ui Culture for Localized text in the UI
- System.Threading.Thread.CurrentThread.CurrentUICulture =
- new System.Globalization.CultureInfo(culture);
- }
In this step, you will implement a customized JavaScript bundle translator class. It helps to bundle the JavaScript with the respective user-selected language translated messages if any exists in the JavaScript file like alert, input validation messages and so on.
So, first create a new folder named “ResourceHandler”. For that right-click on the project “MultiLingualMVCApp” then select “Add” and click on “Add New Folder” and provide the name as “ResourceHandler” and then add a class file “JSTranslator” under the newly created folder "ResourceHandler".
- using System.Text.RegularExpressions;
- using System.Web;
- using System.Web.Optimization;
- namespace MultiLingualMVCApp.ResourceHandler
- {
- public class JSTranslator : IBundleTransform
- {
- #region IBundleTransform
- /// <summary>
- /// IBundleTransform Process method
- /// </summary>
- /// <param name="context">Bundle Context</param>
- /// <param name="response">Bundle Response</param>
- public void Process(BundleContext context, BundleResponse response)
- {
- string translated = ScriptTranslator(response.Content);
- response.Content = translated;
- }
- #endregion
- #region Localization Of Js Bundle Flow
- private static readonly Regex Regex =
- new Regex(@"GetResourceValue\(([^\))]*)\)",
- RegexOptions.Singleline | RegexOptions.Compiled);
- /// <summary>
- /// Translated script based on JavaScript content
- /// </summary>
- /// <param name="text"></param>
- /// <returns></returns>
- private string ScriptTranslator(string text)
- {
- MatchCollection matches = Regex.Matches(text);
- foreach (Match match in matches)
- {
- object obj = HttpContext.GetGlobalResourceObject("Notifications",
- match.Groups[1].Value);
- if (obj != null)
- text = text.Replace(match.Value, CleanText(obj.ToString()));
- }
- return text;
- }
- /// <summary>
- /// Format the text as Clean while displaying
- /// in JavaScript notifications
- /// </summary>
- /// <param name="text"></param>
- /// <returns></returns>
- private static string CleanText(string text)
- {
- text = text.Replace("'", "");
- return text;
- }
- #endregion
- }
- }
About JSTranslator.cs code
- The JsTranslator class is inherited from the “IbundleTransform”.
- The Process method is implemented, as it just gets the BundleResponse content and translates the JavaScript with user-selected language alerts, if any, using the ScriptTranslator method and will be assigned back to that content to the BundleResonse.
- The Regex expression is the key term we used in script files, based on that formatted the regex expression.
- The Regex Key Term example, you used in scripts is: GetResourceValue(ResourceKeyName)
- The ScriptTranslator method first gets the MatchCollection object based on regex expression and then based on the Match collection key name get the translated value using the method “GetGlobalResourceObject”
- The GetGlobalResourceObject takes the parameters of Resource file name and Resource Key name.
- The CleanText method helps to clean if any characters that creates a problem when displaying in JavaScript.
So, you have now successfully added a custom JavaScript bundle class.
Step 12
In this step, you will add two JavaScript files with sample functions under the “Scripts” folder.
- function UserTermsNotification() {
- alert('GetResourceValue(UserTermsDisplayNotification)');
- }
The second JavaScript file is named “UserOperations”. It contains the following functions.
- function AddUserMessage() {
- alert('GetResourceValue(UserAdded)');
- }
- function DeleteUserMessage() {
- alert('GetResourceValue(UserDeleted)');
- }
Step 13
In this step, you will bundle the previously created JavaScript files in BundleConfig.cs (that exists in the App_Start folder) using a custom JavaScript bundle that you have created in the JSTranslator.cs file. So, add the following code block to the RegisterBundles method and also add the required namespaces; those are:
using System.Collections.Generic;
using MultiLingualMVCApp.ResourceHandler;
- var lstLangCultures = new List<string>() { "en", "fr" };
- //Loops through available languages to add language specific
- //JavaScript minified bundles
- foreach (var cultureName in lstLangCultures)
- {
- var extJsNotifications = new Bundle(string.Format("~/Scripts
- /Notifications-{0}", cultureName))
- .Include("~/Scripts/UserNotifications.js")
- .Include("~/Scripts/UserOperations.js");
- extJsNotifications.Transforms.Clear();
- extJsNotifications.Transforms.Add(new JSTranslator());
- extJsNotifications.Transforms.Add(new JsMinify());
- bundles.Add(extJsNotifications);
- }
In this step, you will implement the custom HTML helper class that helps to create a custom JavaScript bundle based on your needs. So, add a new class file named HtmlHelpers under the App_Start folder and then replace that with the following code.
- using System.Web;
- namespace MultiLingualMVCApp
- {
- public class HtmlHelpers
- {
- /// <summary>
- /// Localized JavaScript bundle
- /// </summary>
- /// <param name="fileName"></param>
- /// <returns></returns>
- public static HtmlString LocalizedJsBundle(string fileName)
- {
- string culture;
- var cookie = HttpContext.Current.Request.Cookies["UserLanguage"];
- if (cookie != null && cookie.Value != null
- && cookie.Value.Trim() != string.Empty)
- culture = cookie.Value;
- else
- culture = "en";
- fileName = string.Concat(fileName, "-", culture);
- var output = (HtmlString)System.Web.Optimization.Scripts
- .Render(fileName);
- return output;
- }
- }
- }
In the aforesaid Steps 13 and 14, you have included the custom JavaScript bundle in the BundleConfig.cs file and created a custom HTML helper class to use that specified language bundle based on the user-selected language.
The Bundling and Minification concept is very helpful to reduce the network traffic and file size while loading the form since it minifies the multiple JavaScript files into one file and the file is being cached. If you change the file content then it automatically gets the fresh content with a new version number. So it helps to increase the page performance in all aspects.
Step 15
In this step, you update the “Home.cshtml” form design with the following design.
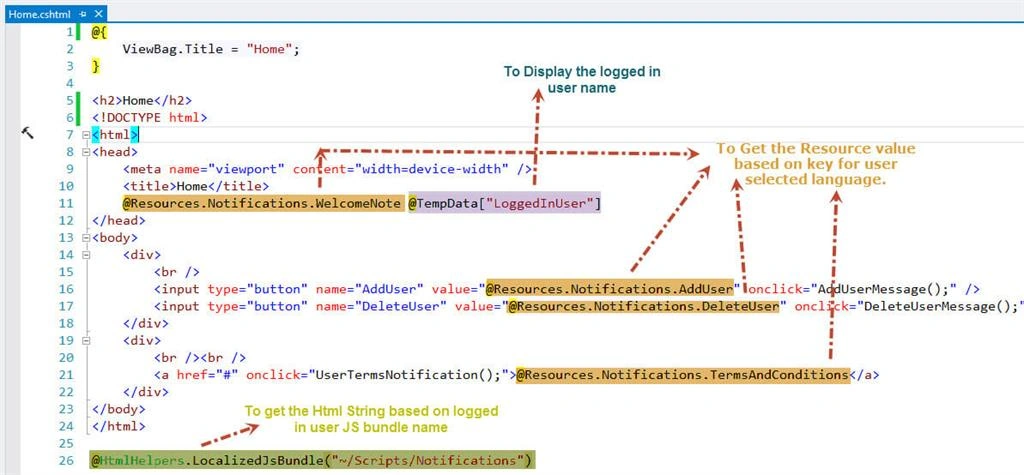
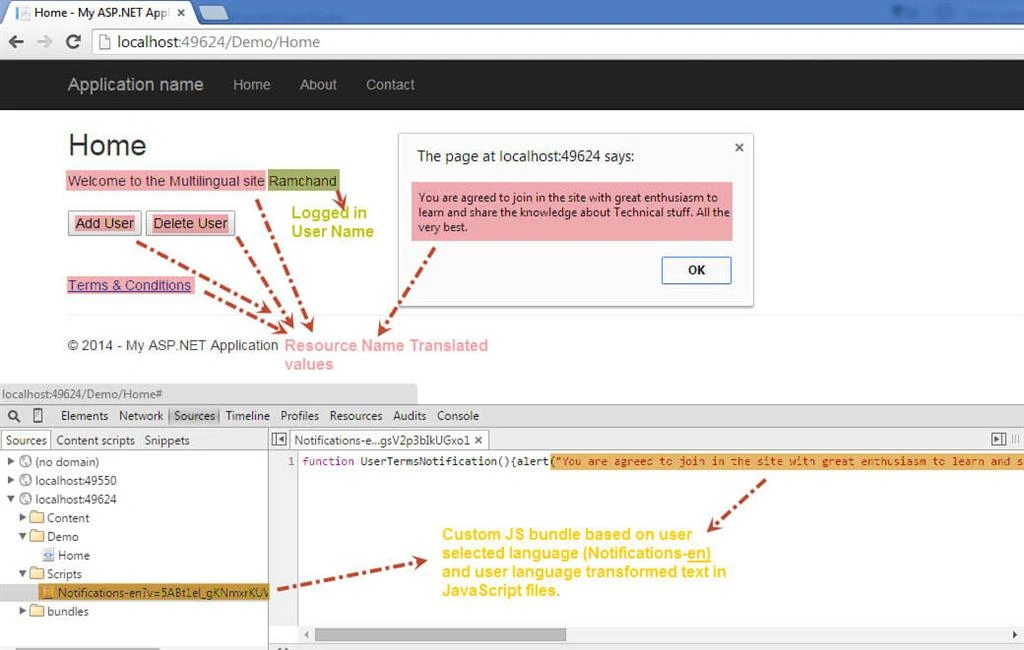
You are done with the multi-language MVC application implementation process with user language-specific JavaScript bundled minified files. So, build the application (F6) and hit the (F5) key to run the application with the following URL (http://localhost:49624/Demo/Index).
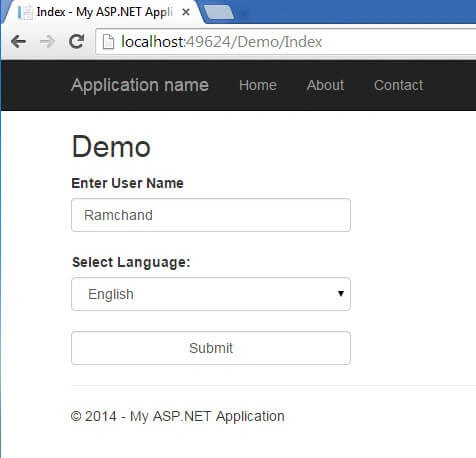
Enter the user name and select the preferred language as English then the form will be displayed like the following.
Step 16
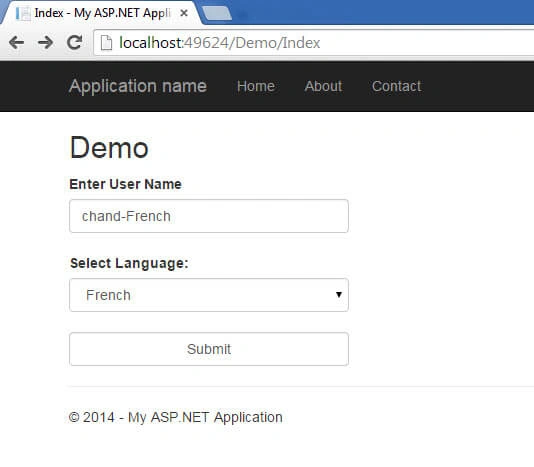
In this step, again you navigate to this URL (http://localhost:49624/Demo/Index) and select the user language as French and check the respective outputs as shown below.
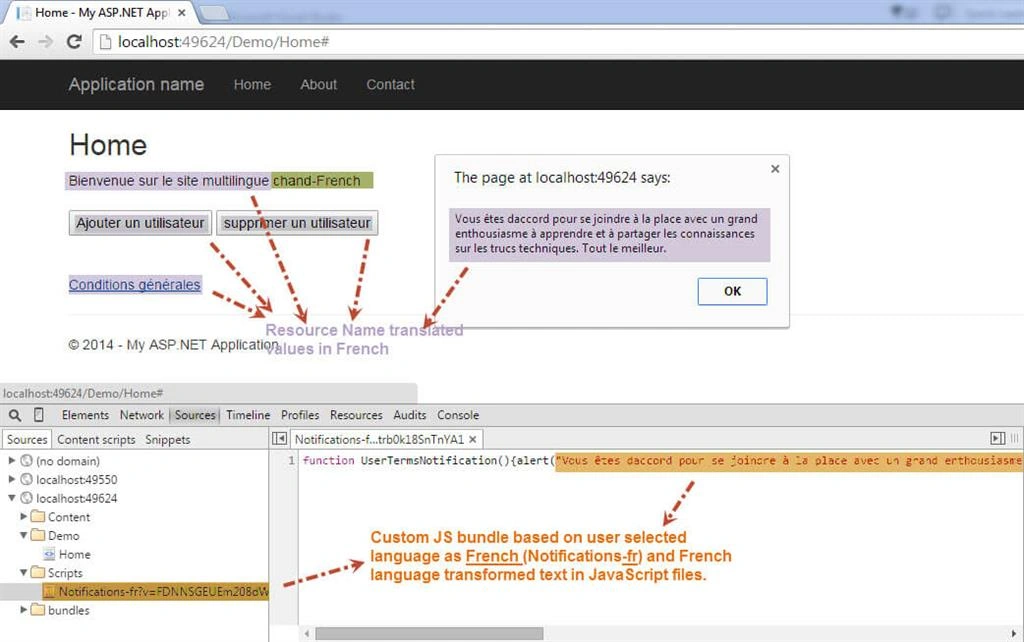
The preceding page is self-explanatory about the implemented functionality. In the similar way when you click on the "Add User" and "Delete User" buttons then it displays the alerts in the French language.
Faisal ChaudharyPosted Dec 8, 2017, 8:56 AM
Found it. I set enableOptimizations to true and it worked.
Faisal ChaudharyPosted Dec 8, 2017, 8:38 AM
I have done all possible things mentioned in this article but the thing is not working. I have added bundles in BundleConfig.cs as indicated in article. Added JSTransalator also. Code in both these blocks fires and resource values are fetched and allocated while debugging but UI still shows the GetResourceValue('Some_Code') in js files. What is happening? Please guide.
Faisal ChaudharyPosted Dec 7, 2017, 3:59 AM
Excellent article. Much needed.
Mukesh GuptaPosted Jun 19, 2017, 9:50 AM
What changes should i do over here object obj = HttpContext.GetGlobalResourceObject("Notifications", match.Groups[1].Value);
Mukesh GuptaPosted Jun 19, 2017, 9:50 AM
I have my App_GlobalResource in different application say in project A and want to access in projectB what changes i need to make if i want to use a common resource across different web application ,
Suresh MolabantiPosted Jul 22, 2016, 5:32 AM
How create the registration form and insert into resource files different languagesplz help me
kh chPosted Nov 23, 2015, 12:09 PM
Thank You Ramchand Repalle
JM LPosted Aug 25, 2015, 7:21 AM
Anybody could help with javascript bundle? I posted the problem in http://stackoverflow.com/questions/32202321/htmlhelpers-localizedjsbundle-does-not-catch-script-bundled-using-system-web-opt
Ramchand RepallePosted Feb 25, 2015, 6:36 AM
Thank you Prakash Joshi
Prakash JoshiPosted Feb 25, 2015, 5:52 AM
Congratulation Ramchand Repalle sir
Ramchand RepallePosted Feb 24, 2015, 12:54 AM
Thanks Rahul Saxena...!!
Rahul Kumar SaxenaPosted Feb 24, 2015, 12:29 AM
congrts Ramchand Repalle... :)
Ramchand RepallePosted Feb 24, 2015, 12:16 AM
Thanks Dinesh Beniwal.
Dinesh BeniwalPosted Feb 23, 2015, 10:34 PM
Congrats Ramchand Repalle Article of the day on ASP.NET
K P Singh ChundawatPosted Dec 29, 2014, 1:56 AM
Great Article .and Beautiful Explanation Ramchand Repalle Sir...Thanks for sharing
Dinesh BeniwalPosted Nov 12, 2014, 2:42 AM
Appreciate your hard work Ramchand Repalle
Damodara NaiduPosted Nov 12, 2014, 2:29 AM
Good one