

Data Annotations
Validation in MVC can be done using Data Annotations that are applied to both the client and server side.
Data Annotation attributes are used to validate the user inputs when posting the form. All the Data Annotation attributes like Required, Range are derived from the ValidationAttribute class that is an abstract class. The ValidationAttribute base class lives in the System.ComponentModel.DataAnnotations namespace.
This article is showing how to create a custom Data Annotations step by step:
Step 1
Create a New MVC 4 Application.
Step 2
Select Razor View Engine.
Step 3
Here I am showing Email validation on the Employee Registration Form.
Select the Model Folder then select Add New Item -> Add New Class CustomEmailValidator.cs.
Here we need to inherit the ValidationAttribute and need to override the IsValid method.
CustomEmailValidator.cs
- using System;
- using System.Collections.Generic;
- using System.Linq;
- using System.Web;
- using System.ComponentModel.DataAnnotations;
- using System.Text.RegularExpressions;
- namespace Custom_DataAnnotation_Attribute.Models
- {
- public class CustomEmailValidator : ValidationAttribute
- {
- protected override ValidationResult IsValid(object value, ValidationContext validationContext)
- {
- if (value != null)
- {
- string email = value.ToString();
- if (Regex.IsMatch(email, @"[A-Za-z0-9._%+-]+@[A-Za-z0-9.-]+\.[A-Za-z]{2,4}", RegexOptions.IgnoreCase))
- {
- return ValidationResult.Success;
- }
- else
- {
- return new ValidationResult("Please Enter a Valid Email.");
- }
- }
- else
- {
- return new ValidationResult("" + validationContext.DisplayName + " is required");
- }
- }
- }
- }
- using System;
- using System.Collections.Generic;
- using System.Linq;
- using System.Web;
- using System.ComponentModel.DataAnnotations;
- namespace Custom_DataAnnotation_Attribute.Models
- {
- public class EmployeeModel
- {
- public string Name { get; set; }
- [CustomEmailValidator]
- public string Email { get; set; }
- public string Password { get; set; }
- public string Mobile { get; set; }
- }
- }
Step 5 Now right-click on the Controller Folder then select Add New Controller.
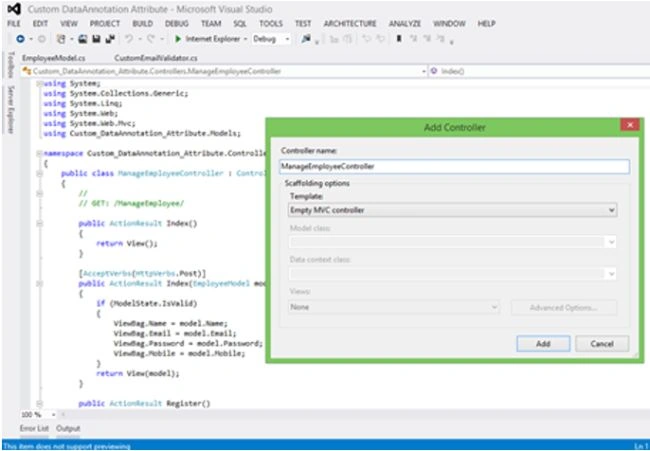
- using System;
- using System.Collections.Generic;
- using System.Linq;
- using System.Web;
- using System.Web.Mvc;
- using Custom_DataAnnotation_Attribute.Models;
- namespace Custom_DataAnnotation_Attribute.Controllers
- {
- public class ManageEmployeeController : Controller
- {
- //
- // GET: /ManageEmployee/
- public ActionResult Index()
- {
- return View();
- }
- [AcceptVerbs(HttpVerbs.Post)]
- public ActionResult Index(EmployeeModel model)
- {
- if (ModelState.IsValid)
- {
- ViewBag.Name = model.Name;
- ViewBag.Email = model.Email;
- ViewBag.Password = model.Password;
- ViewBag.Mobile = model.Mobile;
- }
- return View(model);
- }
- public ActionResult Register()
- {
- return View();
- }
- }
- }
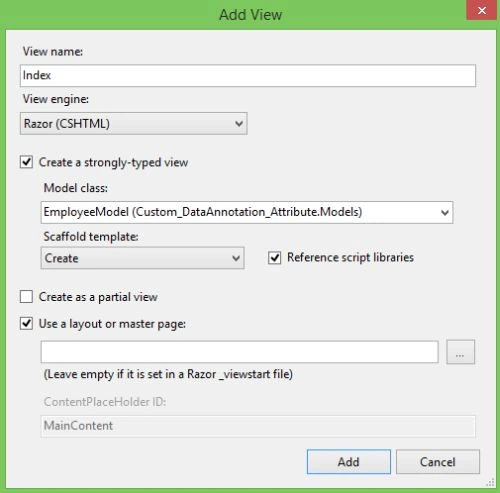
Step 7 Now the ManageEmployee's index.cshtml file will look like:
- @model Custom_DataAnnotation_Attribute.Models.EmployeeModel
- @{
- ViewBag.Title = "Register Employee";
- }
- <h2>Register</h2>
- @using (Html.BeginForm()) {
- @Html.ValidationSummary(true)
- <fieldset>
- <legend>EmployeeModel</legend>
- <div class="editor-label">
- @Html.LabelFor(model => model.Name)
- </div>
- <div class="editor-field">
- @Html.EditorFor(model => model.Name)
- @Html.ValidationMessageFor(model => model.Name)
- </div>
- <div class="editor-label">
- @Html.LabelFor(model => model.Email)
- </div>
- <div class="editor-field">
- @Html.EditorFor(model => model.Email)
- @Html.ValidationMessageFor(model => model.Email)
- </div>
- <div class="editor-label">
- @Html.LabelFor(model => model.Password)
- </div>
- <div class="editor-field">
- @Html.EditorFor(model => model.Password)
- @Html.ValidationMessageFor(model => model.Password)
- </div>
- <div class="editor-label">
- @Html.LabelFor(model => model.Mobile)
- </div>
- <div class="editor-field">
- @Html.EditorFor(model => model.Mobile)
- @Html.ValidationMessageFor(model => model.Mobile)
- </div>
- <p>
- <input type="submit" value="Create" />
- </p>
- </fieldset>
- }
- <div>
- @Html.ActionLink("Back to List", "Index")
- </div>
- @section Scripts {
- @Scripts.Render("~/bundles/jqueryval")
- }
Now run the application:


Gurjit SinghPosted Jul 1, 2019, 6:27 AM
This will work only on server side. You need to add custom validator for unobtrusive jquery To enable it client side https://www.c-sharpcorner.com/UploadFile/abhikumarvatsa/enabling-client-side-validation-on-custom-data-annotations-w/
Jaime StuardoPosted Nov 22, 2017, 2:24 PM
How to add data-val attributes for custom validation? I have only found how to do it in ASP.NET 2.0 but I am in 4.6
Rakesh ShrivastavaPosted Dec 13, 2016, 10:03 AM
Thanks..it is very helpfull
Manav PandyaPosted Sep 13, 2016, 12:12 PM
Well explained sir ...
Rahul Kumar SaxenaPosted Jul 27, 2016, 3:47 AM
Thanks kalu singh rao
Rahul Kumar SaxenaPosted Jul 27, 2016, 3:47 AM
Thanks Tapan Dubey
kalu singh raoPosted Jul 26, 2016, 4:40 AM
Nice one
Tapan DubeyPosted Jan 21, 2016, 8:12 AM
Good one, Thanks For Sharing....
Rahul Kumar SaxenaPosted Feb 26, 2015, 12:57 PM
Thanks 2 All...
Damodara NaiduPosted Nov 19, 2014, 9:15 AM
nice
Rahat YasirPosted Nov 19, 2014, 6:28 AM
Nicely arranged article (Y)
Saineshwar BageriPosted Nov 19, 2014, 4:17 AM
nice start