

Create an empty Web API and integrate with Entity Framework as I explained in my previous article CRUD Opertaion in Kendo Grid using Web API.
Objective of this article
Insert a record into a SQL Server database table and populate the records in a Kendo Dropdown list dynamically by reading the record from a SQL Server database table using the ASP.NET Web API REST full service.
Create a REST full service to Insert a Record in SQL Table.
Open the existing ASP.NET MVC 4 project that we created earlier (refer to the article CRUD Opertaion in Kendo Grid using Web API).
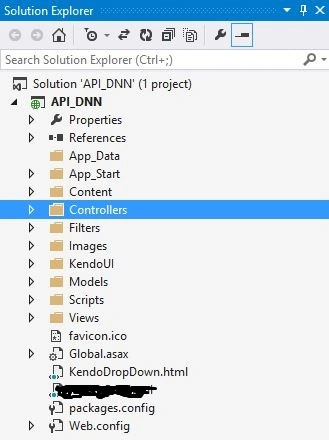
Right-click on the project root and add a new HTML page. I named it KendoDropDown.html.
Finally the project structure will be as in Figure 1.
Open the CategoryController class now, for this application we will use the following GET and POST services.
- public IEnumerable<Category> GetCategories()
- {
- return db.Categories.AsEnumerable();
- }
- public HttpResponseMessage PostCategory(Category category)
- {
- if (ModelState.IsValid)
- {
- db.Categories.Add(category);
- db.SaveChanges();
- HttpResponseMessage response = Request.CreateResponse(HttpStatusCode.Created, category);
- response.Headers.Location = new Uri(Url.Link("DefaultApi", new { id = category.CategoryID }));
- return response;
- }
- else
- {
- return Request.CreateErrorResponse(HttpStatusCode.BadRequest, ModelState);
- }
- }
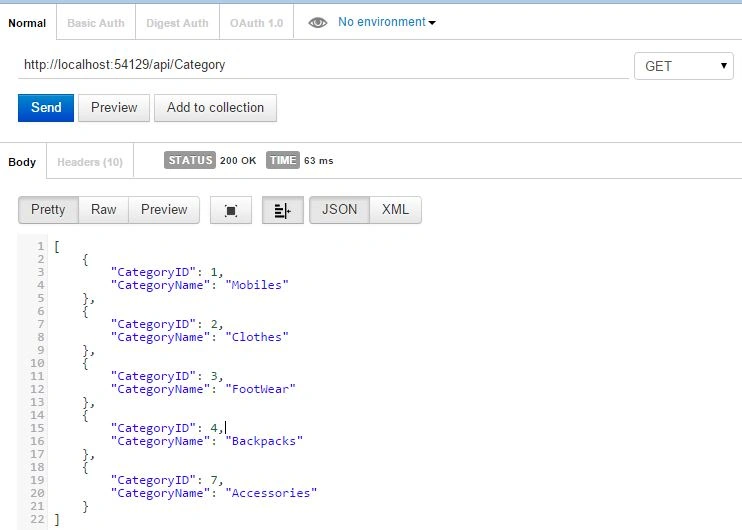
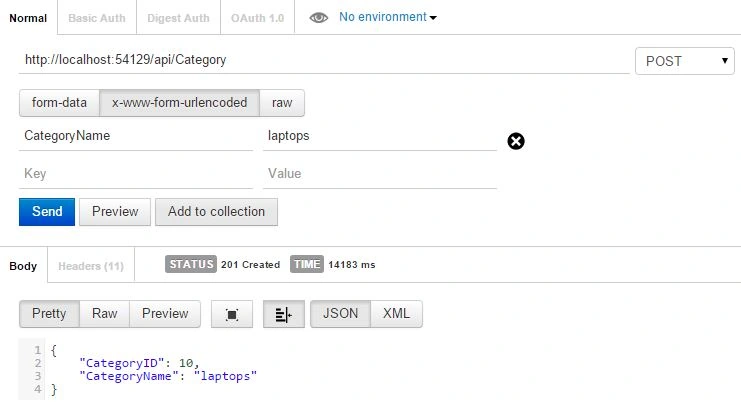
Check the response in Postman/Fiddler.
1. The HTTP GET response/request is as in Figure 2.
2. The HTTP POST response/request is as in Figure 3.
Consuming the REST full services using Kendo UI.
Write the following design in the new HTML page of the project.
- <!DOCTYPE html>
- <html xmlns="http://www.w3.org/1999/xhtml">
- <head>
- <link rel="stylesheet" href="http://cdn.kendostatic.com/2014.3.1316/styles/kendo.common.min.css" />
- <link rel="stylesheet" href="http://cdn.kendostatic.com/2014.3.1316/styles/kendo.default.min.css" />
- <link rel="stylesheet" href="http://cdn.kendostatic.com/2014.3.1316/styles/kendo.dataviz.min.css" />
- <link rel="stylesheet" href="http://cdn.kendostatic.com/2014.3.1316/styles/kendo.dataviz.default.min.css" />
- <script src="http://cdn.kendostatic.com/2014.3.1316/js/jquery.min.js"></script>
- <script src="http://cdn.kendostatic.com/2014.3.1316/js/kendo.all.min.js"></script>
- <title></title>
- </head>
- <body>
- <div id="example">
- <div class="demo-section k-header">
- <input id="Category" style="width: 400px;" />
- </div>
- <br />
- <div id="Category-display" class="demo-section k-header"></div>
- </div>
- <script id="Category_template" type="text/x-kendo-template">
- <h4>Category: #: CategoryName #</h4>
- <div class="form-group" id="Category">
- <div class="col-lg-12 bg">
- <div class="col-lg-6">
- <div class="form-inline">
- <span>Category:</span>
- </div>
- <div class="form-inline">
- <input required validationmessage="Please enter the Category" type="text" id="Category_name" name="Category" data-bind="value:category" class="form-control" placeholder="Category...." />
- <span class="k-invalid-msg" data-for="Category"></span>
- </div>
- <div class="form-inline">
- <button id="submit_btn" onclick="InsertCategory()" class="k-button">Submit</button>
- </div>
- </div>
- </div>
- </div>
- </script>
- <script>
- var template = kendo.template($("#Category_template").html());
- function preview() {
- var dropdown = $("#Category").data("kendoDropDownList");
- var product = dropdown.dataSource.get(dropdown.value());
- var productPreviewHtml = template(product);
- $("#Category-display").html(productPreviewHtml);
- }
- $("#Category").kendoDropDownList({
- dataTextField: "CategoryName",
- dataValueField: "CategoryID",
- dataSource: {
- transport: {
- read: {
- url: "http://localhost:54129/api/Category",
- dataType: "json"
- }
- },
- schema: {
- model: {
- id: "CategoryID"
- }
- }
- },
- dataBound: preview,
- change: preview
- });
- </script>
- <script>
- function InsertCategory() {
- alert("hai");
- $.ajax(
- {
- cache: false,
- async: false,
- type: "POST",
- url: "http://localhost:54129/api/Category",
- data:
- {
- CategoryName: $("#Category_name").val(),
- },
- success: function (data) {
- alert(data);
- },
- });
- };
- </script>
- </body>
- </html>
Run the page and you can see the UI is as in Figures 4 and 5.

Figure 4: Category

Insert a new record as shown in Figures 6 and 7.


Arul RPosted Oct 28, 2015, 5:58 AM
Nice share!!!
Mukesh KumarPosted Oct 20, 2015, 12:49 AM
Great Work thanks for sharing
Sibeesh VenuPosted Jun 4, 2015, 8:34 AM
Good one.
Santhakumar MunuswamyPosted Jun 3, 2015, 2:55 PM
Thanks for nice one
NitinPosted Jun 3, 2015, 9:22 AM
nice