Introduction
This article explains MVC in ASP.Net. I will only show the practical (programmatic) approach of learning ASP.Net MVC. In this article I am not paying much attention to the theory.
This is the continuation of Part 1. If you are new to MVC then I will strongly recommend you to please go through part one before proceeding to this article. Click following link for other parts of this tutorial.
In last tutorial we have seen the basic of controller now we will create a View and work with that view in MVC. View is a UI that our end user will see.
For creating a view we have to follow following steps.
Step 1: First assume what we want to display in our controller. In this case we r going to display Employee list in our view for that we create Employee class like follows.
- public class Employee
- {
- public int EmpId { get; set; }
- public string EmpName { get; set; }
- public int EmpSalary { get; set; }
- }
We need following output
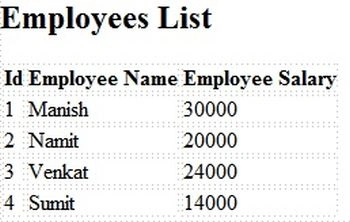
Step 2: For getting above output we need to pass the list of employees from our controller to view. There are various ways to pass data from controller to view. In this example I am using ViewBag to pass data. I have written following code to pass data from controller to view using ViewBag.
- public ActionResult Index()
- {
- List<Employee> employees = new List<Employee>
- {
- new Employee(){EmpId =1,EmpName ="Manish",EmpSalary =30000},
- new Employee() {EmpId =2,EmpName ="Namit",EmpSalary =20000},
- new Employee(){EmpId =3,EmpName ="Venkat",EmpSalary =24000},
- new Employee(){EmpId =4,EmpName ="Sumit",EmpSalary =14000}
- };
- ViewBag.Employee = employees;
- return View();
- }
Step 3: Now our controller action method is ready so we need to create a view that will collect the list of Employees and render output like above. For adding a view right click anywhere on the controller action method and select add view.
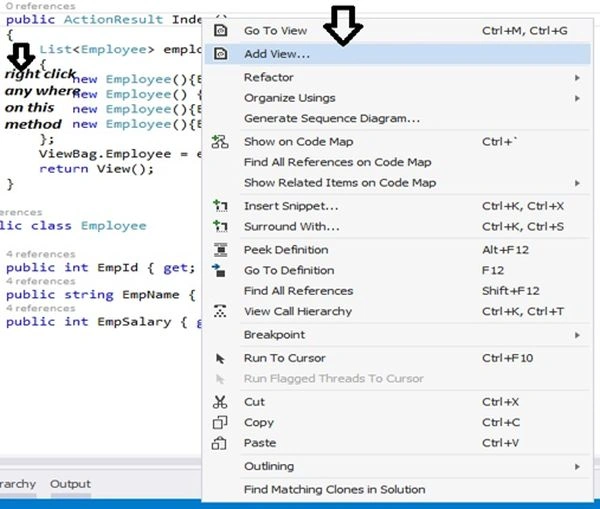 Step 4:
 Remember view name should be same as the controller action method. So do not change the view name after that select empty(without model) from Template. And click on Add.
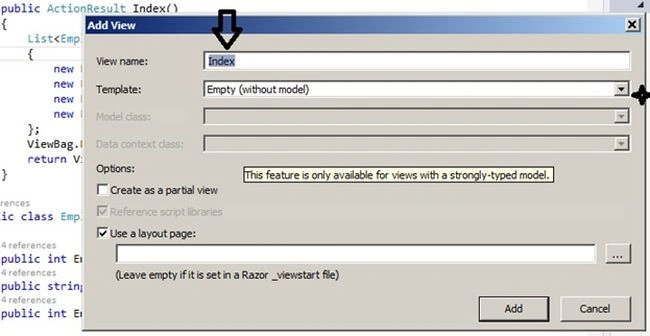 Step 5:
 When you click on add a view has been added to Views folder. Go to View folder that you will find a folder that will match the name of the controller in our case controller name is Default. Click Default folder and expend it then you will find a view Index.cshtml. View name is matching to the controller action method and view folder name is matching to the controller name.
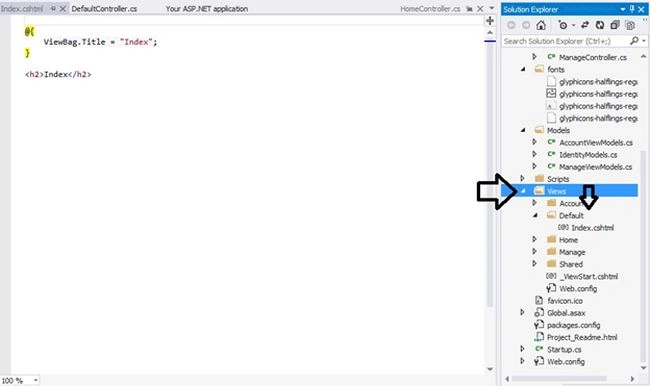 Step 6:
 Now change the above code of view as I am doing.
- @using MVCDemoApps2.Controllers
- @{
- ViewBag.Title = "Employees List";
- }
-
- <h3>Employees List</h3>
- <table border="1">
- <tr>
- <td style="font-weight :bold">
- Id
- </td>
- <td style="font-weight: bold">
- Name
- </td>
- <td style="font-weight: bold">
- Salary
- </td>
- </tr>
- @foreach (var Emp in ViewBag.Employee)
- {
- <tr>
- <td>
- @Emp.EmpId
- </td>
- <td>
- @Emp.EmpName
- </td>
- <td >
- @Emp.EmpSalary
- </td>
- </tr>
- }
- </table>
Run the project by pressing Ctrl+F5 u will get above output.
Note:- We use "@" symbol to switch between html and C# code.
There are following ways to pass data from controller to view
- Using ViewBag
- Using ViewData["<Name>"]
- Using TempData["<Name>"]
Using ViewBag
ViewBag is just a dynamic wrapper around ViewData and exists only in ASP.NET MVC 3. ViewBag is a dynamic property that takes advantage of the new dynamic features in C# 4.0.
It doesn't require typecasting for complex data types. It also contains a null value when redirection occurs.
Above Index action method is using ViewBag.
- Using ViewData["<Name>"]:
The ViewData is a Dictionary of objects that are derived from the 'ViewDataDictionary' class and it’s having keys as string type and a value for respective keys. It contains a null value on each redirection and it needs typecasting for complex data types.
Example
-
- ViewData["<Name>"] = "SomeData";
-
- string strData = ViewData["<Name>"].ToString();
- Using TempData["<Name>"]:
TempData by default uses the session to store data, so it is nearly same to session only, but it gets cleared out at the end of the next request. It should only be used when the data needs only to persist between two requests. If the data needs to persist longer than that, we should either repopulate the TempData or use the Session directly.
Example
-
- TempData["<Name>"] = "SomeData";
-
- string strData = TempData["<Name>"].ToString();
For more details about the difference between ViewBag, ViewData, TempData click here.
We can place our Employee class inside model folder. For accessing that employee class we need to change following thing in our controller action method and View.
-
- using MVCDemoApps2.Models
-
- @using MVCDemoApps2.Models
The main purpose of Models class is to keep data base connectivity logic. We will discuss it in our next tutorial.
Summary
In this illustration, you came to understand the basics of MVC View and Model.


SubashPosted Sep 8, 2016, 1:00 AM
Nice one sir
Gowtham RajamanickamPosted Mar 13, 2015, 5:25 AM
Good article !
Manish Kumar ChoudharyPosted Dec 29, 2014, 11:26 PM
deepak mittal sir soon i will post article of your choice..Thanks..
deepak mittalPosted Dec 26, 2014, 1:01 AM
hello sir, i want to learn all oops concept with practical scenario...i.e in what scenario we use oops concept like abstract class and interface..please provide me the videos for all that stuff if possible...
Manish Kumar ChoudharyPosted Dec 12, 2014, 7:52 AM
Joginder Banger don't call me sir..call me Manish.. c# corner is good or u can take help from "http://csharp-video-tutorials.blogspot.in/p/aspnet-mvc-tutorial-for-beginners.html" its also best..after reading this download c# corner MVC5 ebook its good...
Joginder BangerPosted Dec 12, 2014, 7:48 AM
Manish Kumar Choudhary hello sir i want learn MVC, have a idea any good reference website.