Introduction
In this article, we will explore how to query/filter the SharePoint online list from Another SharePoint online subsite using REST API In SharePoint online. There are a lot of ways to query lists from another SharePoint online. This article is solely for the purpose of guiding you on how to solve permission issues when querying list from another SharePoint subsite. We use Nintex Workflow Call HTTP Web Service action to call the REST API to filter the list from another SharePoint subsite.
Permissions
To avoid Unauthorized Issues - you will need to add the app permissions at both the site and sub site levels.
First, you need to enable the "Workflows can use app permissions" feature at the site you are running the HTTP web service call workflow on.
To allow workflow to use app permissions
- Click the Settings icon at the top of the page (Gear cog icon).
- Go to Site Settings.
- Under the Site Actions section, select Manage site features.
- Locate the feature called 'Workflows can use app permissions', as shown in the screenshot below, and then click Activate.
Next, we need to grant full control to the workflow app on the subsite you are running the web service call against.
To grant full control permission to a workflow
- Navigate again to the Site Settings page on the site you are running the workflow from.
- Under the Users and Permissions section, select Site app permissions.
- On this page the app permissions will be displayed for all apps on your site. Copy the client section of the App Identifier for Workflow. This is the identifier between the last "|" and the "@" sign
Note down the workflow app id which is between i:0i.t|ms.sp.ext| and @

- Then navigate to the 'Grant permission to an app' page for the site you are trying to run the web service call against. This must be manually navigated by typing the following URL: http://YourSite/_layouts/15/appinv.aspx
This will take you to a page that looks similar to this:
Follow the numerical point, as shown in the below screenshot.
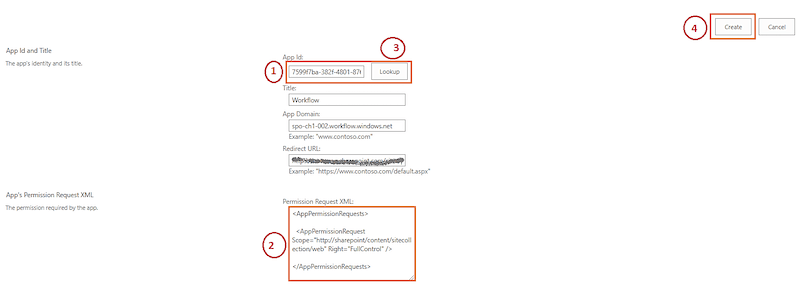
- Paste the workflow App Id that you copied in step three and click Lookup. This will fill the Title, App Domain, and Redirect URL fields automatically.
- In the Permissions Request field, paste the following XML:
- <AppPermissionRequests>
- <AppPermissionRequest Scope="http://sharepoint/content/sitecollection/web" Right="FullControl" />
- </AppPermissionRequests>
*(note this XML is literal and does not need to be modified in any way)
- Click Create.
- You will then be taken to a page where you are asked to trust the Workflow app. Click Trust It.
Scenario
Sharepoint Online Site_B we add the Employee No then apply query on Sharepoint Online Site_A to get the employee Title based on Employee No using Nintex workflow.
Objective - Implementation of Nintex Workflow
The logic of the Nintex Workflow was built using the following steps and to configure Call HTTP Web Service Action to calling REST API
- Sharepoint Online Site_A - the SharePoint online which contains the source list that we want to query.
- Sharepoint Online Site_B - the SharePoint online where the Nintex Workflow will be deployed.
Follow the below steps to create a new Nintex Workflow against a custom list when items are created using the Nintex Workflow Designer
Declared Variables
Add key pair values as described in the table below
| Name |
Type |
Type |
| Accept |
Text |
application/json;odata=verbose |
| Content-Type |
Text |
application/json;odata=verbose |
Build the Dictionary Variables
Use action “Build Dictionary” to build Dictionary RequestHeaders. We need to create headers for Accept and Content Type. To specify JSON as the format we'll be sending the request and the format in which we want to get the response.
Create the Web Service Call
Drag and drop the Call HTTP Web Service action and use the variables we've set up for the different parameters of the action. Make sure you choose GET as the HTTP method of your request. Your action should look like this:
Address: {Sharepoint Site A - Url}/_api/web/lists/getbytitle('employee')/items?$filter=EmpNo eq '{Current Item:Title}'
Request Type: Select HTTP Get Option
Request Headers: build Dictionary RequestHeaders
Response Content: build Dictionary RequestContent
Response Status Code: Text Variable result
Get an Item from a Dictionary
Drag and drop the Get an Item from a Dictionary action from the left toolbox.
Now let’s configure it. When you double click on the action the following screen Appear. Variable “ResponseContent” as Collection (Dictionary). From the “ResponseContent”, Now, let us get the “Title” value in TitleName variable.
Final Structure of Nintex workflow Action
Sharepoint Online Site_A: Using Nintex workflow trigger the query filter on this site in Employee list of EmpNo Column.
Sharepoint Online Site_B: In this site we create Nintex Workflow and filter the Sharepoint Online Site_A site Employee list filter by EmpNo =103. The workflow triggers on item created.
Output
The item level workflow history is in the below screen
Conclusion
When using the "Call HTTP Web Service" action on a sub site you receive the following error:
Unauthorized - {"error":{"code":"-2147024891, System.UnauthorizedAccessException","message":
{"lang":"en-US","value":"Access denied. You do not have permission to perform this action or access this resource."}}}
To resolve this issue follow the Permission steps we explored.