

Before going through this article ensure that you have a basic Knowledge of MVC Architecture and ASP.NET Web API.
Let we start with creating a REST service using WEB API.
Just create a WEB API project in Visual Studio as shown in Figures 1 and 2:
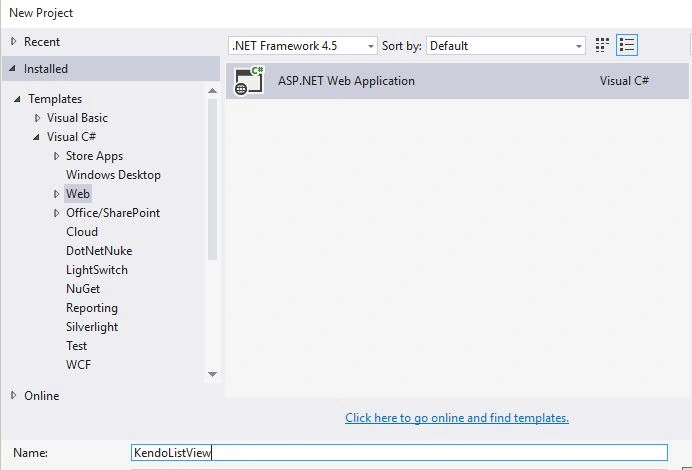
Figure 1

Figure 2
Creating a Model Classes
Right-click on the model folder and create a class, in my case I named it Product.
Write the following code in the Product.cs model class.
Let we start with creating a REST service using WEB API.
Just create a WEB API project in Visual Studio as shown in Figures 1 and 2:
Figure 1
Figure 2
Creating a Model Classes
Right-click on the model folder and create a class, in my case I named it Product.
Write the following code in the Product.cs model class.
- public class Product {
- [Key]
- [DatabaseGenerated(DatabaseGeneratedOption.Identity)]
- public int ProductID {
- get;
- set;
- }
- [Required]
- public string ProductName {
- get;
- set;
- }
- [Required]
- public string UnitPrice {
- get;
- set;
- }
- }
Here I am using Entity Framework Code first technique so we need to create the context class.
Right-click on the model folder and create one more class, in my case I named it ProductContext.
Write the following code in ProductContext class.
Right-click on the model folder and create one more class, in my case I named it ProductContext.
Write the following code in ProductContext class.
- public class ProductContext: DbContext {
- public ProductContext(): base("name=TestConnection") {}
- public DbSet < Product > Products {
- get;
- set;
- }
- }
Scaffolding the WEB API Controller Class
Note: Before doing Scaffolding build your application once.
Right-click on Controller folder then selelct Add--> Controller and create a WEB API class as shown in 3 and 4.
Note: Before doing Scaffolding build your application once.
Right-click on Controller folder then selelct Add--> Controller and create a WEB API class as shown in 3 and 4.
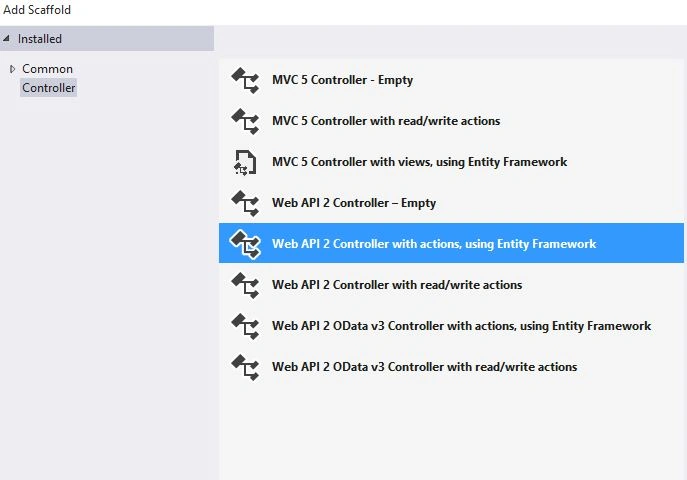
Figure 3
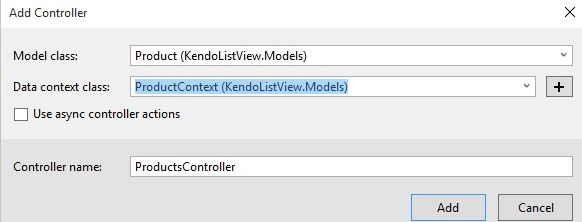
Figure 4
The preceding procedure will scaffold the REST full service in the ProductsController.cs.
You will get some pre-defined HTTP GET, POST, PUT and DELETE requests/responses in the products Controller. Modify the code based on your application requirements. For this example I didn't modify the code.
Now the REST services are created , it's time to create a Kendo UI List View to consume the services.
Before implementing the service in the Kendo UI once check that in Postman / Fiddler.
Creating a Kendo List View with Remote Binding
Create a HMTL page in your project, in my case I named it KendoList.html.
Desgin in KendoList.html
- <html
- xmlns="http://www.w3.org/1999/xhtml">
- <head>
- <link rel="stylesheet" href="http://cdn.kendostatic.com/2014.3.1316/styles/kendo.common.min.css" />
- <link rel="stylesheet" href="http://cdn.kendostatic.com/2014.3.1316/styles/kendo.default.min.css" />
- <link rel="stylesheet" href="http://cdn.kendostatic.com/2014.3.1316/styles/kendo.dataviz.min.css" />
- <link rel="stylesheet" href="http://cdn.kendostatic.com/2014.3.1316/styles/kendo.dataviz.default.min.css" />
- <script src="http://cdn.kendostatic.com/2014.3.1316/js/jquery.min.js"></script>
- <script src="http://cdn.kendostatic.com/2014.3.1316/js/kendo.all.min.js"></script>
- <title></title>
- </head>
- <body>
- <style>
- .product-view {
- float: left;
- width: 50%;
- height: 300px;
- box-sizing: border-box;
- border-top: 0;
- position: relative;
- }
- .product-view:nth-child(even) {
- border-left-width: 0;
- }
- .product-view dl {
- margin: 10px 10px 0;
- padding: 0;
- overflow: hidden;
- }
- .product-view dt, dd {
- margin: 0;
- padding: 0;
- width: 100%;
- line-height: 24px;
- font-size: 18px;
- }
- .product-view dt {
- font-size: 11px;
- height: 16px;
- line-height: 16px;
- text-transform: uppercase;
- opacity: 0.5;
- }
- .product-view dd {
- height: 46px;
- overflow: hidden;
- white-space: nowrap;
- text-overflow: ellipsis;
- }
- .product-view dd .k-widget,
- .product-view dd .k-textbox {
- font-size: 14px;
- }
- .k-listview {
- border-width: 1px 1px 1px 0;
- padding: 0;
- overflow: hidden;
- min-height: 298px;
- }
- .edit-buttons {
- position: absolute;
- bottom: 0;
- left: 0;
- right: 0;
- text-align: right;
- padding: 5px;
- background-color: rgba(0,0,0,0.1);
- }
- span.k-invalid-msg {
- position: absolute;
- margin-left: 6px;
- }
- .k-add-button {
- margin-bottom: 2em;
- }
- @media only screen and (max-width : 620px) {
- .product-view {
- width: 100%;
- }
- .product-view:nth-child(even) {
- border-left-width: 1px;
- }
- }
- </style>
- <div id="example">
- <div class="demo-section k-header wide">
- <div class="container">
- <div class="row">
- <div class="col-md-3">
- <label>Product Name</label>
- </div>
- <div class="col-md-3">
- <input type="text" id="ProductName" data-bind="value:ProductName" class="k-textbox" />
- </div>
- </div>
- <div class="row">
- <div class="col-md-3">
- <label>Unit Cost</label>
- </div>
- <div class="col-md-3">
- <input type="text" id="UnitPrice" class="k-textbox" data-bind="value:UnitPrice" />
- </div>
- </div>
- <br/>
- <br/>
- <div class="row">
- <button data-role="button"
- data-sprite-css-class="k-icon k-edit"
- data-bind="events: { click: InsertProduct }"
- style="width: 180px">
- Submit
- </button>
- </div>
- </div>
- <div>
- <h4>Kendo List</h4>
- <div data-role="listview"
- data-template="template"
- data-bind="source: products,
- visible: isVisible"
- style="height: 300px; overflow: auto"></div>
- </div>
- </div>
- <script type="text/x-kendo-tmpl" id="template">
- <div class="product-view k-widget">
- <dl>
- <dt>Product Name</dt>
- <dd>#:ProductName#</dd>
- <dt>Unit Price</dt>
- <dd>#:kendo.toString(UnitPrice, "c")#</dd>
- </dl>
- </div>
- </script>
- </div>
JavaScipt with MVVM Model
- $(document).ready(function() {
- var viewModel = kendo.observable({
- isVisible: true,
- ProductName: '',
- UnitPrice: '',
- products: new kendo.data.DataSource({
- batch: true,
- transport: {
- read: {
- url: "api/Products",
- dataType: "json"
- },
- parameterMap: function(options, operation) {
- if (operation !== "read" && options.models) {
- return {
- models: kendo.stringify(options.models)
- };
- }
- }
- },
- schema: {
- model: {
- id: "ProductID",
- }
- },
- }),
- InsertProduct: function(e) {
- e.preventDefault()
- $.ajax({
- type: "POST",
- url: 'api/Products',
- data: {
- ProductName: $("#ProductName").val(),
- UnitPrice: $("#UnitPrice").val()
- },
- })
- }
- });
- kendo.bind($("#example"), viewModel);
- })
Result in a browser
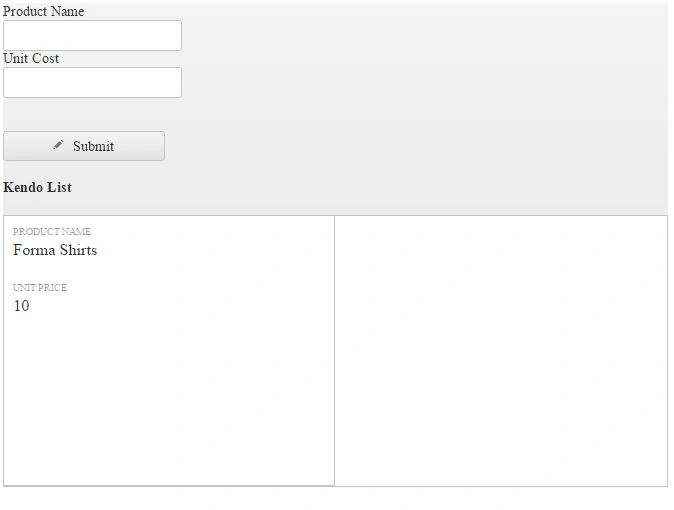
Figure 5
To show the structure of the Kendo list I already inserted one product into it.
We will start to add one more new product as shown in 6 and 7.
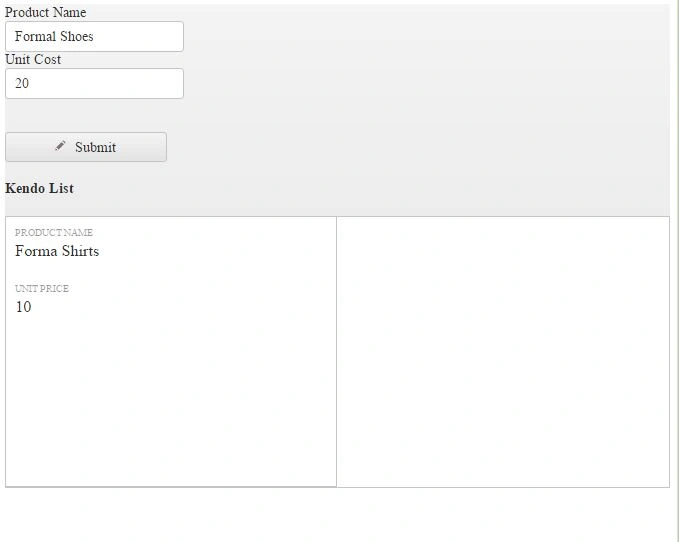
Figure 6
Figure 5
To show the structure of the Kendo list I already inserted one product into it.
We will start to add one more new product as shown in 6 and 7.
Figure 6
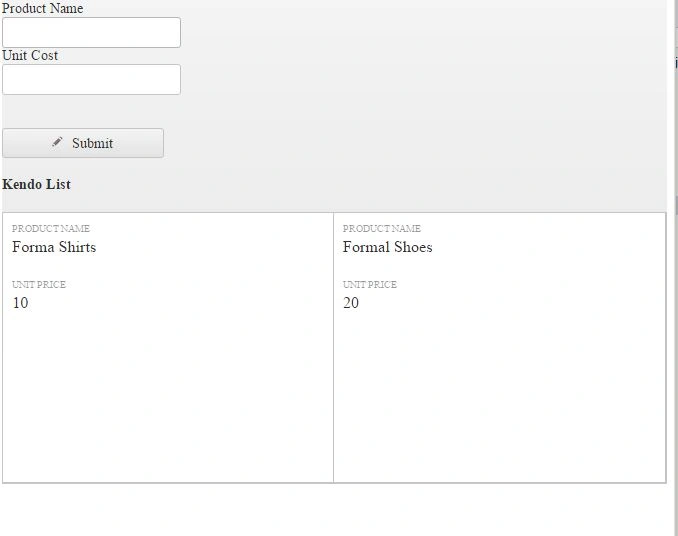
Figure 7
Check the table in your SQL database:
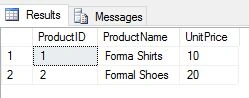
Yes, the records are inserted into the table.
That's it, I hope you have enjoyed this article, thank you.
Happy Coding.
Arul RPosted Oct 28, 2015, 5:56 AM
Nice share!!!
RakeshPosted Aug 22, 2015, 1:33 PM
Good Work
Sumit JoshiPosted Aug 22, 2015, 10:26 AM
thanks for sharing..
Yashwanth MuthineniPosted Aug 22, 2015, 7:07 AM
Good one
Santhakumar MunuswamyPosted Aug 22, 2015, 6:08 AM
Good Article. Thanks for sharing
Karthikeyan KPosted Aug 22, 2015, 4:41 AM
Good one sir...Thanks for share
Mohammed IbrahimPosted Aug 22, 2015, 2:55 AM
nice share
Vaikesh K PPosted Aug 22, 2015, 2:46 AM
Good One
Rajeesh MenothPosted Aug 22, 2015, 1:46 AM
Nice Share