

ASP.NET Core 1.1 has an inbuilt Response Compression Middleware for compression, which by default uses GZIP compression. In simple words, GZIP is a technique, which is used for the file compression and decompression for faster network transfer.
All the modern Browsers support response compression. Using GZIP Compression is the best approach to reduce the response size and provide better speed for transferring the files over the network.
Enable GZIP compression in ASP.NET Core
Let's first install GZIP in our ASP.NET MVC Project, using NUGET Package Manager.
Step 1
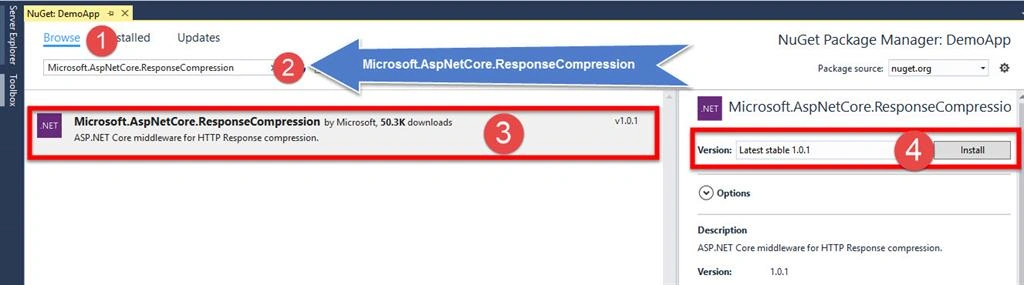
Right click on ASP.NET Core and select Manage Nuget Package.
Enable GZIP compression in ASP.NET Core
Let's first install GZIP in our ASP.NET MVC Project, using NUGET Package Manager.
Step 1
Right click on ASP.NET Core and select Manage Nuget Package.

Step 2
Browse Microsoft.AspNetCore.ResponseCompression.
Once ResponseCompression is installed, we need to configure it.
Let's open Startup.cs file and add the code given below in ConfigurationService method.
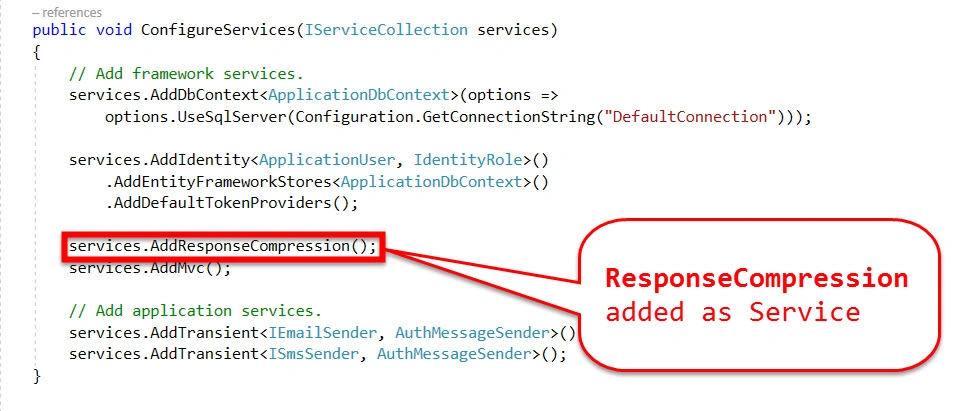
Code snippet
Browse Microsoft.AspNetCore.ResponseCompression.
Once ResponseCompression is installed, we need to configure it.
Let's open Startup.cs file and add the code given below in ConfigurationService method.
Code snippet
- // This method gets called by the runtime. Use this method to add services to the container.
- public void ConfigureServices(IServiceCollection services)
- {
- // Add framework services.
- services.AddDbContext<ApplicationDbContext>(options =>
- options.UseSqlServer(Configuration.GetConnectionString("DefaultConnection")));
- services.AddIdentity<ApplicationUser, IdentityRole>()
- .AddEntityFrameworkStores<ApplicationDbContext>()
- .AddDefaultTokenProviders();
- //Add ResponseCompression as Service
- services.AddResponseCompression();
- services.AddMvc();
- // Add application services.
- services.AddTransient<IEmailSender, AuthMessageSender>();
- services.AddTransient<ISmsSender, AuthMessageSender>();
- }
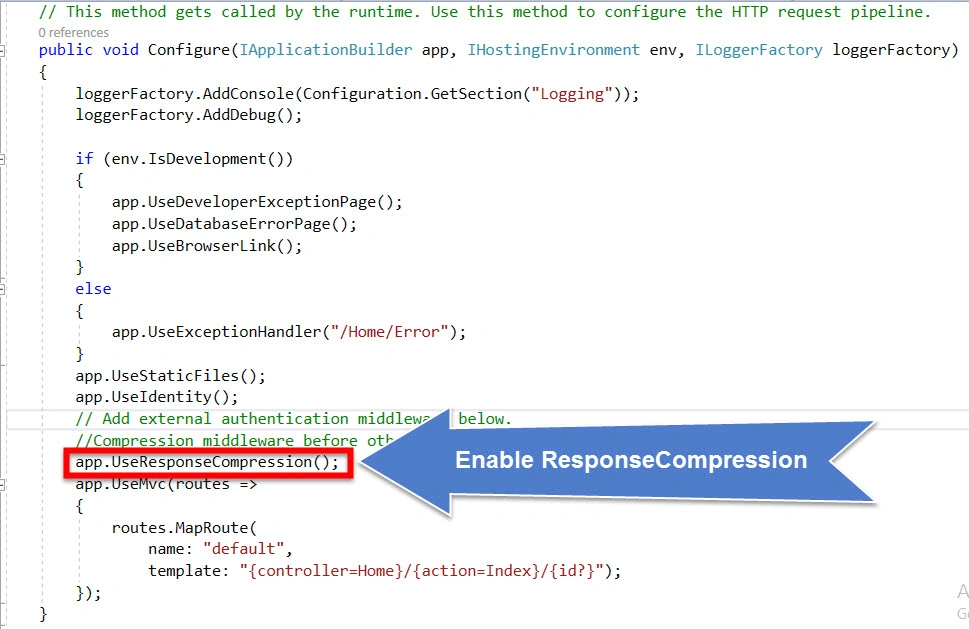
By default, ASP.NET Core uses GZIP compression. Now, let’s add this middleware to HTTP pipeline, so add the line of code given below in Configure method of Startup.cs.
Remember to add Compression middleware before other middlewares, which serves the files.
Code snippet
Remember to add Compression middleware before other middlewares, which serves the files.
Code snippet
- // This method gets called by the runtime. Use this method to configure the HTTP request pipeline.
- public void Configure(IApplicationBuilder app, IHostingEnvironment env, ILoggerFactory loggerFactory)
- {
- loggerFactory.AddConsole(Configuration.GetSection("Logging"));
- loggerFactory.AddDebug();
- if (env.IsDevelopment())
- {
- app.UseDeveloperExceptionPage();
- app.UseDatabaseErrorPage();
- app.UseBrowserLink();
- }
- else
- {
- app.UseExceptionHandler("/Home/Error");
- }
- app.UseStaticFiles();
- app.UseIdentity();
- // Add external authentication middleware below.
- //Compression middleware before other middlewares which serves the files.
- app.UseResponseCompression();
- app.UseMvc(routes =>
- {
- routes.MapRoute(
- name: "default",
- template: "{controller=Home}/{action=Index}/{id?}");
- });
- }
So far we have installed and configured Response Compression in ASP.NET Core Application.
Creating dummy data for Test
Lets create a Test API to assess the data.
My TestAPI looks like, as shown below.
My TestAPI looks like, as shown below.

Code snippet
- //[Route("api/TestAPI/Get")]
- [HttpGet]
- public IEnumerable<string> Get()
- {
- List<string> data = new List<string>();
- for (int i = 1; i <= 100; i++)
- {
- data.Add("ID :" + i.ToString());
- data.Add("Name :" + i.ToString());
- data.Add("Address :" + i.ToString());
- data.Add("Email :" + i.ToString());
- data.Add("Telephone :" + i.ToString());
- }
- return data;
- }
Application execution
Lets run the Application and navigate to API.
Lets run the Application and navigate to API.
In my case, it is http://localhost:51381/TestAPI/Get
Case I
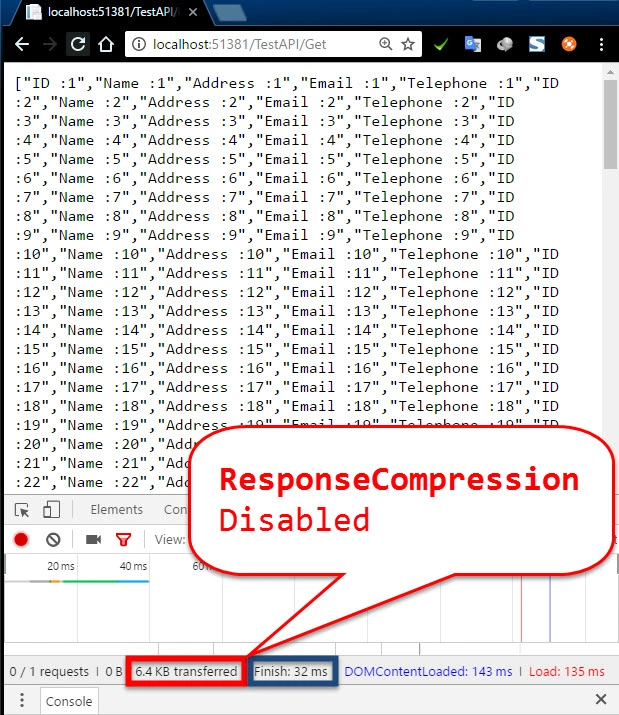
When Response Compression is disabled.
(Comment below lines in Startup.cs)
(Comment below lines in Startup.cs)
- services.AddResponseCompression(); (ConfigureServices method)
- app.UseResponseCompression(); (Configure Method)
Case II
When Response Compression is enabled.
(UnComment below lines in Startup.cs)
(UnComment below lines in Startup.cs)
- services.AddResponseCompression(); (ConfigureServices method)
- app.UseResponseCompression(); (Configure Method)
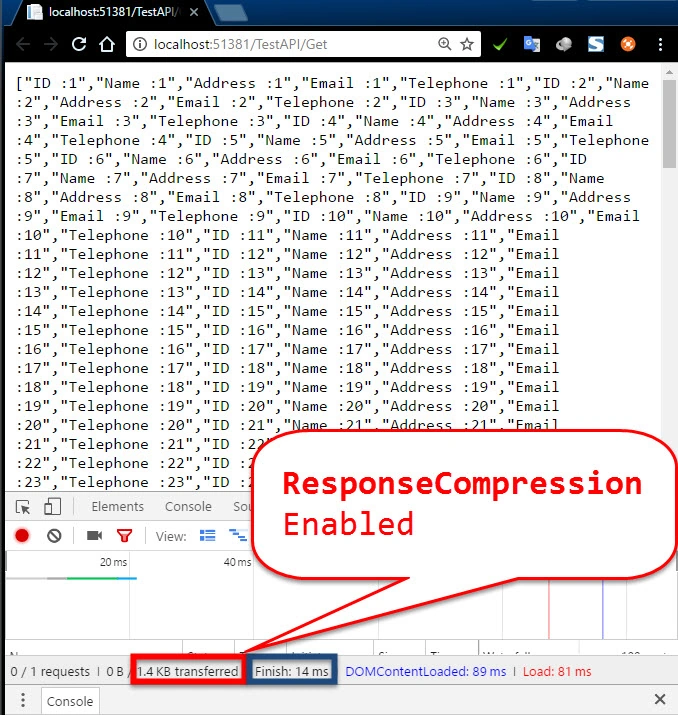
Comparision
| Response Compression Disabled | Response Compression Enabled | |
| Transferred data | 6.4 KB | 1.4 KB |
| Finish time | 32 ms | 14 ms |
| Load time | 135ms | 81 ms |
Summary
Thus we learned,
- How to install Response Compression library in ASP.NET Core.
- How to enable Response Compression as middleware.
- How to transfer the data over the network by compressing.
- Decrease Transfer and Load time of the data.
You may also like
- How to configure Email Services in ASP.NET Core Applications.
- How to export data to Excel from Web API in ASP.NET Core using Kendo UI
- Sorting and Grouping in Kendo Grid using Web API in ASP.NET Core Application
- Call Web API Using JQuery AJAX In ASP.NET Core Web Applications
- How to create Image Thumbnail in ASP.NET Web Application
Harish PaudelPosted Apr 26, 2020, 8:34 AM
10x friend new thing i learn today from your articles, thanks once again for your efforts.
Parth AkbariPosted Oct 17, 2018, 12:33 AM
I want to compress file and sent it to browser. is it possible? if yes, then browser download that file so, it will decompress it or not?
Ryan BattistonePosted Feb 13, 2018, 12:20 PM
This is actually a very vulnerable method. Do not use this, unless your website is static, and does not use any sort of password or login authentication, any kind of API tokens, etc. https://security.stackexchange.com/questions/19911/crime-how-to-beat-the-beast-successor/19914