
This article gives a walk-through of selecting table rows with checkboxes using the JQuery plugin Tabulator.js with SQL Server as backend database and server as ASP.Net.
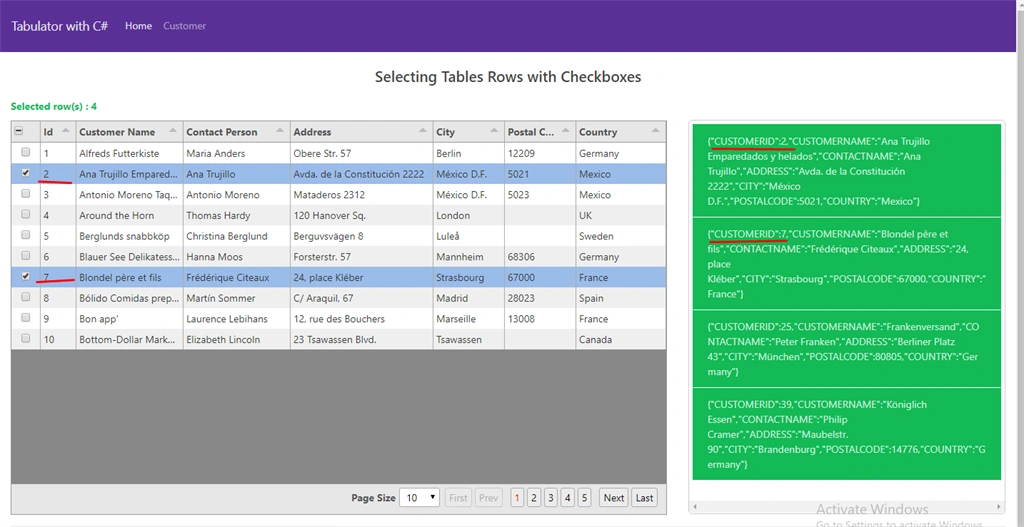
Below is the screenshot of the final output that we want to achieve at the end of this tutorial.
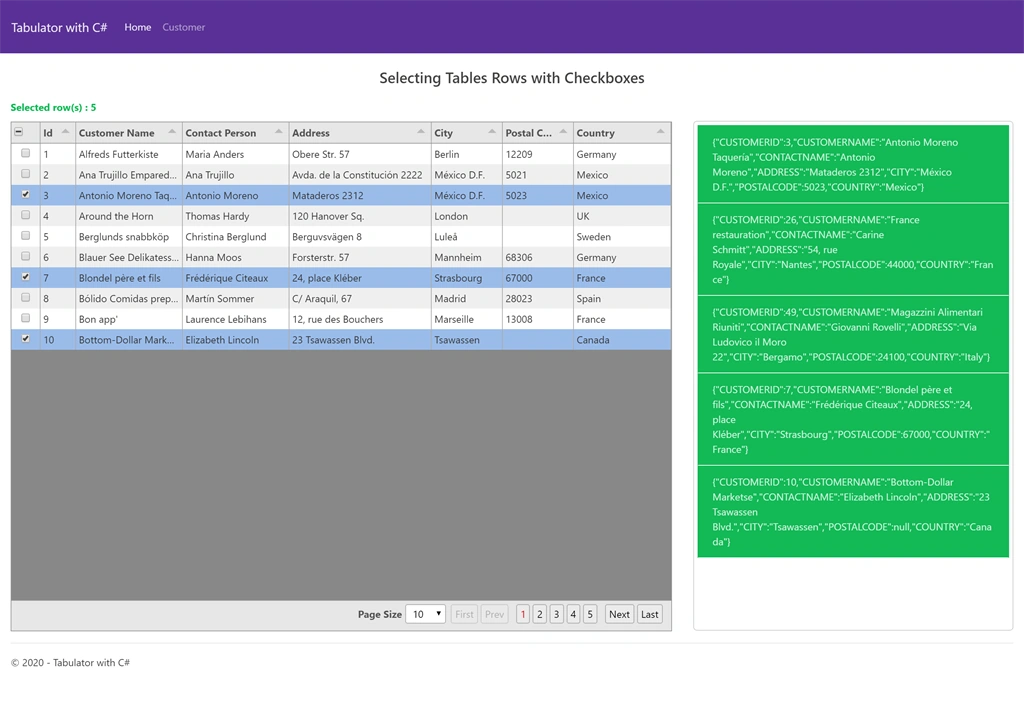
In the above result, we are displaying the data from the database; i.e SQL Server 2014 and fetching the data using jquery ajax call with WebMethod in the ASP.Net code behind CustomerDetails.aspx.cs.
The link for tabulator.js for more details is at http://tabulator.info/ and for the row selection documentation is at http://tabulator.info/docs/4.6/select.
Prerequisites for this tutorial
- Visual Studio (any version)
- SQL Server (any database version)
- Tabulator.js and Tabulator.css (download from the official site provided above)
Database structure and data
Create the database SQL server script with name as Practice.
- USE master;
- GO
- IF DB_ID (N'Practice') IS NOT NULL
- DROP DATABASE Practice;
- GO
- CREATE DATABASE Practice;
Now create the table called tblCustomers2
- USE [Practice]
- GO
- SET ANSI_NULLS ON
- GO
- SET QUOTED_IDENTIFIER ON
- GO
- CREATE TABLE [dbo].[tblCustomer2](
- [CustomerID] [float] NULL,
- [CustomerName] [nvarchar](255) NULL,
- [ContactName] [nvarchar](255) NULL,
- [Address] [nvarchar](255) NULL,
- [City] [nvarchar](255) NULL,
- [PostalCode] [float] NULL,
- [Country] [nvarchar](255) NULL
- ) ON [PRIMARY]
- GO
Steps to follow:
Step 1
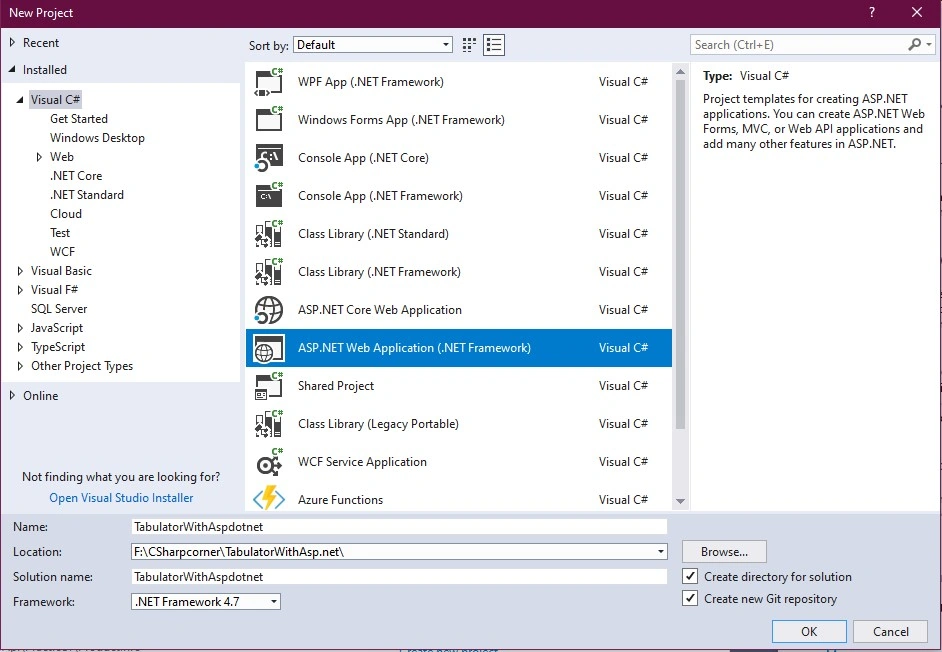
Create a new project in Visual Studio as given in the below screenshot.
Step 2
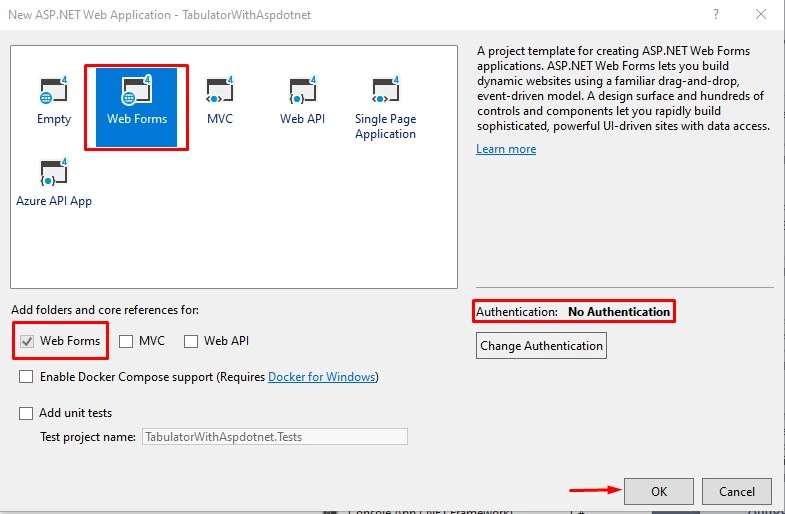
Create Web Forms with No Authentication.
Step 3
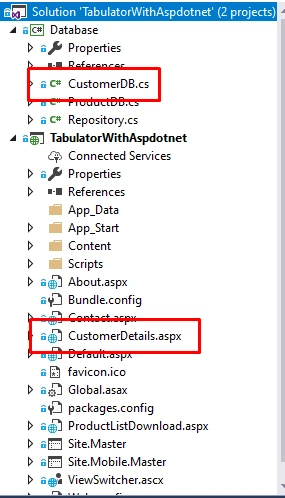
Below is the structure of the project.
Step 4
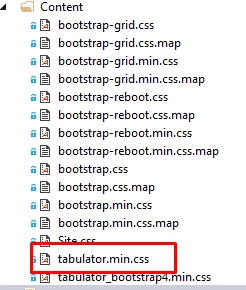
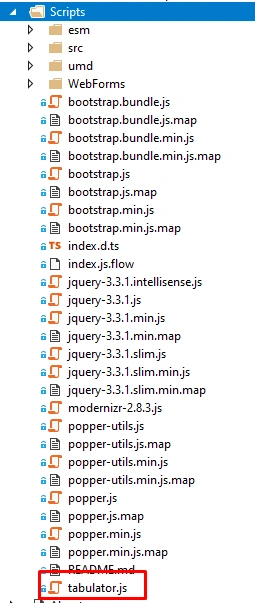
Add the Tabulator.js and Tabulator.css into Scripts and Content/CSS folders.
Step 5
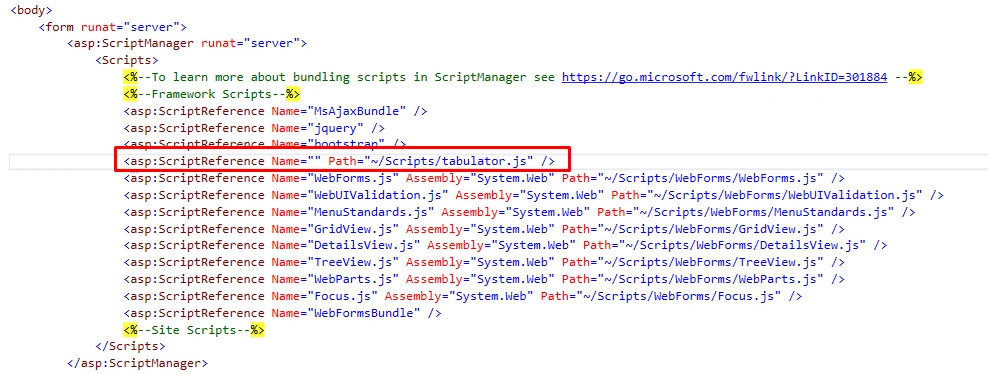
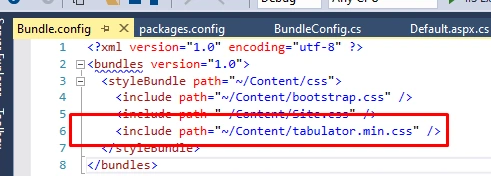
Now add the Tabulator.Js and Tabulator.css into Site.Master and Bundle.config as shown in the below screen.
Step 6
Now we have to change the page header and place the application in the header.
- <nav class="navbar navbar-expand-lg navbar-dark bg-primary">
- <a class="navbar-brand" href="#">Tabulator with C#</a>
- <button class="navbar-toggler" type="button" data-toggle="collapse" data-target="#navbarColor01" aria-controls="navbarColor01" aria-expanded="false" aria-label="Toggle navigation">
- <span class="navbar-toggler-icon"></span>
- </button>
- <div class="collapse navbar-collapse" id="navbarColor01">
- <ul class="navbar-nav mr-auto">
- <li class="nav-item active">
- <a class="nav-link" href="/">Home <span class="sr-only">(current)</span></a>
- </li>
- <li class="nav-item">
- <a class="nav-link" href="CustomerDetails.aspx">Customer <span class="sr-only">(current)</span></a>
- </li>
- </ul>
- </div>
- </nav>
Step 7
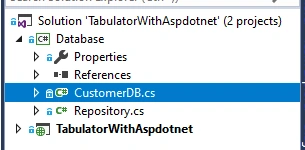
Now create a class library as Database and in that create a class as CustomerDB.cs which will handle our database operation using normal ADO.Net SqlDataAdapter to read that from the database SQL query.
- public class CustomerDB
- {
- public readonly SqlConnection Conn = null;
- public CustomerDB()
- {
- this.Conn = new SqlConnection(ConfigurationManager.AppSettings["SQlConnectionString"].ToString());
- }
- /// <summary>
- /// This method will get the list of Customer from database table CustomerRawInfo.
- /// </summary>
- /// <returns>List of customers in datatable</returns>
- public DataTable Customers
- {
- get
- {
- string Query = string.Empty;
- DataTable dataTable = new DataTable();
- SqlDataAdapter sqlDataAdapter = null;
- try
- {
- Query = "SELECT CUSTOMERID,CUSTOMERNAME,CONTACTNAME,ADDRESS,CITY,POSTALCODE,COUNTRY FROM PRACTICE.DBO.TBLCUSTOMER2 WITH(NOLOCK)";
- SqlCommand sqlCommand = new SqlCommand(Query, Conn);
- Conn.Open();
- // create data adapter
- sqlDataAdapter = new SqlDataAdapter(sqlCommand);
- // this will query your database and return the result to your datatable
- sqlDataAdapter.Fill(dataTable);
- }
- catch (Exception ex)
- {
- dataTable = null;
- }
- finally
- {
- Conn.Close();
- sqlDataAdapter.Dispose();
- }
- return dataTable;
- }
- }
- }
In the connection string provide the details of your database inside the web.config file,

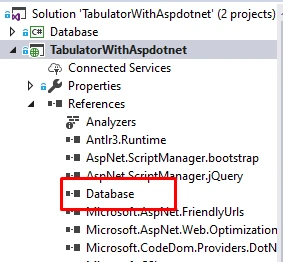
After this build the class library Database and then add the reference to TabulatorWithAspdotnet.
Step 8
Create a web form name CustomerDetails.aspx and in the code bind CustomerDetails.aspx.cs and fetch the data from SQL Database using the class library Database Repository class. To fill the page; i.e CustomerDetails.aspx with SQL database data, we are displaying it using the HTML Table for which table header will be filled with defined columns and rows will be filled from code behind (from CustomerDetails.aspx.cs) with HTML table body structure.
CustomerDetails.aspx.cs(code behind)
- public partial class CustomerDetails : System.Web.UI.Page
- {
- protected void Page_Load(object sender, EventArgs e)
- {
- }
- [WebMethod]
- public static object LoadCustomers()
- {
- // Return response object
- object Resp = new { status = 0, data = string.Empty };
- try
- {
- CustomerDB customerDB = new CustomerDB();
- DataTable CustomerTable = customerDB.Customers;
- if (CustomerTable != null && CustomerTable.Rows.Count > 0)
- {
- Resp = new
- {
- status = 1,
- data = Newtonsoft.Json.JsonConvert.SerializeObject(CustomerTable)
- };
- return Resp;
- }
- }
- catch (Exception ex)
- {
- return null;
- }
- return null;
- }
- }
CustomerDetails.aspx
- <div class="row">
- <div class="col-12 text-center">
- <br />
- <h4>Selecting Tables Rows with Checkboxes</h4>
- <br />
- </div>
- </div>
- <div class="row">
- <div class="col-8">
- <span class="text-success font-weight-bold mb-10">Selected row(s) : <span id="select-stats" class="pull-left"></span></span>
- <div id="CustomerGrid"></div>
- </div>
- <div class="col-4">
- <div class="ContainerGrid">
- <ul class="list-group">
- </ul>
- </div>
- </div>
- </div>
- <div class="row">
- <div class="col-12 text-center mtb-10">
- <h3 class="text-underline">Product List(Downloading data into xlsx, json, csv, pdf, html)</h3>
- </div>
- </div>
- <div class="row">
- <div class="col-12">
- <div class="btn-group btn-group-md mb2-10 float-right">
- <button type="button" id="download-csv" class="btn btn-primary">Download CSV</button>
- <button type="button" id="download-json" class="btn btn-success">Download JSON</button>
- <button type="button" id="download-xlsx" class="btn btn-info">Download XLSX</button>
- <button type="button" id="download-pdf" class="btn btn-warning">Download PDF</button>
- <button type="button" id="download-html" class="btn btn-dark">Download HTML</button>
- </div>
- </div>
- </div>
- <div class="row">
- <div class="col-12">
- <div id="GridExample"></div>
- </div>
- </div>
- <script type="text/javascript" src="https://oss.sheetjs.com/sheetjs/xlsx.full.min.js"></script>
- <script src="https://cdnjs.cloudflare.com/ajax/libs/jspdf/1.3.5/jspdf.min.js"></script>
- <script src="https://cdnjs.cloudflare.com/ajax/libs/jspdf-autotable/3.0.5/jspdf.plugin.autotable.js"></script>
- <script type="text/javascript">
- var table = "";
- $(document).ready(function () {
- var ProductData = LoadData("ProductListDownload.aspx/LoadProductList");
- //trigger download of data.csv file
- document.getElementById("download-csv").addEventListener("click", function () {
- table.download("csv", "data.csv");
- });
- //trigger download of data.json file
- document.getElementById("download-json").addEventListener("click", function () {
- table.download("json", "data.json");
- });
- //trigger download of data.xlsx file
- document.getElementById("download-xlsx").addEventListener("click", function () {
- table.download("xlsx", "data.xlsx", { sheetName: "My Data" });
- });
- //trigger download of data.pdf file
- document.getElementById("download-pdf").addEventListener("click", function () {
- table.download("pdf", "data.pdf", {
- orientation: "portrait", //set page orientation to portrait
- title: "Example Report", //add title to report
- });
- });
- //trigger download of data.html file
- document.getElementById("download-html").addEventListener("click", function () {
- table.download("html", "data.html", { style: true });
- });
- })
- // Load the Product grid Data from the server
- function LoadData(url) {
- try {
- var ajaxObj = $.ajax({
- type: "POST",
- url: url,
- data: null,
- dataType: "JSON",
- contentType: "application/json; charset=utf-8",
- async: false,
- cache: false,
- success: function (res) {
- // This will check if is any null or undefined data is there or not and also check the status of the request.
- if (res && res.d.status == 1 && res.d.data) {
- // Parsing the string data into Array of object
- var ProdtGridData = JSON.parse(res.d.data);
- ProcessTableStructure(ProdtGridData);
- }
- },
- error: function (err, type, httpStatus) {
- alert("Error! Please try later.");
- }
- });
- } catch (e) {
- console.log("Page :ProductListDownload.aspx | Function:LoadData | Error:" + e);
- }
- }
- // Process the customer grid data into multi-select row table
- function ProcessTableStructure(gridData) {
- try {
- table = new Tabulator("#GridExample", {
- height: "50vh",
- layout: "fitDataStretch",
- pagination: "local",
- paginationSize: 10,
- paginationSizeSelector: [10, 20, 30, 50, 100],
- data: gridData,
- columns: [
- { title: "Product Id", field: "PRODUCTID", width: 110 },
- { title: "Name", field: "NAME", width: 160 },
- { title: "Category", field: "CATEGORY", width: 150 },
- { title: "Main Category", field: "MAINCATEGORY", width: 150 },
- { title: "Supplier Name", field: "SUPPLIERNAME", width: 150 },
- { title: "Description", field: "DESCRIPTION", width: 450 },
- { title: "Quantity", field: "QUANTITY", width: 100 },
- {
- title: "Price", field: "PRICE", width: 80, formatter: "money", formatterParams: {
- decimal: ".",
- thousand: ",",
- symbol: "₹",
- symbolBefore: "p",
- precision: false,
- }
- },
- ]
- });
- } catch (e) {
- console.log("Page :CustomerDetails.aspx | Function:ProcessTableStructure | Error:" + e);
- }
- }
- </script>
Now run the application to get the below result.
Result
Join the conversation! Your thoughts help the community grow.