Sending E-mails with ASP.NET 2.0 using C#


Nowadays, web masters prefer to receive information from their users or customers through a contact or feedback form placed on the website. ASP.NET 2.0 provides a simplified approach to achieve the task as compared to ASP.NET 1.1. In this part of the series, we will examine how to send e-mails in plain text and HTML formats using C#.

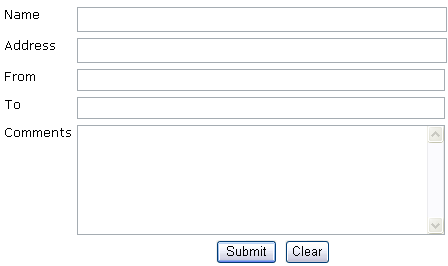
Let us start our discussion by creating a simple user interface as shown below

Figure 1

The code to create the above WebForm is given below.

<form id="Form1" runat="server">

<div align="left">

<table border="0" width="544">

<tr>

<td valign="top"><font face="Verdana" size="2">Name</font></td>

<td height="24" valign="top"> <asp:TextBox runat="server" Height="25px" Width="370px" ID="txtName"></asp:TextBox>

<asp:RequiredFieldValidator ID = "reqName" ControlToValidate = "txtName" Runat = "server" ErrorMessage = "*"></asp:RequiredFieldValidator></td>

</tr>

<tr>

<td valign="top"><font size="2" face="Verdana">Address</font></td>

<td height="24" valign="top">

<asp:TextBox runat="server" Height="25px" Width="370px" ID="txtAddress"></asp:TextBox> </td>

</tr>

<tr>

<td valign="top"><font face="Verdana" size="2">From</font></td>

<td height="24" valign="top"> <asp:TextBox runat="server" Height="22px" Width="368px" ID="txtFrom"></asp:TextBox>

<asp:RequiredFieldValidator ID = "reqFrom1" ControlToValidate = "txtFrom" runat = "server" ErrorMessage = "*" ></asp:RequiredFieldValidator>

<asp:RegularExpressionValidator ID = "regFrom2" ControlToValidate = "txtFrom" runat = "server" ErrorMessage = "Invalid Email" ValidationExpression="\w+([-+.]\w+)*@\w+([-.]\w+)*\.\w+([-.]\w+)*"></asp:RegularExpressionValidator>

<br></td>

</tr>

<tr>

<td valign="top"><font face="Verdana" size="2">To</font></td>

<td height="24" valign="top">

<asp:TextBox runat="server" Height="22px" Width="368px" ID="txtTo"></asp:TextBox>

<asp:RequiredFieldValidator ID = "reqTo1" ControlToValidate = "txtTo" runat = "server" ErrorMessage = "*" ></asp:RequiredFieldValidator>

<asp:RegularExpressionValidator ID = "reqTo2" ControlToValidate = "txtTo" runat = "server" ErrorMessage = "Invalid Email" ValidationExpression="\w+([-+.]\w+)*@\w+([-.]\w+)*\.\w+([-.]\w+)*"></asp:RegularExpressionValidator>

</td>

</tr>

<tr>

<td valign="top"><font face="Verdana" size="2">Comments</font></td>

<td height="112" valign="top"><asp:TextBox runat="server" Height="110px" TextMode="MultiLine" Width="368px" ID="txtComments"></asp:TextBox>

<asp:RequiredFieldValidator ID = "reqComments" ControlToValidate = "txtComments" Runat = "server" ErrorMessage = "*"></asp:RequiredFieldValidator> </td>

</tr>

<tr>

<td colspan="2" valign="top" height="30">

<p align="center">


<asp:Button Runat = server ID = btnSubmit OnClick = btnSubmit_Click Text = "Submit"></asp:Button>

&nbsp;<input id="Reset1" type = "reset" runat = "server" value = "Clear"></td>

</tr>

</table>

</div>

<p>&nbsp;</p>

<p><br>

<!-- Insert content here -->

</p>

</form>

As you can see we have applied validation controls to prevent input errors. The next process is to provide the required code for sending e-mails upon submission of the form. We will analyze each process in a series of steps for better understanding.

Step 1: Importing Namespace

<%@ Page Language="C#" %>

<%@ Import Namespace="System.Net.Mail" %>

Step 2: Creating objects of SmtpClient and MailMessage classes

SmtpClient smtpClient = new SmtpClient();

MailMessage objMail = new MailMessage();

Step 3: Creating and Specifying From, To Addresses

//From Address will be assigned from the e-mail specified in the From TextField

MailAddress objMail_fromaddress = new MailAddress(txtFrom.Text);


You can also give the code given below.


MailAddress objMail_fromaddress = new MailAddress(txtFrom.Text, "Learnxpress Support");


The above code inserts the text Learnxpress Support instead of the From e-mail address.


//To Address will be assigned from the e-mail specified in the To TextField

MailAddress objMail_toaddress = new MailAddress(txtTo.Text);


//Assigning From address to the MailMessage class

objMail.From = objMail_fromaddress;


//Assigning To address to the MailMessage class as a collection

objMail.To.Add(objMail_toaddress);

Step 4: Creating the Subject and Message Body Text Format

objMail.Subject = "E-mail Example - CSharp - Text";
objMail.Body = "Name: " +txtName.Text + "\r\n" +"Address: " + txtAddress.Text + "\r\n" + "Comments: "  + txtComments.Text;

Step 5: Specifying the HTML Header

objMail.IsBodyHtml =
true;

Step 6: Creating the Subject and Message Body HTML Format

objMail.Subject = "E-mail Example - CSharp - HTML";
objMail.Body = "<html><head><title>Sending E-mails with ASP.NET 2.0 using CSharp</title></head><body>"   +"<p>Name : " +txtName.Text + "</p>" +"<p>Address : " +txtAddress.Text + "</p>" +"<p>Comments : " +txtComments.Text + "</p>" +"</body></html>";

Step 7: Specifying Mail Priority

objMail.Priority = MailPriority.High;

Step 8: Enabling SMTP Authentication

Sometimes, you will need to provide the code for SMTP authentication to send e-mails. The required code snippet is given below.

smtpClient.Host = "mail.domain.com";
smtpClient.Credentials = new System.Net.NetworkCredential("[email protected]","Password");

Note: domain should be substituted with your real domain name such as c-sharpcorner, learnxpress.

Step 9: Handling Exceptions and Delivering E-mail

try
{
smtpClient.Send(objMail);
Response.Redirect("http://www.c-sharpcorner.com");
}
catch (Exception exc)
{
Response.Write("Send failure: " + exc.ToString());
}

In the above code, we have specified that the page should be redirected to c-sharpcorner website after the successful submission of the form. You can also create a separate page called thankyou.aspx and redirect users to the page so that users will know that the mail has been successfully delivered. Once you understood the basics of System.Net.Mail namespace then it is very easy to write the code. Moreover, we now have a simplified coding mechanism as compared to ASP.NET 1.1.

You can download the complete source code of this sample application and customize it as per your requirements.


Similar Articles