

Introduction
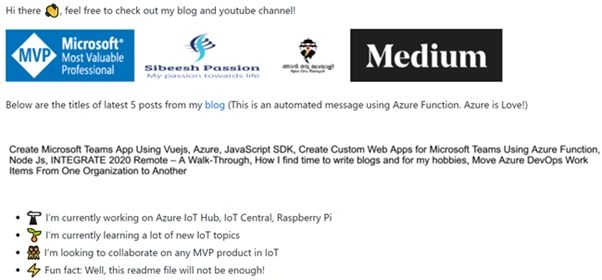
GitHub recently introduced an option to customize our profile by giving a separate magical repository. This repository name should be the same as your username, for example, here. This is how you can find this secret repository.
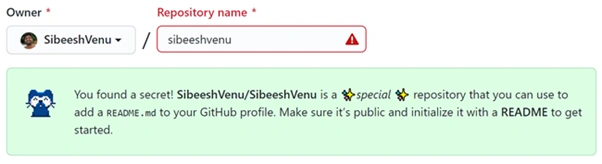
GitHub secret repository
This opens endless opportunities for what you can do to your GitHub home page. For example, I am showing the image of the titles of my recent 5 blog posts on my home page automatically. I did it using the Azure Function which will return the image, and all I had to do in this repository was to use it. Overall it was fun.
Custom GitHub home page
Here in this post, we will see how we can develop an Azure Function solution that returns the above-mentioned image.
Develop an Azure function
The first thing that you need to do is to create a new Azure Function. Go to your Azure portal, and search for Azure Function. The creation process is the same as we would create any other Azure resource.
Once you create the Azure function, you are good to go and develop an Azure function application in Visual Studio. Here, I am using Visual Studio 2019.
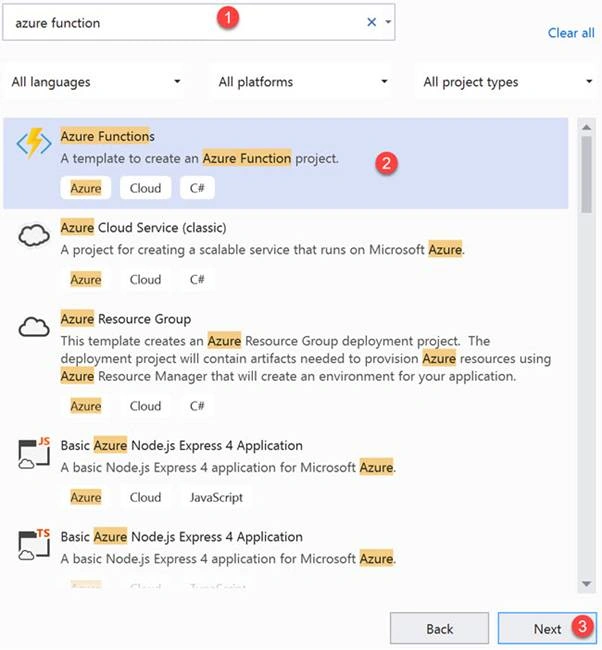
Create Azure function using Visual Studio
We are going to create an HttpTrigger Azure function, so make sure you select that option on the next screen. If you need a basic introduction about the HttpTrigger Azure function. I named my function as GetLatestPosts, and feel free to give any name you wish. This Azure function has the preceding jobs to do.
- Get the latest posts details from the feed of my blog
- Create an image with the feed data
- Send back the image as a stream
Get the latest posts details from the feed
You can usually get the feed data by going to {yoursitelink}/feed. For example, I can get my feed data by going to https://sibeeshpassion.com/feed/. So in our function, we will get this data using an XmlReader and Deserialize it using SyndicationFeed. Please be noted that the Syndication namespace is part of the System.ServiceModel and you should install the Nuget package System.ServiceModel.Syndication. Below is the function used to retrieve the latest 5 blog posts' details.
- public static IEnumerable < SyndicationItem > GetLatestFeeds() {
- var reader = XmlReader.Create(Configuration.BlogLink);
- var feed = SyndicationFeed.Load(reader);
- reader.Close();
- return feed.Items.Take(5);
- }
Create an image with titles
Now we need a function to generate an image and write the blog posts title to that image dynamically. To do this, we are using the Nuget package called SixLabors.ImageSharp. Feel free to use any packages you like, the only thing that matters is that we need an image with the blog posts titles. The SixLabors.ImageSharp is indeed an amazing library, I can recommend you to give it a try. This is how your Nuget package installed window should look now:
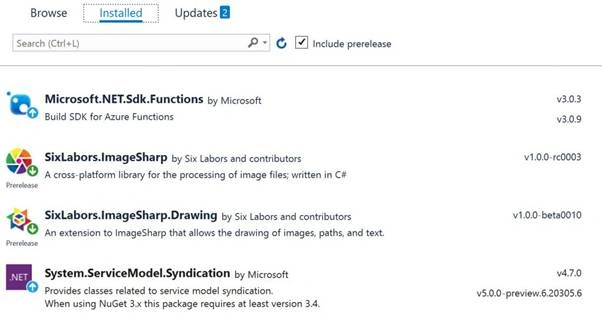
Required Nuget packages
Now we can write the function as shown below.
- private static string WriteOnImage(IEnumerable < SyndicationItem > feedItems) {
- var titles = string.Join(", ", feedItems.Select(s => s.Title.Text).ToList());
- using
- var img = new Image < Rgba32 > (Configuration.ImageWidth, Configuration.ImageHeight);
- var font = System Fonts.CreateFont(Configuration.Font, Configuration.FontSize);
- img.Mutate(ctx => ctx.ApplyScalingWaterMark(font, titles, Color.Black, 5, true));
- return img.ToBase64String(PngFormat.Instance);
- }
As you can see that there is a Configuration class, from where we take all the configurations. Let’ write that now. You can also use Environment variables here, I may update my repository in the coming days.
- namespace GitHub Funcs {
- public static class Configuration {
- public static string BlogLink {
- get;
- set;
- } = "https://sibeeshpassion.com/feed";
- public static int ImageWidth {
- get;
- set;
- } = 850;
- public static int ImageHeight {
- get;
- set;
- } = 100;
- public static string ContentType {
- get;
- set;
- } = "image/png";
- public static string Font {
- get;
- set;
- } = "Arial";
- public static int FontSize {
- get;
- set;
- } = 5;
- }
- }
The SixLabors.ImageSharp has an inbuilt extension function called ToBase64String, which will return the image as base64 string. Did you notice that we are using another extension method here, “ApplyScalingWaterMark”? Let’s create a class for our Extension methods so that it will be handy in the future.
- using SixLabors.Fonts;
- using SixLabors.ImageSharp;
- using SixLabors.ImageSharp.Drawing.Processing;
- using SixLabors.ImageSharp.Processing;
- using System;
- namespace GitHub Funcs.ExtensionMethods {
- public static class ImageSharpExtensions {
- public static IImageProcessingContextApplyScalingWaterMark(thisIImageProcessingContextprocessingContext, Font font, string text, Color color, float padding, bool wordwrap) {
- if (wordwrap) {
- return processing Context.ApplyScalingWaterMarkWordWrap(font, text, color, padding);
- } else {
- return processing Context.ApplyScalingWaterMarkSimple(font, text, color, padding);
- }
- }
- private static IImage Processing Context Apply Scaling WaterMarkSimple(thisIImageProcessingContextprocessingContext, Font font, string text, Color color, float padding) {
- Size imgSize = processingContext.GetCurrentSize();
- float target Width = img Size.Width - (padding * 2);
- float target Height = img Size.Height - (padding * 2);
- // measure the text size
- Font Rectangle size = Text Measurer.Measure(text, newRendererOptions(font));
- //find out how much we need to scale the text to fill the space (up or down)
- float scaling Factor = Math.Min(imgSize.Width / size.Width, imgSize.Height / size.Height);
- //create a new font
- Fonts caled Font = new Font(font, scalingFactor * font.Size);
- var center = new PointF(imgSize.Width / 2, imgSize.Height / 2);
- var textGraphicOptions = new TextGraphicsOptions() {
- Text Options = {
- Horizontal Alignment = Horizontal Alignment.Center,
- Vertical Alignment = Vertical Alignment.Center
- }
- };
- return processing Context.DrawText(textGraphicOptions, text, scaledFont, color, center);
- }
- private static IImageProcessing ContextApply ScalingWaterMark WordWrap(thisIImageProcessingContextprocessingContext, Font font, string text, Color color, float padding) {
- Size imgSize = processing Context.GetCurrentSize();
- floattar get Width = img Size.Width - (padding * 2);
- floattar get Height = imgSize.Height - (padding * 2);
- float target Min Height = imgSize.Height - (padding * 3); // must be with in a margin width of the target height
- // now we are working i 2 dimensions at once and can't just scale because it will cause the text to
- // reflow we need to just try multiple times
- var scaled Font = font;
- Font Rectangles = new FontRectangle(0, 0, float.MaxValue, float.MaxValue);
- float scale Factor = (scaledFont.Size / 2); // every time we change direction we half this size
- int trap Count = (int) scaledFont.Size * 2;
- if (trap Count < 10) {
- trap Count = 10;
- }
- bool is TooSmall = false;
- while ((s.Height > targetHeight || s.Height < targetMinHeight) && trapCount > 0) {
- if (s.Height > target Height) {
- if (isTooSmall) {
- scale Factor = scale Factor / 2;
- }
- scaled Font = new Font(scaledFont, scaledFont.Size - scaleFactor);
- isTooSmall = false;
- }
- if (s.Height < targetMinHeight) {
- if (!isTooSmall) {
- scale Factor = scale Factor / 2;
- }
- scaled Font = new Font(scaledFont, scaledFont.Size + scaleFactor);
- isTooSmall = true;
- }
- trapCount--;
- s = TextMeasurer.Measure(text, newRendererOptions(scaledFont) {
- Wrapping Width = target Width
- });
- }
- var center = new PointF(padding, imgSize.Height / 2);
- var textGraphicOptions = new TextGraphicsOptions() {
- Text Options = {
- Horizontal Alignment = Horizontal Alignment.Left,
- Vertical Alignment = Vertical Alignment.Center,
- WrapText Width = target Width
- }
- };
- return processing Context.DrawText(textGraphicOptions, text, scaledFont, color, center);
- }
- }
- }




Join the conversation! Your thoughts help the community grow.