

This article explains how to create a simple registration form with Kendo Panel Bar using WEB API 2 and Entity Framework 5.
Just create a Web API project as shown in Figures 1 & 2.
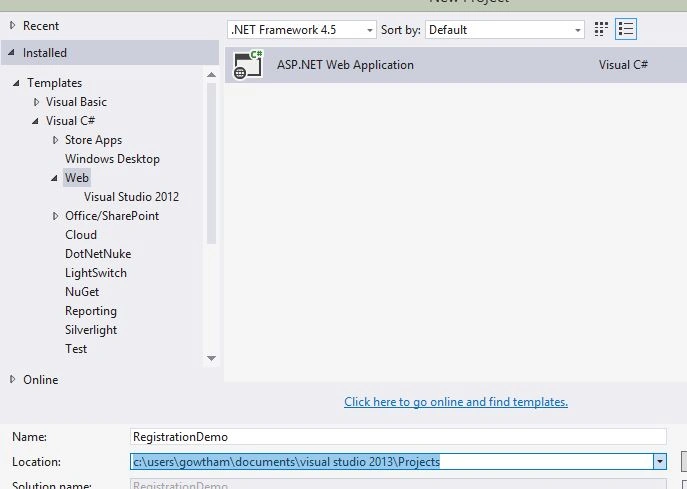
Figure 1

Figure 2
I am using the Entity Framework Code First technique to connect with the database.
Create a model class and name it Registration.
Use the following code in that class:
- public class Registration
- {
- [Key]
- [DatabaseGenerated(DatabaseGeneratedOption.Identity)]
- public int UserID { get; set; }
- [Required]
- public string FirstName { get; set; }
- public string MiddleName { get; set; }
- [Required]
- public string LastName { get; set; }
- [Required]
- public string UserName { get; set; }
- }
Use the following code in that class:
- public class RegistrationContext:DbContext
- {
- public RegistrationContext() : base("name=TestConnection") { }
- public DbSet<Registration> RegisterUser { get; set; }
- }
- <connectionStrings>
- <add name="TestConnection" connectionString="Data Source=your SQL server Name;Initial Catalog=Your Database Name;Integrated Security=True" providerName="System.Data.SqlClient" />
- </connectionStrings>
Build your project once to start scaffolding.
Add a controller as shown in Figures 3, 4 & 5.

Figure 3
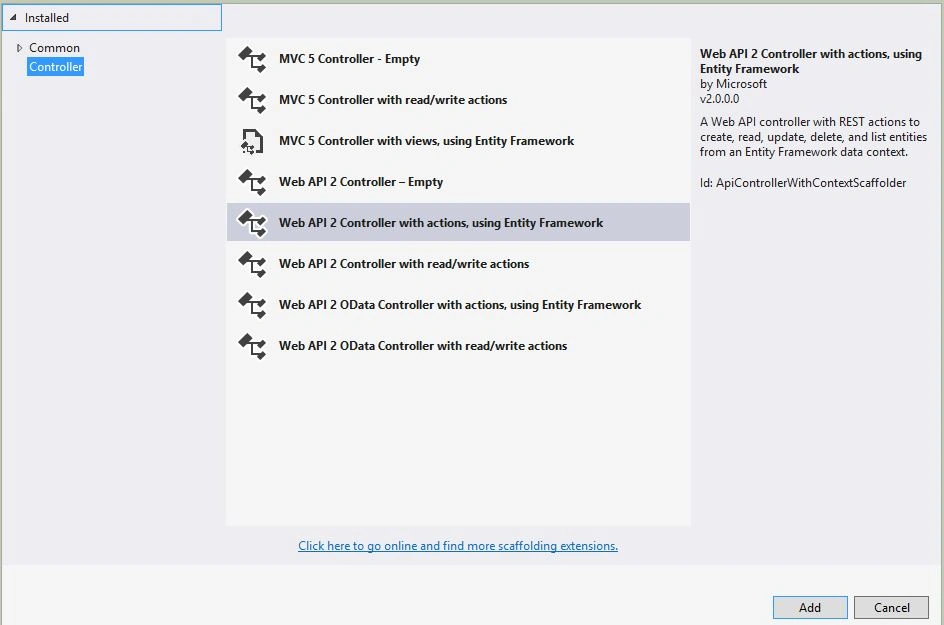
Figure 4
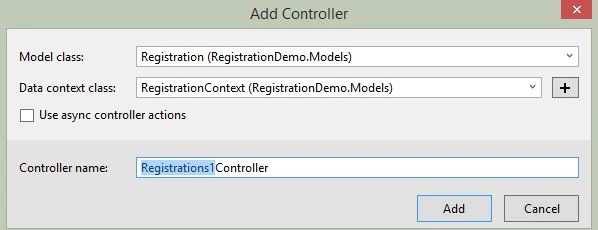
Figure 5
The following step will scaffold the REST full service in the Registration controller.
You will get some pre-defined HTTP GET, POST, PUT and DELETE request/responses in Registrations Controller. Modify the code based on your application requirements. For this example I did not change the code.
To insert a record into the registration table we should use HTTP POST request/response.
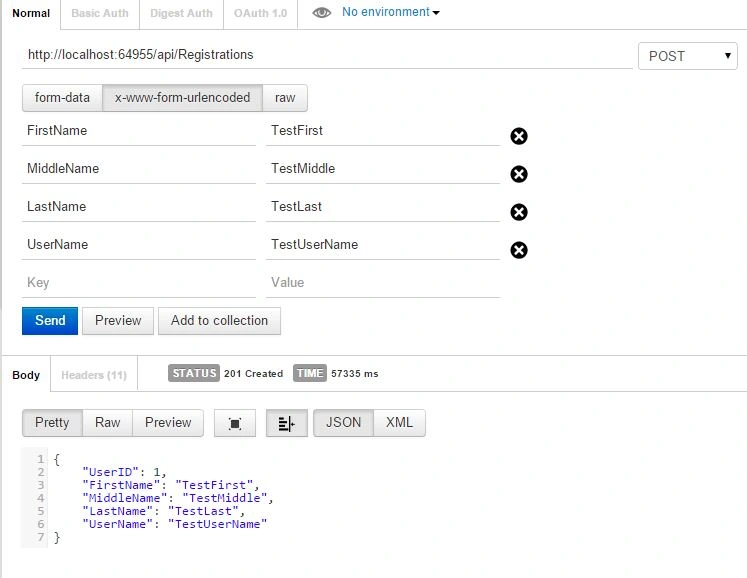
Figure 6
Design the UI to consume the REST HTTP POST service.
I have used the Kendo UI to Desgin with MVVM Pattern.
Here is my design:
- <!DOCTYPE html>
- <html
- xmlns="http://www.w3.org/1999/xhtml">
- <head>
- <title></title>
- <script type='text/javascript' src='http://ajax.googleapis.com/ajax/libs/jquery/1.10.2/jquery.min.js'></script>
- <link rel="stylesheet" href="http://cdn.kendostatic.com/2014.3.1316/styles/kendo.common.min.css" />
- <link rel="stylesheet" href="http://cdn.kendostatic.com/2014.3.1316/styles/kendo.default.min.css" />
- <link rel="stylesheet" href="http://cdn.kendostatic.com/2014.3.1316/styles/kendo.dataviz.min.css" />
- <link rel="stylesheet" href="http://cdn.kendostatic.com/2014.3.1316/styles/kendo.dataviz.default.min.css" />
- <script src="http://cdn.kendostatic.com/2014.3.1316/js/jquery.min.js"></script>
- <script src="http://cdn.kendostatic.com/2014.3.1316/js/kendo.all.min.js"></script>
- <script src="Js/RegisterViewModel.js"></script>
- </head>
- <body>
- <div id="example">
- <div id="RegistrationForm" class="demo-section k-header">
- <div class="container">
- <h4>Simple Registration Page Using Kendo Panel Bar</h4>
- <ul data-role="panelbar"
- style="width: 1130px">
- <li>
- <span>Personal Details</span>
- <div class="row">
- <div class="col-lg-3">
- <label for="fname">First Name:</label>
- </div>
- <div class="col-lg-3">
- <input id="fname" data-bind="value: firstName" class="k-textbox" required />
- </div>
- <div class="col-lg-3">
- <span class="k-invalid-msg" data-for="fname"></span>
- </div>
- </div>
- <div class="row">
- <div class="col-lg-3">
- <label for="mname">Middle Name:</label>
- </div>
- <div class="col-lg-3">
- <input id="mname" data-bind="value: MiddleName" class="k-textbox" />
- </div>
- </div>
- <div class="row">
- <div class="col-lg-3">
- <label for="lname">Last Name:</label>
- </div>
- <div class="col-lg-3">
- <input id="lname" data-bind="value: lastName" class="k-textbox" required />
- </div>
- </div>
- </li>
- <!--Second Pane Login Infomation-->
- <li>
- <span>Login Information</span>
- <div class="row">
- <div class="col-lg-3">
- <label for="UserName">User Name*:</label>
- </div>
- <div class="col-lg-3">
- <input id="UserName" data-bind="value: UserName" class="k-textbox" required />
- </div>
- </div>
- <div class="row">
- <div class="col-lg-3">
- <label for="password">Password*:</label>
- </div>
- <div class="col-lg-3">
- <input required type="password" id="Password" data-bind="value: Passsword" class="k-textbox" />
- </div>
- </div>
- <div class="row">
- <div class="col-lg-3">
- <label for="ConfirmPwd">Confirm Password*:</label>
- </div>
- <div class="col-lg-3">
- <input required type="password" id="ConfirmPwd" data-bind="value: ConfirmPwd" class="k-textbox" />
- </div>
- </div>
- </li>
- </ul>
- <input type="submit" id="btn_Submit1" value="Submit" class="k-button" onclick="RegisterUser()" />
- </div>
- </div>
- </div>
- </body>
- </html>
In browser as show in Figure 7,

Figure 7
- $(document).ready(function() {
- var viewModel = kendo.observable({
- firstName: null,
- MiddleName: null,
- lastName: null,
- UserName: null,
- isVisible: true,
- })
- kendo.bind($("#example"), viewModel);
- });
- function RegisterUser() {
- $.ajax({
- cache: false,
- async: false,
- type: "POST",
- url: "http://localhost:64955/api/Registrations",
- data: {
- FirstName: $("#fname").val(),
- MiddleName: $("#mname").val(),
- LastName: $("#lname").val(),
- UserName: $("#UserName").val()
- },
- success: function(data) {
- //alert(data);
- if (data == 'True') {
- ret = false;
- uploadWindow.close();
- window.location = SubmitURL;
- } else ret = true;
- },
- error: function(jqXHR, exception) {
- alert(errorHandling(jqXHR, exception));
- }
- });
- }
Insert a record using the Kendo UI Panel bar as shown in Figure 8.
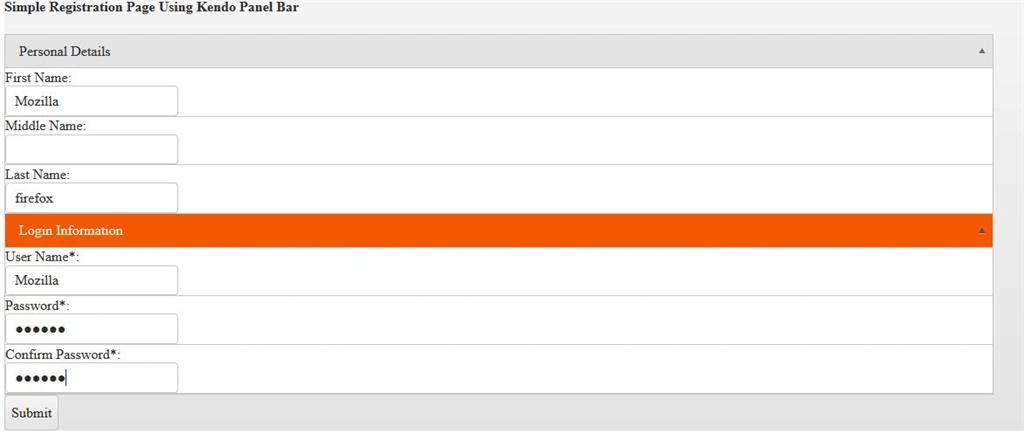
Figure 8
Check your database table.
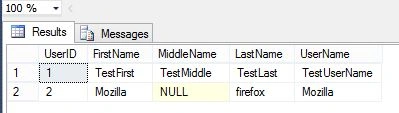
Hooray! The records are inserted.
That's it, enjoy coding.
pravati santaraPosted May 12, 2018, 1:27 PM
Not at all working i have tried for whole day .....how come u post this with issue ????
Arul RPosted Oct 28, 2015, 5:57 AM
Nice share!!!
NitinPosted Jun 15, 2015, 10:26 AM
good one
Former memberPosted Jun 15, 2015, 8:22 AM
Nice article
Debasis SahaPosted Jun 15, 2015, 6:13 AM
good one
Santhakumar MunuswamyPosted Jun 14, 2015, 2:45 PM
Thanks for nice article :)