
Introduction
In this article, we will learn how to implement Spring.NET IOC container/ Dependency Injection in ASP.NET MVC 5. In this example, we are going to create a basic application, and share the different steps to perform Spring.NET IOC in ASP.NET MVC5.
What’s Spring.NET?
Spring.NET is an open source Application Framework, which makes building enterprise .NET Applications easier.
Providing components based on proven design patterns that can be integrated into all tiers of your Application architecture, Spring helps in increasing development productivity and improving the application quality and performance.

In this article, we are going to,
- Create a database.
- Create MVC Application.
- Configuring Entity Framework ORM.
- Create repository.
- Configuring Spring.NET.
- Create controller.
SQL database part
Here, you can find the scripts to create a database and a table.
Create database
- USE [master]
- GO
- /****** Object: Database[DBCustomer] Script Date: 3/19/2017 3:54:44 AM ******/
- CREATEDATABASE [DBCustomer]
- CONTAINMENT = NONE
- ON PRIMARY
- ( NAME= N'DBCustomer', FILENAME = N'c:\Program Files (x86)\Microsoft SQL Server\MSSQL11.MSSQLSERVER\MSSQL\DATA\DBCustomer.mdf' , SIZE = 3072KB , MAXSIZE = UNLIMITED, FILEGROWTH = 1024KB )
- LOG ON
- ( NAME= N'DBCustomer_log', FILENAME = N'c:\Program Files (x86)\Microsoft SQL Server\MSSQL11.MSSQLSERVER\MSSQL\DATA\DBCustomer_log.ldf', SIZE = 1024KB , MAXSIZE = 2048GB , FILEGROWTH = 10%)
- GO
- ALTERDATABASE[DBCustomer] SET COMPATIBILITY_LEVEL = 110
- GO
- IF (1 = FULLTEXTSERVICEPROPERTY('IsFullTextInstalled'))
- begin
- EXEC[DBCustomer].[dbo].[sp_fulltext_database] @action= 'enable'
- end
- GO
- ALTERDATABASE[DBCustomer] SET ANSI_NULL_DEFAULT OFF
- GO
- ALTERDATABASE[DBCustomer] SET ANSI_NULLS OFF
- GO
- ALTERDATABASE[DBCustomer] SET ANSI_PADDING OFF
- GO
- ALTERDATABASE[DBCustomer] SET ANSI_WARNINGS OFF
- GO
- ALTERDATABASE[DBCustomer] SET ARITHABORT OFF
- GO
- ALTERDATABASE[DBCustomer] SET AUTO_CLOSE OFF
- GO
- ALTERDATABASE[DBCustomer] SET AUTO_CREATE_STATISTICS ON
- GO
- ALTERDATABASE[DBCustomer] SET AUTO_SHRINK OFF
- GO
- ALTERDATABASE[DBCustomer] SET AUTO_UPDATE_STATISTICS ON
- GO
- ALTERDATABASE[DBCustomer] SET CURSOR_CLOSE_ON_COMMIT OFF
- GO
- ALTERDATABASE[DBCustomer] SET CURSOR_DEFAULT GLOBAL
- GO
- ALTERDATABASE[DBCustomer] SET CONCAT_NULL_YIELDS_NULL OFF
- GO
- ALTERDATABASE[DBCustomer] SET NUMERIC_ROUNDABORT OFF
- GO
- ALTERDATABASE[DBCustomer] SET QUOTED_IDENTIFIER OFF
- GO
- ALTERDATABASE[DBCustomer] SET RECURSIVE_TRIGGERS OFF
- GO
- ALTERDATABASE[DBCustomer] SET DISABLE_BROKER
- GO
- ALTERDATABASE[DBCustomer] SET AUTO_UPDATE_STATISTICS_ASYNC OFF
- GO
- ALTERDATABASE[DBCustomer] SET DATE_CORRELATION_OPTIMIZATION OFF
- GO
- ALTERDATABASE[DBCustomer] SET TRUSTWORTHY OFF
- GO
- ALTERDATABASE[DBCustomer] SET ALLOW_SNAPSHOT_ISOLATION OFF
- GO
- ALTERDATABASE[DBCustomer] SET PARAMETERIZATION SIMPLE
- GO
- ALTERDATABASE[DBCustomer] SET READ_COMMITTED_SNAPSHOT OFF
- GO
- ALTERDATABASE[DBCustomer] SET HONOR_BROKER_PRIORITY OFF
- GO
- ALTERDATABASE[DBCustomer] SET RECOVERY SIMPLE
- GO
- ALTERDATABASE[DBCustomer] SET MULTI_USER
- GO
- ALTERDATABASE[DBCustomer] SET PAGE_VERIFY CHECKSUM
- GO
- ALTERDATABASE [DBCustomer] SET DB_CHAINING OFF
- GO
- ALTERDATABASE [DBCustomer] SET FILESTREAM( NON_TRANSACTED_ACCESS = OFF )
- GO
- ALTERDATABASE [DBCustomer] SET TARGET_RECOVERY_TIME = 0 SECONDS
- GO
- ALTERDATABASE [DBCustomer] SET READ_WRITE
- GO
- CreateTables
- USE [DBCustomer]
- GO
- /****** Object: Table[dbo].[Customer] Script Date: 3/19/2017 3:55:15 AM ******/
- SETANSI_NULLS ON
- GO
- SETQUOTED_IDENTIFIER ON
- GO
- SETANSI_PADDING ON
- GO
- CREATETABLE [dbo].[Customer](
- [CustID] [int] IDENTITY(1,1) NOT NULL,
- [FirstName] [varchar](50) NULL,
- [LastName] [varchar](50) NULL,
- [Email] [varchar](50) NULL,
- [Country] [varchar](50) NULL,
- CONSTRAINT [PK_Customer] PRIMARY KEY CLUSTERED
- (
- [CustID] ASC
- )WITH(PAD_INDEX = OFF, STATISTICS_NORECOMPUTE = OFF, IGNORE_DUP_KEY = OFF, ALLOW_ROW_LOCKS = ON, ALLOW_PAGE_LOCKS = ON) ON [PRIMARY]
- ) ON[PRIMARY]
- GO
- SETANSI_PADDING OFF
- GO
Create your MVC Application
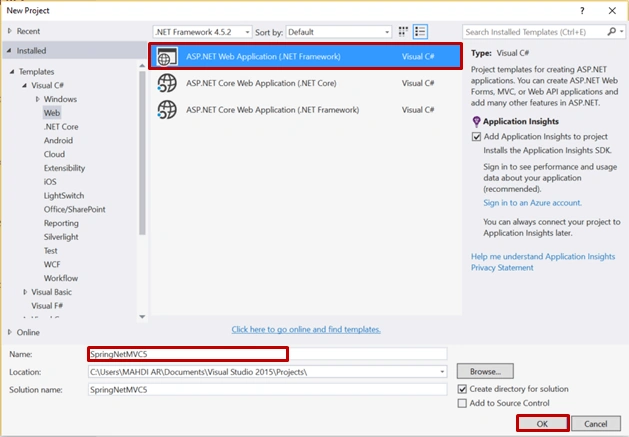
Open Visual Studio and select File >> New Project.
The New Project Window will pop up. Select ASP.NET Web Application (.NET Framework), name your project and click OK.
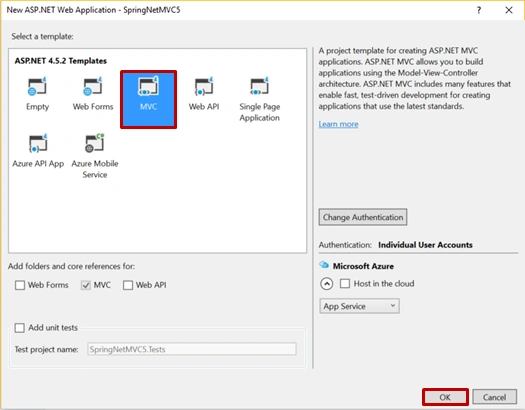
Now, new dialog will pop up to select the template. We are going to choose MVC template and click OK button.
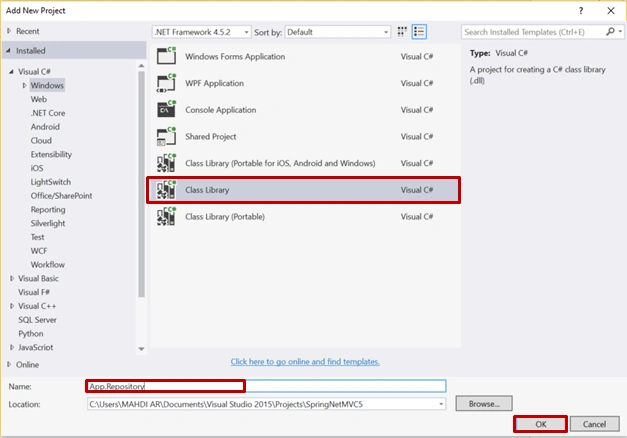
After creating our project, we are going to add Class Library. For this, right click on the project name >> New Project >> Class Library.
Our class library named App.Repository will look, as shown below.
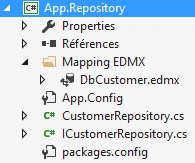
Configuring EntityFramework ORM
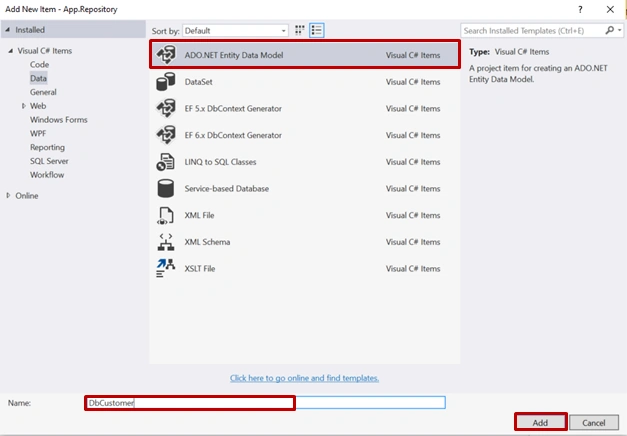
To add ADO.NET Entity Framework, right click on Mapping EDMX file >> Add >> Add New Item. Dialog box will pop up. Inside Visual C#, select Data >> ADO.NET Entity Data Model and enter a name for your Dbcontext model as DbCustomer.
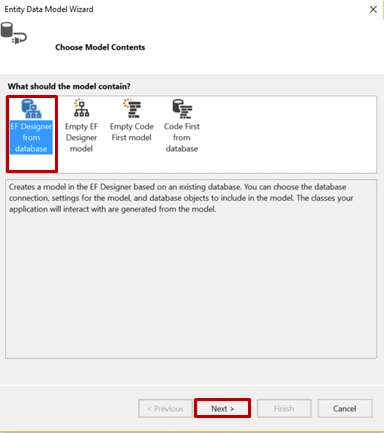
Now, we need to choose EF Designer from the database, which model contains.
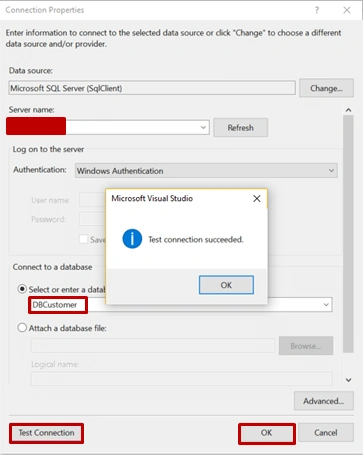
As you can see below, we need to select Server name, then via dropdown list; connect to a database panel. You should choose your database name. Finally, click OK.
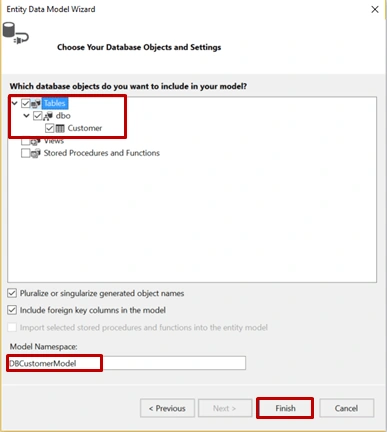
Now, the dialog Entity Data Model Wizard will pop up to choose the object, which we need to use. In our case, we are going to choose Customer table and click Finish button.
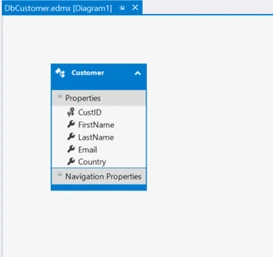
Finally, we see that EDMX model generates a Customer class.
Create Repository
ICustomerRepository.cs
- using App.Repository.Mapping_EDMX;
- using System;
- using System.Collections.Generic;
- using System.Linq;
- using System.Text;
- using System.Threading.Tasks;
- namespace App.Repository
- {
- public interface ICustomerRepository
- {
- IQueryable<Customer> GetAllCustomer();
- }
- }
CustomerRepository.cs
- using System;
- using System.Collections.Generic;
- using System.Linq;
- using System.Text;
- using System.Threading.Tasks;
- using App.Repository.Mapping_EDMX;
- namespace App.Repository
- {
- public class CustomerRepository : ICustomerRepository
- {
- DBCustomerEntities db = new DBCustomerEntities();
- public IQueryable<Customer> GetAllCustomer()
- {
- return db.Customers.AsQueryable();
- }
- }
- }
The next step is to configure Spring.NET IOC. Let’s start.
Configuring Spring.NET
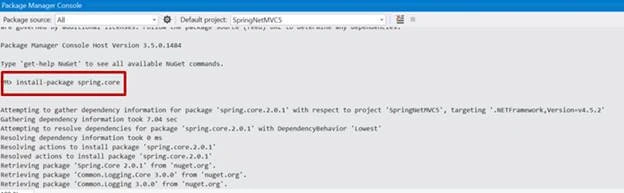
You can get Spring.NET by using Package Manager Console and run the command given below:
PM> install-package spring.core
Once Sprint.NET is installed. We are going to add class, which handles Spring.NET Application context.
SpringApplicationContext.cs
- using Spring.Context;
- using Spring.Context.Support;
- using System;
- using System.Collections.Generic;
- using System.Linq;
- using System.Web;
- namespace SpringNetMVC5
- {
- /// <summary>
- /// Spring Application Context.
- /// </summary>
- public static class SpringApplicationContext
- {
- /// <summary>
- ///
- /// </summary>
- private static IApplicationContext Context { get; set; }
- /// <summary>
- /// Returns a boolean value if the current application context contains an named object.
- /// </summary>
- /// <param name=”objectName”>Accepts the name of the object to check.</param>
- public static bool Contains(string objectName)
- {
- SpringApplicationContext.EnsureContext();
- return SpringApplicationContext.Context.ContainsObject(objectName);
- }
- /// <summary>
- /// Return a instance of an object in the context by the specified name.
- /// </summary>
- /// <param name=”objectName”>Accepts a string object name.</param>
- public static object Resolve(string objectName)
- {
- SpringApplicationContext.EnsureContext();
- return SpringApplicationContext.Context.GetObject(objectName);
- }
- /// <summary>
- /// Return a instance of an object in the context by the specified name and type.
- /// </summary>
- /// <typeparam name=”T”>Accepts the type of the object to resolve.</typeparam>
- /// <param name=”objectName”>Accepts a string object name.</param>
- public static T Resolve<T>(string objectName)
- {
- return (T)SpringApplicationContext.Resolve(objectName);
- }
- /// <summary>
- ///
- /// </summary>
- private static void EnsureContext()
- {
- if (SpringApplicationContext.Context == null)
- {
- SpringApplicationContext.Context = ContextRegistry.GetContext();
- }
- }
- }
- }
In the next step we need to add a controller factory that allows Spring.NET to manage your controllers.
SpringControllerFactory.cs
- using System;
- using System.Collections.Generic;
- using System.Linq;
- using System.Web;
- using System.Web.Mvc;
- namespace SpringNetMVC5
- {
- public class SpringControllerFactory : DefaultControllerFactory, IControllerFactory
- {
- #region IControllerFactory Memebers
- IController IControllerFactory.CreateController(System.Web.Routing.RequestContext requestContext, string controllerName)
- {
- IController controller = null;
- string controllerClassName = string.Format("{0}Controller", controllerName);
- if (SpringApplicationContext.Contains(controllerClassName))
- {
- controller = SpringApplicationContext.Resolve<IController>(controllerClassName);
- }
- else
- {
- try
- {
- controller = base.CreateController(requestContext, controllerName);
- }
- catch (Exception ex)
- {
- throw ex;
- }
- }
- return controller;
- }
- #endregion
- void IControllerFactory.ReleaseController(IController controller)
- {
- IDisposable disposable = controller as IDisposable;
- if (disposable != null)
- {
- disposable.Dispose();
- }
- }
- }
- }
Web.config
Add the spring config given below to <configSections></configSections>
- <!-- SPRING -->
- <sectionGroup name="spring">
- <section name="context" type="Spring.Context.Support.ContextHandler, Spring.Core"/>
- <section name="objects" type="Spring.Context.Support.DefaultSectionHandler, Spring.Core"/>
- </sectionGroup>
- <!--END SPRING-->
- Here, we are going to configure spring object by adding the following config to <configuration></configuration>.
- <!—Spring Configuration -->
- <spring>
- <context>
- <resource uri="config://spring/objects"/>
- </context>
- <objects xmlns="http://www.springframework.net">
- <object name="CustomerRepositoryService"
- type="App.Repository.CustomerRepository,App.Repository"/>
- <object name="CustomerController" type="SpringNetMVC5.Controllers.CustomerController, SpringNetMVC5" singleton="false">
- <property name="CustomerRepository" ref="CustomerRepositoryService"/>
- </object>
- </objects>
- </spring>
- <!-- END Spring Configuration -->
Note
Please make sure that SpringControllerFactory class has been added at Application_Start() method.
- using System;
- using System.Collections.Generic;
- using System.Linq;
- using System.Web;
- using System.Web.Mvc;
- using System.Web.Optimization;
- using System.Web.Routing;
- namespace SpringNetMVC5
- {
- public class MvcApplication : System.Web.HttpApplication
- {
- protected void Application_Start()
- {
- AreaRegistration.RegisterAllAreas();
- FilterConfig.RegisterGlobalFilters(GlobalFilters.Filters);
- RouteConfig.RegisterRoutes(RouteTable.Routes);
- BundleConfig.RegisterBundles(BundleTable.Bundles);
- ControllerBuilder.Current.SetControllerFactory(typeof(SpringControllerFactory));
- }
- }
- }
Create a controller
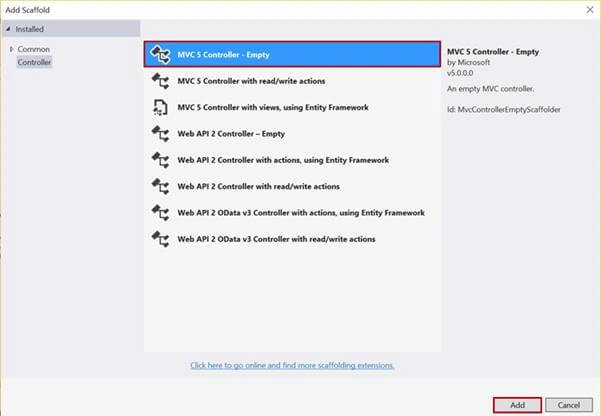
Now, we are going to create a controller. Right click on the controllers folder >> Add >> Controller>> select MVC5 Controller>> Empty >> click Add.
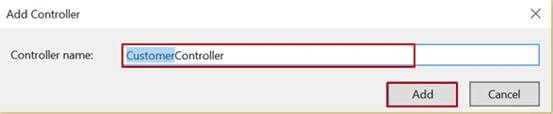
Enter Controller name (‘CustomerController’).
CustomerController.cs
- using App.Repository;
- using System;
- using System.Collections.Generic;
- using System.Linq;
- using System.Web;
- using System.Web.Mvc;
- namespace SpringNetMVC5.Controllers
- {
- public class CustomerController : Controller
- {
- public ICustomerRepository CustomerRepository { get; set; }
- // GET: Customer
- public ActionResult Index()
- {
- var customerList = CustomerRepository.GetAllCustomer();
- return View(customerList);
- }
- }
- }
Here, I am creating Index() action to retrieve data from Customer table in JSON format. As you can see, I have used CustomerRepository as a property, which is injected by Spring.NET in order to return the customers data.
Adding View
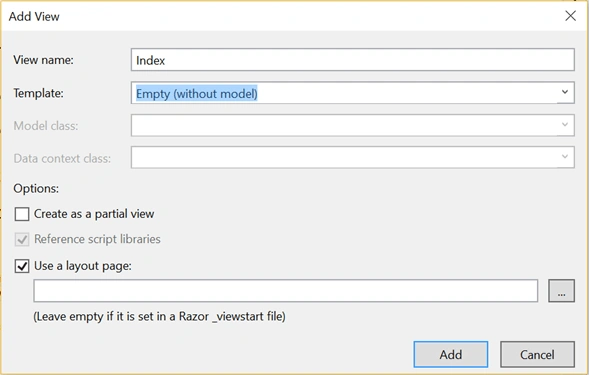
It’s easy to do. Just right click on Index() action, select Add View and the dialog will pop up. Write a name for your view and finally click Add.
Index.cshtml
- @model IEnumerable<App.Repository.Mapping_EDMX.Customer>
- @{
- ViewBag.Title = "Index";
- }
- <h2>Index</h2>
- <p>
- @Html.ActionLink("Create New", "Create")
- </p>
- <table class="table">
- <tr>
- <th>
- @Html.DisplayNameFor(model => model.CustID)
- </th>
- <th>
- @Html.DisplayNameFor(model => model.FirstName)
- </th>
- <th>
- @Html.DisplayNameFor(model => model.LastName)
- </th>
- <th>
- @Html.DisplayNameFor(model => model.Email)
- </th>
- <th>
- @Html.DisplayNameFor(model => model.Country)
- </th>
- <th></th>
- </tr>
- @foreach (var item in Model) {
- <tr>
- <td>
- @Html.DisplayFor(modelItem => item.CustID)
- </td>
- <td>
- @Html.DisplayFor(modelItem => item.FirstName)
- </td>
- <td>
- @Html.DisplayFor(modelItem => item.LastName)
- </td>
- <td>
- @Html.DisplayFor(modelItem => item.Email)
- </td>
- <td>
- @Html.DisplayFor(modelItem => item.Country)
- </td>
- <td>
- @Html.ActionLink("Edit", "Edit", new { /* id=item.PrimaryKey */ }) |
- @Html.ActionLink("Details", "Details", new { /* id=item.PrimaryKey */ }) |
- @Html.ActionLink("Delete", "Delete", new { /* id=item.PrimaryKey */ })
- </td>
- </tr>
- }
- </table>
Output
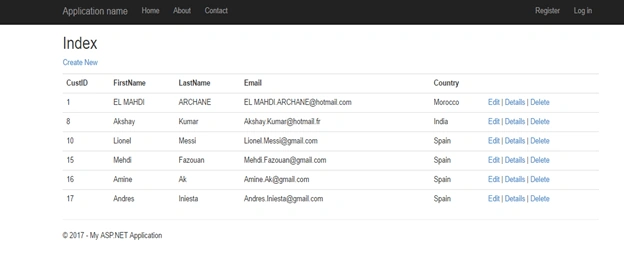
Now, you can run your Application. Let’s see the output.
Rajesh KadamPosted Mar 28, 2017, 1:35 AM
Good article. But, it would be great if you can share the basic difference in terms of advantage over the normal MVC application. Thank you..
Manav PandyaPosted Mar 27, 2017, 12:16 AM
Thanks for sharing sir ...