

Introduction
Prerequisites
Basic knowledge of ASP.NET Web API, jQuery, and Kendo UI.
Before going through this article, I strongly recommend you refer to my previous article where I have explained how to implement the kendo panel bar with remote databinding.
Remote Data Source for Kendo UI Panel Bar
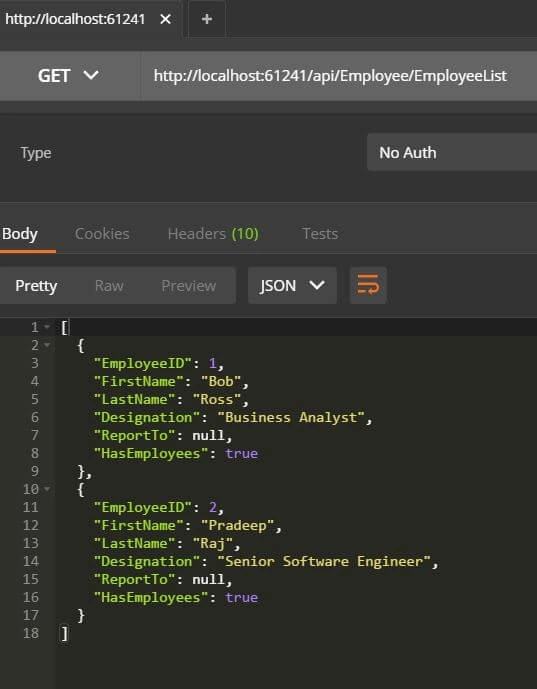
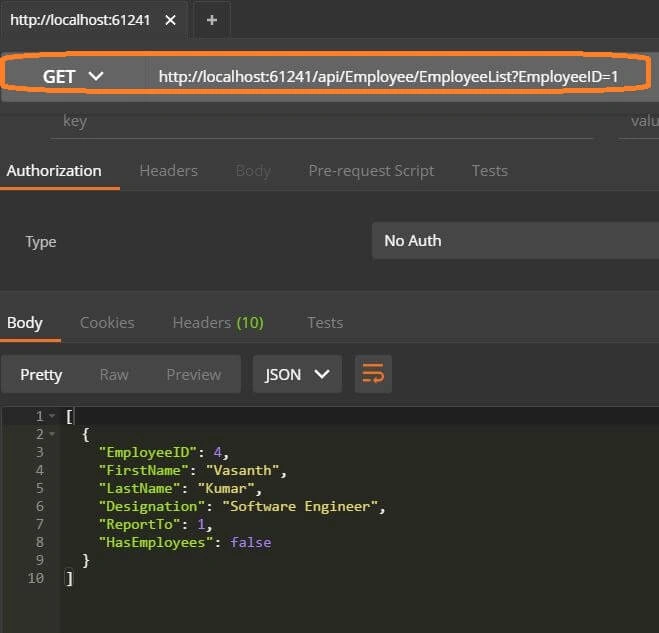
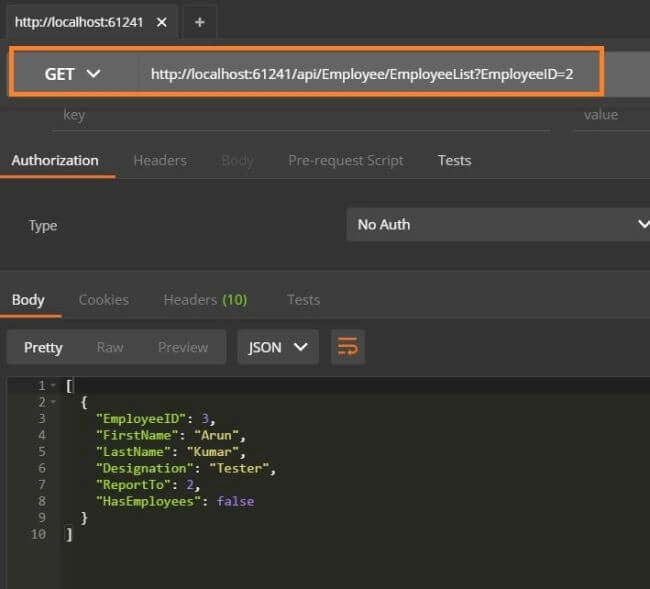
I’m going to use the following remote datasource which is created in my previous article with the help of ASP.NET WEB API and Entity Framework.
API - /api/Employee/EmployeeList.
Type - GET.
API - /api/Employee/EmployeeList?EmployeeID=[EmployeeID]
Type - GET.
Templates in kendo Panel Bar
Templates are mainly used for customizing the information which is rendering each node in the panel bar. This can easily be achieved using the template property in the Kendo panel bar.
PanelBar.html
- <!DOCTYPE html>
- <html>
- <head>
- <title>Kendo Panel Bar</title>
- <meta charset="utf-8" />
- <link rel="stylesheet" href="http://kendo.cdn.telerik.com/2017.1.118/styles/kendo.common.min.css">
- <link rel="stylesheet" href="http://kendo.cdn.telerik.com/2017.1.118/styles/kendo.rtl.min.css">
- <link rel="stylesheet" href="http://kendo.cdn.telerik.com/2017.1.118/styles/kendo.default.min.css">
- <link rel="stylesheet" href="http://kendo.cdn.telerik.com/2017.1.118/styles/kendo.mobile.all.min.css">
- <script src="http://code.jquery.com/jquery-1.12.3.min.js"></script>
- <script src="http://kendo.cdn.telerik.com/2017.1.118/js/angular.min.js"></script>
- <script src="http://kendo.cdn.telerik.com/2017.1.118/js/jszip.min.js"></script>
- <script src="http://kendo.cdn.telerik.com/2017.1.118/js/kendo.all.min.js"></script>
- </head>
- <body>
- <h3>Kendo Panel Bar</h3>
- <div id="example">
- <div class="demo-section k-content">
- <div id="panelbar"></div>
- </div>
- <script>
- var homogeneous = new kendo.data.HierarchicalDataSource({
- transport: {
- read: {
- url: "/api/Employee/EmployeeList",
- dataType: "json"
- }
- },
- schema: {
- model: {
- id: "EmployeeID",
- hasChildren: "HasEmployees"
- }
- }
- });
- $("#panelbar").kendoPanelBar({
- template:"#=item.FirstName# #=item.LastName# - #=item.Designation#",
- dataSource: homogeneous,
- dataTextField: "FirstName"
- });
- </script>
- </div>
- </body>
- </html>
From the above code, you can observe that the template property is used while defining the kendo panel bar. The template is decorated/customized in the way which is used to display the firstname and lastname of the employee with his designation.
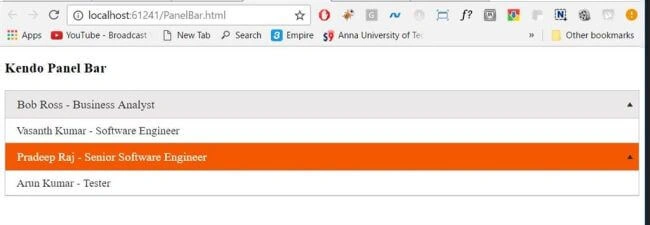
You can perform the same operation by creating the template in separate script.
- <!DOCTYPE html>
- <html>
- <head>
- <title>Kendo Panel Bar</title>
- <meta charset="utf-8" />
- <link rel="stylesheet" href="http://kendo.cdn.telerik.com/2017.1.118/styles/kendo.common.min.css">
- <link rel="stylesheet" href="http://kendo.cdn.telerik.com/2017.1.118/styles/kendo.rtl.min.css">
- <link rel="stylesheet" href="http://kendo.cdn.telerik.com/2017.1.118/styles/kendo.default.min.css">
- <link rel="stylesheet" href="http://kendo.cdn.telerik.com/2017.1.118/styles/kendo.mobile.all.min.css">
- <script src="http://code.jquery.com/jquery-1.12.3.min.js"></script>
- <script src="http://kendo.cdn.telerik.com/2017.1.118/js/angular.min.js"></script>
- <script src="http://kendo.cdn.telerik.com/2017.1.118/js/jszip.min.js"></script>
- <script src="http://kendo.cdn.telerik.com/2017.1.118/js/kendo.all.min.js"></script>
- </head>
- <body>
- <h3>Kendo Panel Bar</h3>
- <div id="example">
- <div class="demo-section k-content">
- <div id="panelbar"></div>
- </div>
- <script id="panelbar-template" type="text/kendo-ui-template">
- #:item.FirstName# #: item.LastName# - #: item.Designation#
- </script>
- <script>
- var homogeneous = new kendo.data.HierarchicalDataSource({
- transport: {
- read: {
- url: "/api/Employee/EmployeeList",
- dataType: "json"
- }
- },
- schema: {
- model: {
- id: "EmployeeID",
- hasChildren: "HasEmployees"
- }
- }
- });
- $("#panelbar").kendoPanelBar({
- template: kendo.template($("#panelbar-template").html()),
- dataSource: homogeneous,
- dataTextField: "FirstName"
- });
- </script>
- </div>
- </body>
- </html>
Figure 5
Template with condition
- <!DOCTYPE html>
- <html>
- <head>
- <title>Kendo Panel Bar</title>
- <meta charset="utf-8" />
- <link rel="stylesheet" href="http://kendo.cdn.telerik.com/2017.1.118/styles/kendo.common.min.css">
- <link rel="stylesheet" href="http://kendo.cdn.telerik.com/2017.1.118/styles/kendo.rtl.min.css">
- <link rel="stylesheet" href="http://kendo.cdn.telerik.com/2017.1.118/styles/kendo.default.min.css">
- <link rel="stylesheet" href="http://kendo.cdn.telerik.com/2017.1.118/styles/kendo.mobile.all.min.css">
- <script src="http://code.jquery.com/jquery-1.12.3.min.js"></script>
- <script src="http://kendo.cdn.telerik.com/2017.1.118/js/angular.min.js"></script>
- <script src="http://kendo.cdn.telerik.com/2017.1.118/js/jszip.min.js"></script>
- <script src="http://kendo.cdn.telerik.com/2017.1.118/js/kendo.all.min.js"></script>
- </head>
- <body>
- <h3>Kendo Panel Bar</h3>
- <div id="example">
- <div class="demo-section k-content">
- <div id="panelbar"></div>
- </div>
- <script id="panelbar-template" type="text/kendo-ui-template">
- #if(item.HasEmployees){#
- #: item.FirstName# #: item.LastName# - #: item.Designation#
- #}
- else{#
- #: item.FirstName# #: item.LastName#
- #}#
- </script>
- <script>
- var homogeneous = new kendo.data.HierarchicalDataSource({
- transport: {
- read: {
- url: "/api/Employee/EmployeeList",
- dataType: "json"
- }
- },
- schema: {
- model: {
- id: "EmployeeID",
- hasChildren: "HasEmployees"
- }
- }
- });
- $("#panelbar").kendoPanelBar({
- template: kendo.template($("#panelbar-template").html()),
- dataSource: homogeneous,
- dataTextField: "FirstName"
- });
- </script>
- </div>
- </body>
- </html>
Based on the HasEmployee property value, the panel node value is customized. If the HasEmployee value is true it is going to display first name and last name with designation or else it is going to display the firstname and lastName.
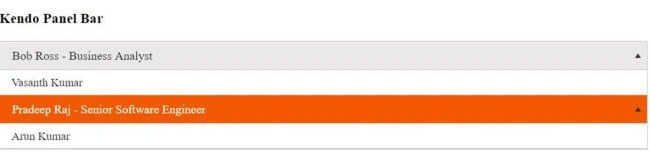
Figure 6
Template with HTML tags
PanelBar.html
- <!DOCTYPE html>
- <html>
- <head>
- <title>Kendo Panel Bar</title>
- <meta charset="utf-8" />
- <link rel="stylesheet" href="http://kendo.cdn.telerik.com/2017.1.118/styles/kendo.common.min.css">
- <link rel="stylesheet" href="http://kendo.cdn.telerik.com/2017.1.118/styles/kendo.rtl.min.css">
- <link rel="stylesheet" href="http://kendo.cdn.telerik.com/2017.1.118/styles/kendo.default.min.css">
- <link rel="stylesheet" href="http://kendo.cdn.telerik.com/2017.1.118/styles/kendo.mobile.all.min.css">
- <script src="http://code.jquery.com/jquery-1.12.3.min.js"></script>
- <script src="http://kendo.cdn.telerik.com/2017.1.118/js/angular.min.js"></script>
- <script src="http://kendo.cdn.telerik.com/2017.1.118/js/jszip.min.js"></script>
- <script src="http://kendo.cdn.telerik.com/2017.1.118/js/kendo.all.min.js"></script>
- </head>
- <body>
- <h3>Kendo Panel Bar</h3>
- <div id="example">
- <div class="demo-section k-content">
- <div id="panelbar"></div>
- </div>
- <script id="panelbar-template" type="text/kendo-ui-template">
- #if(item.HasEmployees){#
- <b>#:item.FirstName# #: item.LastName# </b> - <label style='font-style:italic'> #: item.Designation# </label>
- #}
- else{#
- <b> #: item.FirstName# #: item.LastName# </b>
- #}#
- </script>
- <script>
- var homogeneous = new kendo.data.HierarchicalDataSource({
- transport: {
- read: {
- url: "/api/Employee/EmployeeList",
- dataType: "json"
- }
- },
- schema: {
- model: {
- id: "EmployeeID",
- hasChildren: "HasEmployees"
- }
- }
- });
- $("#panelbar").kendoPanelBar({
- template: kendo.template($("#panelbar-template").html()),
- dataSource: homogeneous,
- dataTextField: "FirstName"
- });
- </script>
- </div>
- </body>
- </html>
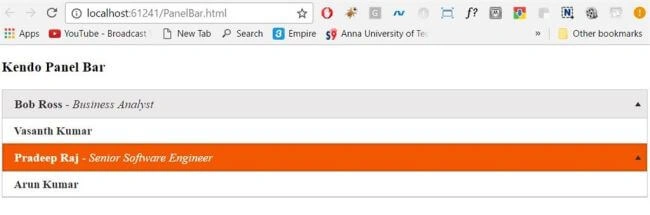
Figure 7
Sneha SharmaPosted Aug 11, 2017, 2:42 AM
Kendo Framework...when we click to menu option in panel bar, submenu should be open and at the same time menu option will disappear. how to do this? is important please suggest answers