

In this article, we are going to create a web application using Blazor, .Net 6.0 with the help of Entity Framework Core perform CRUD operations hosted by Asp.Net Core.
Here I am going to use Visual Studio 2022 and SQL Server 2014.
Creating Table
We will use the “userdetails” table to perform CRUD operations. Open SQL Server and create the “userdetails” table using the below query.
CREATE TABLE [dbo].[userdetails](
    [userid] [int] IDENTITY(1,1) NOT NULL,
    [username] [nvarchar](100) NULL,
    [address] [nvarchar](500) NULL,
    [cellnumber] [nvarchar](50) NULL,
    [emailid] [nvarchar](50) NULL,
    CONSTRAINT [PK_userdetails] PRIMARY KEY CLUSTERED
    (
        [userid] ASC
    )
)
Create Blazor Web Application
Here we will create a new project using Blazor WebAssembly App and .Net 6.0. Now open Visual Studio 2022 and follow the below steps.
Step 1
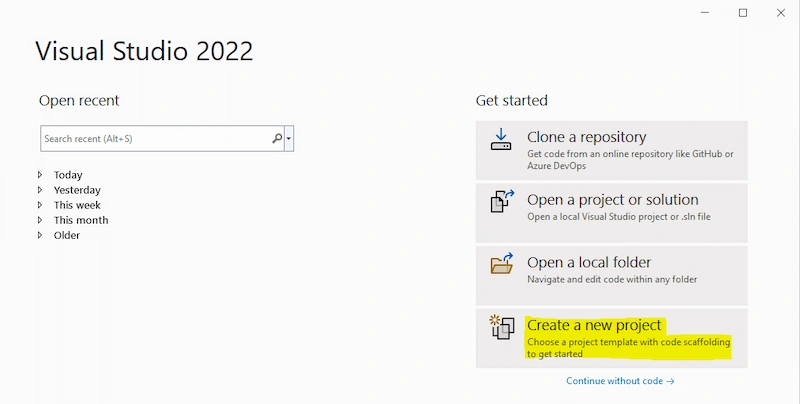
Step 2
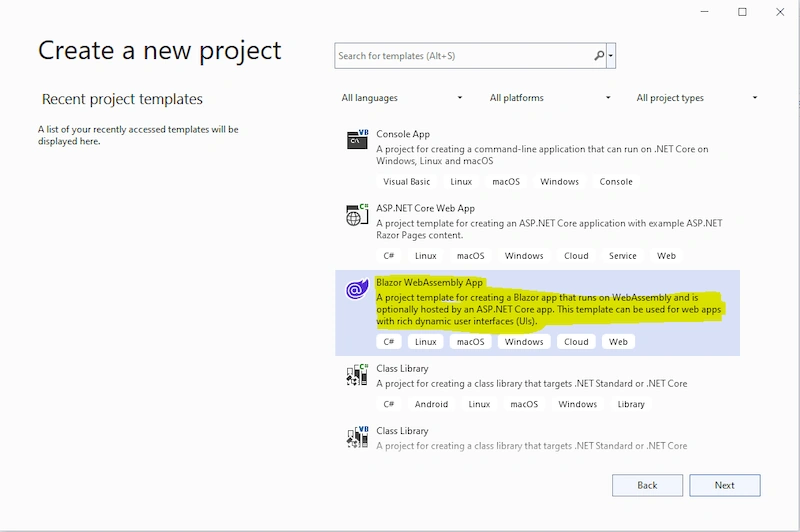
In this step we will select “Blazor WebAssembly App” project type.
Step 3
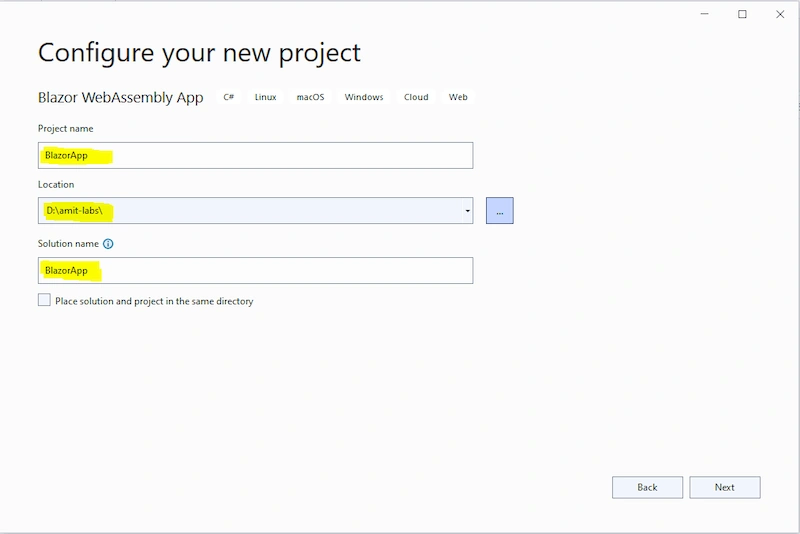
Step 4
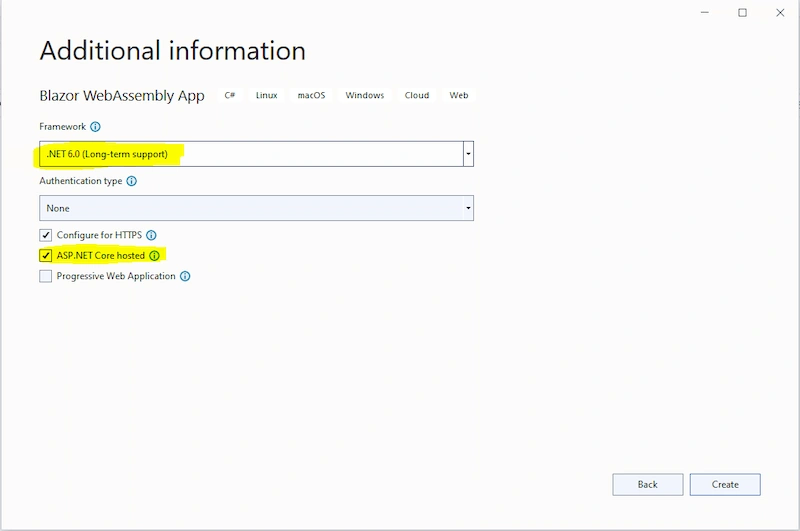
Here we will select Framework type as .NET 6.0 and also select the ASP.NET Core hosted option.
Now, our Blazor application will be created and the folder structure in Solution Explorer as given in the below image.
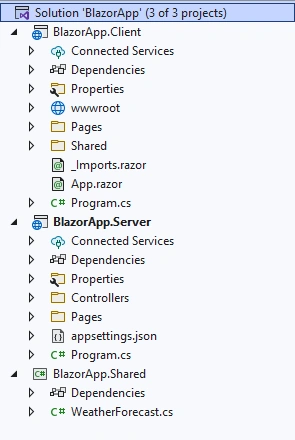
In the above image we can see that we have 3 project files created inside the “BlazorApp” solution.
- BlazorApp.Client – It contains the client side code and the pages that will be rendered on the browser.
- BlazorApp.Server – It contains the server side codes like database connection, operations and web API.
- BlazorApp.Shared – It contains the shared code that can be accessed by both client and server.
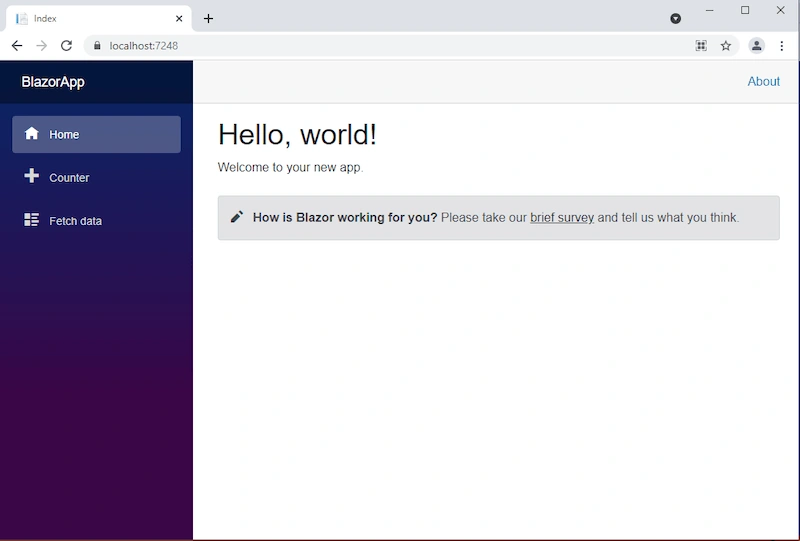
If now we run the application by pressing F5, then we can see a landing page of the application similar to the below image.
Install Required Nuget Packages
Go to “Tools” menu, select NuGet Package Manager > Package Manager Console
and then run the below commands to add database provider and Entity Framework Tools.
=> Install-Package Microsoft.EntityFrameworkCore.SqlServer
=> Install-Package Microsoft.EntityFrameworkCore.Tools
Adding the Model to the Application
Now we will create a Model class which will contain the User model properties.
To do that right click on “BlazorApp.Shared” project and add a New Folder as “Models”.
Then right click on “Models” folder and add a Class as “User.cs”.
Now open “User.cs” file and paste the below code to it.
using System;
using System.Collections.Generic;
using System.Linq;
using System.Text;
using System.Threading.Tasks;
namespace BlazorApp.Shared.Models
{
    public class User
    {
        public int Userid { get; set; }
        public string Username { get; set; } = null!;
        public string Address { get; set; } = null!;
        public string Cellnumber { get; set; } = null!;
        public string Emailid { get; set; } = null!;
    }
}
Adding Data Access Layer to the Application
Now we will create a “DatabaseContext.cs” class where we define database connection. To do that right click on “BlazorApp.Server” project and add a folder as “Models”. Add “DatabaseContext.cs” file to the “Models” folder and put the below code to it.
using BlazorApp.Shared.Models;
using Microsoft.EntityFrameworkCore;
namespace BlazorApp.Server.Models
{
    public partial class DatabaseContext : DbContext
    {
        public DatabaseContext()
        {
        }
        public DatabaseContext(DbContextOptions<DatabaseContext> options)
            : base(options)
        {
        }
        public virtual DbSet<User> Users { get; set; } = null!;
        protected override void OnModelCreating(ModelBuilder modelBuilder)
        {
            modelBuilder.Entity<User>(entity =>
            {
                entity.ToTable("userdetails");
                entity.Property(e => e.Userid).HasColumnName("Userid");
                entity.Property(e => e.Username)
                    .HasMaxLength(100)
                    .IsUnicode(false);
                entity.Property(e => e.Address)
                    .HasMaxLength(500)
                    .IsUnicode(false);
                entity.Property(e => e.Cellnumber)
                    .HasMaxLength(50)
                    .IsUnicode(false);
                entity.Property(e => e.Emailid)
                    .HasMaxLength(50)
                    .IsUnicode(false);
            });
            OnModelCreatingPartial(modelBuilder);
        }
        partial void OnModelCreatingPartial(ModelBuilder modelBuilder);
    }
}
Now we will create another two folder “Interfaces” and “Services” to handle database related operations.
Right click on “BlazorApp.Server” project and add two new folders as “Interfaces” and “Services”.
Now add an interface to the “Interfaces” folder, name it as “IUser.cs” and put the below code to it.
using BlazorApp.Shared.Models;
namespace BlazorApp.Server.Interfaces
{
    public interface IUser
    {
        public List<User> GetUserDetails();
        public void AddUser(User user);
        public void UpdateUserDetails(User user);
        public User GetUserData(int id);
        public void DeleteUser(int id);
    }
}
Now add a class name as “UserManager.cs” to the “Services” folder, which will inherit “IUser” interface and put the below code to it.
using BlazorApp.Server.Interfaces;
using BlazorApp.Server.Models;
using BlazorApp.Shared.Models;
using Microsoft.EntityFrameworkCore;
namespace BlazorApp.Server.Services
{
    public class UserManager : IUser
    {
        readonly DatabaseContext _dbContext = new();
        public UserManager(DatabaseContext dbContext)
        {
            _dbContext = dbContext;
        }
        //To Get all user details
        public List<User> GetUserDetails()
        {
            try
            {
                return _dbContext.Users.ToList();
            }
            catch
            {
                throw;
            }
        }
        //To Add new user record
        public void AddUser(User user)
        {
            try
            {
                _dbContext.Users.Add(user);
                _dbContext.SaveChanges();
            }
            catch
            {
                throw;
            }
        }
        //To Update the records of a particluar user
        public void UpdateUserDetails(User user)
        {
            try
            {
                _dbContext.Entry(user).State = EntityState.Modified;
                _dbContext.SaveChanges();
            }
            catch
            {
                throw;
            }
        }
        //Get the details of a particular user
        public User GetUserData(int id)
        {
            try
            {
                User? user = _dbContext.Users.Find(id);
                if (user != null)
                {
                    return user;
                }
                else
                {
                    throw new ArgumentNullException();
                }
            }
            catch
            {
                throw;
            }
        }
        //To Delete the record of a particular user
        public void DeleteUser(int id)
        {
            try
            {
                User? user = _dbContext.Users.Find(id);
                if (user != null)
                {
                    _dbContext.Users.Remove(user);
                    _dbContext.SaveChanges();
                }
                else
                {
                    throw new ArgumentNullException();
                }
            }
            catch
            {
                throw;
            }
        }
    }
}
Now we will add “DatabaseContext”,“IUser” and “UserManager” reference to the “Program.cs” file of the“BlazorApp.Server” project.
Open “Program.cs” file and put the below code to it.
using BlazorApp.Server.Interfaces;
using BlazorApp.Server.Models;
using BlazorApp.Server.Services;
using Microsoft.AspNetCore.ResponseCompression;
using Microsoft.EntityFrameworkCore;
var builder = WebApplication.CreateBuilder(args);
// Add services to the container.
//Donot forgot to add ConnectionStrings as "DefaultConnection" to the appsetting.json file
builder.Services.AddDbContext<DatabaseContext>
    (options =>
    options.UseSqlServer(builder.Configuration.GetConnectionString("DefaultConnection")));
builder.Services.AddTransient<IUser, UserManager>();
builder.Services.AddControllersWithViews();
builder.Services.AddRazorPages();
var app = builder.Build();
// Configure the HTTP request pipeline.
if (app.Environment.IsDevelopment())
{
    app.UseWebAssemblyDebugging();
}
else
{
    app.UseExceptionHandler("/Error");
    // The default HSTS value is 30 days. You may want to change this for production scenarios, see https://aka.ms/aspnetcore-hsts.
    app.UseHsts();
}
app.UseHttpsRedirection();
app.UseBlazorFrameworkFiles();
app.UseStaticFiles();
app.UseRouting();
app.MapRazorPages();
app.MapControllers();
app.MapFallbackToFile("index.html");
app.Run();
Adding the web API Controller to the Application
Right click on “BlazorApp.Server/Controllers” folder and select “Add” then “New Item”. It will open an “Add New Item” dialog box. Select “ASP.NET” from the left panel, then select “API Controller - Empty” from templates and put the controller class name as “UserController.cs”. Press Add to create the controller.
Join the conversation! Your thoughts help the community grow.