Background
After my article Uploading Images to Database Using ASP.NET C# I have often been asked how to upload images to a database and displaying them from the database using ASP.Net C#. So to satisfy those the requirements I decided to write this article especially focusing on beginners and those who want to learn how to upload images to a database and display those images.
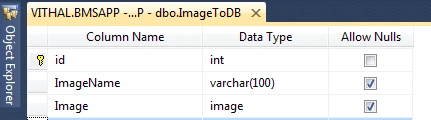
Now before creating the application, let us create a table named "ImageToDB" or whatever name you wish in a database to store the uploaded image files in a database table having the following fields (shown in the following image),
Then after that don't forget to set the identity specification of the id column to yes, because in this application Id is an important role for retrieving the images, if you don't know how to set it then see the following example.
When you select the id column of the above table then it shows the column properties as,
Now in the image above, you see the "Is Identity" property, set it to "yes".
In the preceding table, the ImageName column name is used to store the name of an image file and the image is used to store the image file .
I hope you have created the same type of table.
Now let us start to create an application to upload and display image files step-by-step.
Now create the project as,
- "Start" - "All Programs" - "Microsoft Visual Studio 2010".
- "File" - "New Project" - "C#" - "Empty Project" (to avoid adding a master page).
- Give the project a name, such as "DisplayingImages" or another as you wish and specify the location.
- Then right-click on Solution Explorer - "Add New Item" - "Default.aspx" page.
- One File upload control, one Button, one TextBox, one label and one Image control to display images.
Then the <form> section of the Default.aspx page looks as in the following,
- <form id="form1" runat="server">
- <tr> Name
- <td>
- <asp:TextBox ID="TextBox1" runat="server" /> </td>
- <td>
- <td> Select Image </td>
- <td>
- <asp:FileUpload ID="FileUpload1" runat="server" /> </td>
- </td>
- </tr>
- </table>
- <table>
- <tr>
- <td>
- <p>
- <asp:Label ID="Label2" runat="server" Text="label"></asp:Label>
- </p>
- </td>
- </tr>
- </table>
- </div>
- </form>
Now we need to add a Handler file to our project to display images from the database because we are saving images in binary format to get the binary formatted data we are using the Handler class. To know more about the handler class please refer to the MSDN forum.
Adding Handler Class
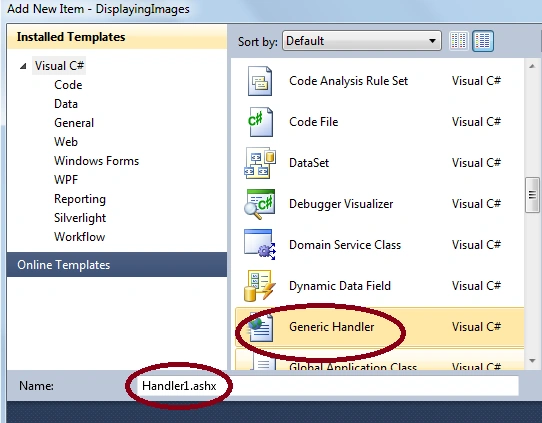
1. Right-click on your project add a new Handler1.ashx file as,
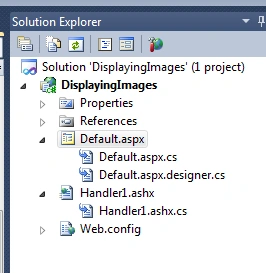
In the preceding image, we can see the .ashx extension file, now keep the name as it is or change it as you wish, I have kept it as it is because the next time you can easily remember it and click on the add button, now after that your Solution Explorer will look as in the following,
Now switch to design mode to code behind and create the following method to upload the image files as,
- private void Imageupload()
- {
- if (FileUpload1.HasFile)
- {
- int imagefilelenth = FileUpload1.PostedFile.ContentLength;
- byte[] imgarray = new byte[imagefilelenth];
- HttpPostedFile image = FileUpload1.PostedFile;
- image.InputStream.Read(imgarray, 0, imagefilelenth);
- connection();
- query = "Insert into ImageToDB (ImageName, Image) values (@Name, @Image)";
- SqlCommand com = new SqlCommand(query, con);
- com.Parameters.AddWithValue("@Name", SqlDbType.VarChar).Value = TextBox1.Text;
- com.Parameters.AddWithValue("@Image", SqlDbType.Image) Value = imgarray;
- com.ExecuteNonQuery();
- Label1.Visible = true;
- Label1.Text = "Image Is Uploaded successfully";
- imagebindGrid();
- }
- }
Now double-click on the "Imageupload" button and call the preceding method on it as,
- protected void upload(object sender, EventArgs e)
- {
- Imageupload();
- }
Now, create the method to bind to the GridView as,
- public void imagebindGrid()
- {
- connection();
- query = "Select id, ImageName, Image from ImageToDB";
- SqlCommand com = new SqlCommand(query, con);
- SqlDataReader dr = com.ExecuteReader();
- Gridview1.DataSource = dr;
- Gridview1.DataBind();
- }
And call preceding "Imagebindgirdmethod"() on page load as,
- protected void Page_Load(object sender, EventArgs e)
- {
- Label1.Visible = false;
- if (!IsPostBack)
- imagebindGrid();
- }
Now, open the "Handler1.ashx.cs" and write the following code,
- public class Handler1 : IHttpHandler
- {
-
-
- Default cls = new Default();
- public void ProcessRequest(HttpContext context)
- {
-
- string displayimgid = context.Request.QueryString["id_Image"].ToString();
- cls.connection();
-
-
- cls.query = "select Image from ImageToDB where id=" + displayimgid;
- SqlCommand com = new SqlCommand(cls.query, cls.con);
- SqlDataReader dr = com.ExecuteReade();
- dr.Read();
- context.Response.BinaryWrite((Byte[])dr[0]);
- context.Response.End();
- }
- }
In the preceding Handler1.ashx.cs file, first I have created the object of the default.aspx.cs class to use the connection method and variable to avoid the repetition of code because in the handler.ashx.cs file we also need the same connection method and string variables that are in the default.aspx.cs class.
Now, the most important thing is to specify the image URL property of the image control that display the images from the database, so let us see how to do it.
ImageUrl='<%# "Handler1.ashx?id_Image="+ Eval("id") %>'
Now run, the application that will look like as in the following,
Now upload the images that will display the output as follows,
In preceding output, you can clearly see that my uploaded image is displayed in the GridView with file name and image.
Note
- For detailed code please download the zip file attached above.
- Don't forget to update the "Web.config" file for your server location.
Summary
Now we have learned how to upload images to a database and display those images in GridView. I hope this article is useful for all students and beginners. If you have any suggestion related to this article then please contact me.





harry patelPosted May 19, 2019, 4:19 AM
Same table using angularjs and mvc how to create
Vithal WadjePosted Mar 13, 2016, 4:08 PM
Thanks Johnny Arthur sir
Johnny ArthurPosted Mar 10, 2016, 2:14 AM
Very Useful . ThankYou
Vithal WadjePosted Jan 15, 2016, 9:25 AM
welcome
Ravindra KUMARPosted Jan 15, 2016, 6:51 AM
thanks
Vithal WadjePosted Sep 7, 2015, 11:43 AM
Thanks Upendra sir
Vithal WadjePosted Sep 7, 2015, 11:43 AM
Carla Carmona create instance of command object
Upendra Pratap ShahiPosted Sep 7, 2015, 5:05 AM
nice sir
Carla CarmonaPosted Sep 5, 2015, 4:17 PM
when trying to insert the image I get an "Prepare: CommandText property has not been initialized" error. can you please help ?
Vithal WadjePosted Feb 13, 2015, 1:29 PM
Yes you can,refer my article list
Abdul SamadhuPosted Feb 13, 2015, 7:22 AM
i have one doubt. shall we create the grid view in .aspx page? give the example design code for grid view.please
Vithal WadjePosted Feb 3, 2015, 9:13 AM
Check whether the uploader has file ,if not then set default image path
macky kumarPosted Feb 3, 2015, 4:10 AM
plzreply me.
macky kumarPosted Feb 3, 2015, 4:09 AM
if i am not upload any image in this upload file section then a default image show...???
macky kumarPosted Feb 3, 2015, 4:08 AM
sir
Vithal WadjePosted Oct 9, 2014, 11:37 AM
Wait for my next article ,i will post it within two days
fahran mallickPosted Oct 9, 2014, 4:30 AM
Can you help any one Multiple images insert in database not images path please read clear and retrive the all images on slider with help of id
Vithal WadjePosted Sep 30, 2014, 1:45 PM
can you share me button click code
U DhatchayiniPosted Sep 30, 2014, 3:30 AM
i wanna display the image(which is already stored in sql server2008) by using image button. when i click that button it moves to next page. can u please help me?
Vithal WadjePosted Sep 29, 2014, 2:23 PM
dont change size of image ,adjust height and width of gridview according to your requirement
Vithal WadjePosted Mar 16, 2014, 8:03 AM
increase height and width of gridview
Amol BhorPosted Mar 15, 2014, 4:01 PM
image saved in db but while showing in gridvw Id n name of img is coming but img is not visible
Mary TicongPosted Jan 11, 2014, 12:03 AM
Hello! Please expand on how did you add tables, what type of Db did you use?
Vithal WadjePosted Nov 26, 2013, 12:13 PM
ok,change connection string setting from web.config file as per your database location
Anita SrivastavPosted Nov 26, 2013, 1:35 AM
i am just using you code with the same database
Vithal WadjePosted Nov 25, 2013, 12:42 PM
please check Image url path ,if still not working then send me your code which you are using k
Anita SrivastavPosted Nov 25, 2013, 5:23 AM
hello sir i use your code in my web application but its save the image in database but at the time of shoing the image it shows Incorrect syntax near '=' after this i downlod your project and run it but same here can u please tell me what is wrong
Vithal WadjePosted Aug 27, 2013, 2:27 PM
praveen mal,download application
Vithal WadjePosted Aug 27, 2013, 2:27 PM
thanks RAGHUNANDAN YADAV sir
RAGHUNANDAN YADAVPosted Aug 27, 2013, 7:12 AM
I am not able to see image in output BUT name and id is showing. thank u very much for such a nice and simple program.
praveen malPosted Aug 5, 2013, 3:23 AM
am not able to view the images
Vithal WadjePosted Jun 11, 2013, 5:02 AM
thanks Georgie sir for reading my article,you can set the height and width by using the gridview Image template field ,please see the Gridview source code for more detail by downloading above zip file
Vithal WadjePosted Jun 11, 2013, 4:58 AM
thanks Priya..
Georgie WebberPosted Jun 11, 2013, 3:45 AM
How to set the height, width and position of the image..
priya talolePosted Jun 11, 2013, 2:32 AM
It is ossum and very usefull artical for me thank you so much.