

In this article series, we are going to explore REST API versioning best practices. By the end of the article series, you will be able to pick the best solution for your project needs.
Problem
What is one of the best ways to implement REST API versioning in ASP.NET Core?
Solution
There are many ways to version a REST API -
- URI-based (URL PATH SEGMENT) versioning
GET /api/Items HTTP 1.1
GET /api/v2/Items HTTP 1.1
- Header-based (HTTP Header/Custom Header) versioning
GET /api/Items HTTP 1.1
GET /api/Items HTTP 1.1
ApiVersion: 2
- Query String Parameter Versioning
/api/hi?api-version=2.0
- Media type-based versioning
GET /api/Items HTTP 1.1
Accept: application/vnd.smartit.esale.webapi+json
GET /api/Items HTTP 1.1
Accept: application/vnd.smartit.esale webapi-v2+json
One of the best ways to implement the versioning in ASP.NET Core Web API is the URI-based versioning with using different namespaces on the Controllers.
- GET /api/v1/Hi
- GET /api/v2/Hi
In this step by step tutorial, I will demonstrate how to version a Web API in ASP.NET Core using the URI-based method with different namespaces on the Controllers.
Why you would want to choose this approach
Let us look at the advantages and disadvantages of this approach.
PROS of URI-based API versioning
GET /api/v1/Hi
GET /api/v2/Hi
- Most common method that is currently in use by APIs today
- Easy to implement with the code
- It is easy to consume
- It allows exploring different versions with just a browser.
- Fast performance, no overhead of search or switch statement needed.
- Can be added to any old, not versioned or versioned REST API project
- No extra configuration needed
- Extremely easy to test
CONS
- It disrupts the RESTful compliance: URIs should represent the resources and not versions (one URI: one resource/resource version)
Step 1 - Download the sample project from website
Step 2- Add API Version 1 Controller
Step 3- Add API Version 2 Controller
Step 4- Test and verify the v1 and v2 of APIs
Step 1- Download the sample project
Go to
http://smartitcodeacademy2018.azurewebsites.net
- Select Category as Article.
- Item as API Versioning-Web API Tutorial
Compile and run the sample project.

Add a new HiController.cs under the Controllers folder.
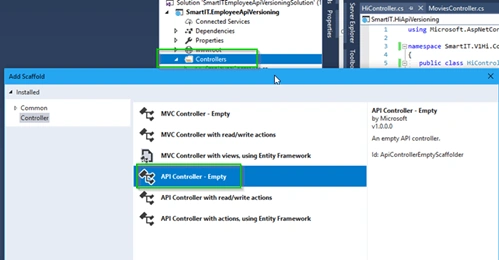
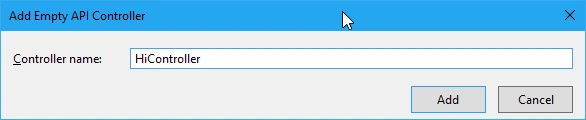
For simplicity of illustration, the sample controller will only have a single get method, as all the other actions will behave identically.
Replace the HiController code with the below one.
Listing
HiController.cs (Simplifies for easy illustration and learning),
- using Microsoft.AspNetCore.Mvc;
- namespace SmartIT.V1Hi.Controllers
- {
- public class HiController : Controller
- {
- [Route("~/api/v1/Hi")] // Attribute routing
- [HttpGet]
- public IActionResult Get() => Content("Hi Version 1");
- }
- }
- namespace SmartIT.V2Hi.Controllers
- {
- public class HiController : Controller
- {
- [Route("~/api/v2/Hi")]// Attribute routing
- [HttpGet]
- public IActionResult Get() => Content("Hi Version 2");
- }
- }
Note
In real-world projects, this controller will be in their own folder with separate files.
We created the HiController with an attribute routing /api/v1/Hi HTTP Get method with SmartIT.V1Hi.Controllers Namespace.
Listing
HiController for V1
- // api/v1/h1
- namespace SmartIT.V1Hi.Controllers
- {
- public class HiController : Controller
- {
- [Route("~/api/v1/Hi")] // Attribute routing
- [HttpGet]
- public IActionResult Get() => Content("Hi Version 1");
- }
- }
We created the HiController with an attribute routing /api/v2/Hi HTTP Get method with SmartIT.V2Hi.Controllers Namespace.
Listing - HiController for V2
- // api/v2/h1
- namespace SmartIT.V2Hi.Controllers
- {
- public class HiController : Controller
- {
- [Route("~/api/v2/Hi")]// Attribute routing
- [HttpGet]
- public IActionResult Get() => Content("Hi Version 2");
- }
- }
The only difference between the two Controllers is route attribute and the content of the Get method.
Compile and run the project.
| Route | Namespace | Content |
| [Route("~/api/v1/Hi")] | SmartIT.V1Hi.Controllers | Hi Version 1 |
| [Route("~/api/v2/Hi")] | SmartIT.V2Hi.Controllers | Hi Version 2 |
Also, don't worry. You can use namespaces to have multiple HiControllers without having to have any number in the class names.
Compile and run the project.
Go to the /api/v1/Hi: http://localhost:58570/api/v1/hi
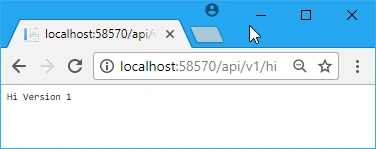
It displays “Hi Version 1”
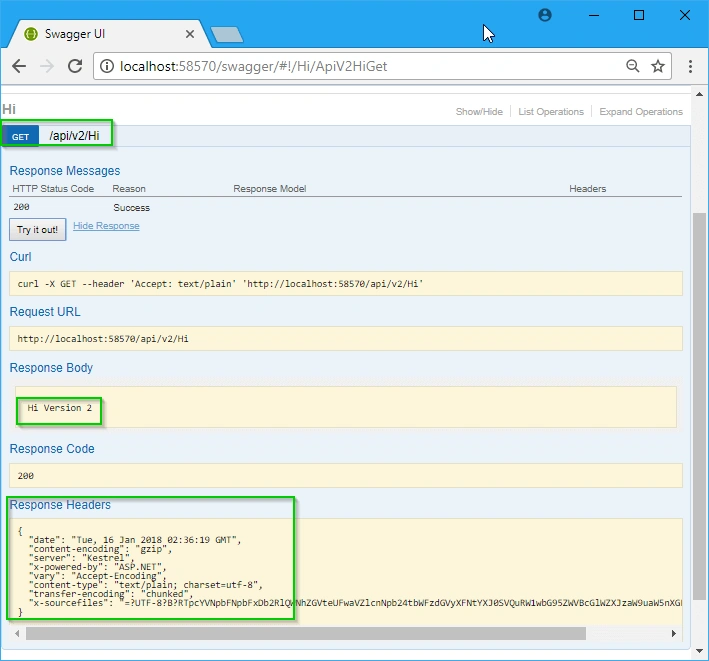
Go to the /api/v2/Hi: http://localhost:58570/api/v2/hi
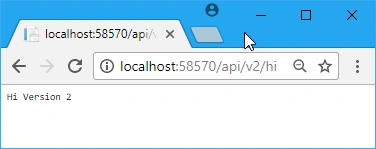
It displays “Hi Version 2”
Swagger is pre-set in this project. To see APIs in swagger, go to the swagger URI.
http://localhost:58570/swagger/
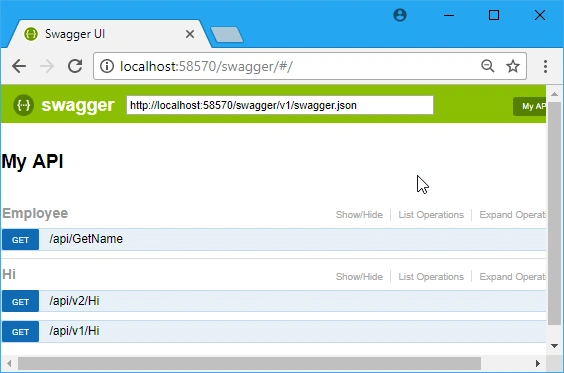
Click on GET /api/v2/hi
Summary
In PART 1, we leaned the simplified way to version REST Web API with using different namespaces on the Controllers. In part 2 of this article, I will demonstrate a real-world example of how to version URI-based versioning and adding API version number to the response header.
Download source code.
References
- https://www.amazon.com/John-Kocer/e/B0779Q6VV3/ref=dp_byline_cont_ebooks_1
- Professional Entity Framework Core 2.0 & 6.x with Examples
- JumpStart ASP.NET Core 2.0 and jQuery with Examples
- Angular 5.0: ASP.NET Core 2.0 and Web API with Examples
- Top 10 Interview Questions for Software Developers
Thank you for reading this article. You may be interested in reading the below Training articles too.
Naresh SinghalPosted Jan 25, 2018, 5:34 AM
So Good Article on REST API