

Introduction
In the era of technology it's not so difficult to automate windows/web
applications. On internet you will find loads of Open source/commercial tool
available to help us achieve our goal of automation. But out of that only few
would provide support for Win32, Win Forms, WPF, Silverlight application as well
as for basic applications UI automation. and white framework is one of the few
which I'm going to target for our automation purpose.so, In this article I will
take an example of calculator which is best for window application automation to
explain how we can use white to achieve our UI automation goal. Here I'm
targeting the automation testers who are new to white.
White Framework
White is open-source, written in C# and it supports all rich client
applications, which are Win32, Win Form, WPF and SWT (java). It is .NET based
and does not require the use of any proprietary scripting languages. It provides
a consistent object oriented API and it hides all the complexity of Microsoft's
UI Automation library and Win32 Windows messages.
For more information on white framework you can visit below links:
- http://white.codeplex.com/
- http://www.scip.be/index.php?Page=ArticlesNET19
- http://white.codeplex.com/wikipage?title=Layers&referringTitle=Home
- http://blog.benhall.me.uk/2008/02/project-white-automated-ui-testing.html
- http://white.codeplex.com/wikipage?title=Get%20Started&referringTitle=Home
White Interaction with Application:

The white framework will interact to an application through UI elements. So, you
have to be ready with some UI elements inspection tool to find out the
Automation ID and many more properties, for that purpose you can use UISpy and
VisualUIAVerify.
UISpy is a standalone executable which enables developers to view all UI
elements and their details.
But I personally preferred VisualUIAVerify. Which am I found very handy and
comfortable to use.
VisualUIAVerify:
With the Visual UIA Verify, you can quickly find and select any UI element
anywhere on the desktop. Based on the specific control type and the supported
control patterns, UIA Verify provides the built-in test scenarios prioritized
for the particular UI element. Developers can add additional test scenarios by
adding the code to the UIA Test Library. The tool can output the test results or
the summary in various forms. Visual UIA Verify can output test details in HTML.
You can download VisualUIAVerify from below link:
http://uiautomationverify.codeplex.com/
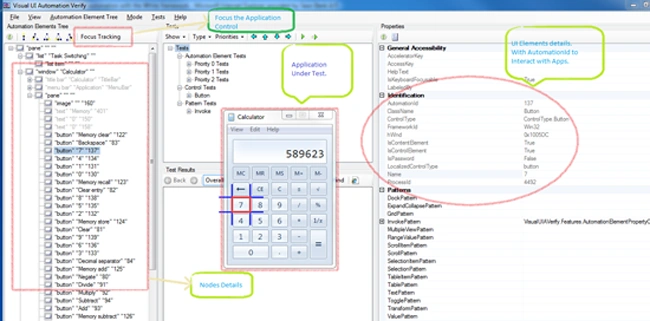
After starting VisualUIAVerify a UI Automation tree will be displayed. The root
element represents the current desktop and the child elements represent
application windows. Each of these child elements contain UI elements such as
menus, buttons, radiobuttons, textboxes, toolbars, listboxes, ...
Refer below snap shot.
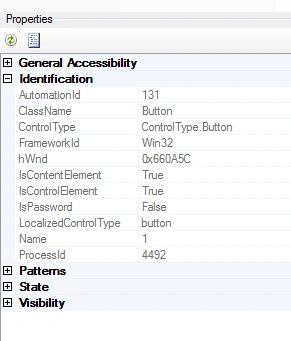
Detailed information about the UI element is displayed in the Properties
panel(below screen shot). When you want to access a UI element via White, then
you need to know the AutomationId, ControlType and Name.
Now it's enough explaining about VisualUI. It's time to come at point without
rolling here and there.
Getting Started:
The API of White is very user-friendly. You can get the benefit of this
framework quickly.to start working with white.
I have developed this demo project using console application. Now let's start
our coding to explain bit in details.
1. Download the latest white dll from this location
http://white.codeplex.com/releases
2. Unzip the white folder
3. Open your project and select it as Console application, name it as
TestWhiteCalculator
4. Now we have to add the references to our project as below(See below Snap Shot
for the details):
- Open your Solution Explorer
- Right click on References folder
- Select Add references
- Goto the folder where we have unzipped the White framework.
- Select the below dll's :
- White.Core.dll
- Bricks.dll
- Bricks.RuntimeFramework.dll
- Castle.Core.dll
- Castle.DynamicProxy2.dll
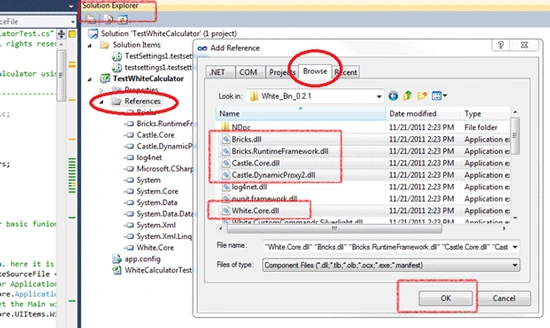
5. In the WhiteCalculatorTest.cs file add the below references
- using White.Core.Factory;
- using White.Core.UIItems.Finders;
- using White.Core.InputDevices;
6. Finally we are done with all formalities.
Now we will start our main part
7. Launch calculator through white:
// source
exe file path. here it is calculator exe path
private const
string ExeSourceFile =
@"C:\Windows\system32\calc.exe";
//Global Variable to for Application launch
private
static White.Core.Application
_application;
//Global variable to get the Main window of calculator from application.
private static
White.Core.UIItems.WindowItems.Window _mainWindow;
//strat
process for the above exe file location
var psi = new
ProcessStartInfo(ExeSourceFile);
// launch the process through white application
application = White.Core.Application.AttachOrLaunch(psi);
To launch a calculator I have used and process for the same. And we will force
the white application as White.Core.Application.AttachOrLaunch(psi) to lunch or
attached our process which we have start for calculator.
8. Now we will get the control of calculator window to perform our operation on
calculator. we have to get the control of the window on which we want to do some
operation. Here in our case it is calculator.
//Get the
window of calculator from white application
_mainWindow = _application.GetWindow(SearchCriteria.ByText("Calculator"),
InitializeOption.NoCache);
9. When you run the above piece of code you can see that this will open
calculator. On opened calculator we try perform our first operation:
I. Through White Use Key Board To Operate Calculator:
To achieve this the white has provide a functionality as WindowsAPI
Like White.Core.WindowsAPI.KeyboardInput
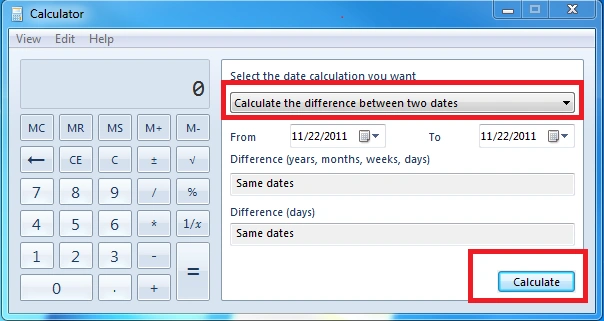
We will write a piece of code which will convert the calculator in date
difference mode. Through which we can find out the difference between dates
provided on calculator.
///
<summary>
/// Find difference
between dates through calculator
///
</summary>
private
static void DateDifferenceCalculation()
{
Keyboard.Instance.HoldKey(White.Core.WindowsAPI.KeyboardInput.SpecialKeys.CONTROL);
Keyboard.Instance.Enter("E");
Keyboard.Instance.LeaveKey(White.Core.WindowsAPI.KeyboardInput.SpecialKeys.CONTROL);
//On Date window find the difference
between dates.
//Set value into combobox
var comboBox = _mainWindow.Get<White.Core.UIItems.ListBoxItems.ComboBox>(SearchCriteria.ByAutomationId("4003"));
comboBox.Select("Calculate the
difference between two dates");
//Click on Calculate button
White.Core.UIItems.Button
caclButton =
_mainWindow.Get<White.Core.UIItems.Button>(SearchCriteria.ByAutomationId("4009"));
caclButton.Click();
}
To convert our open calculator in date difference
mode using short cut Hot, we have to just press (Ctrl+E) and the calculator
would get converted in to Date Difference mode.
Keyboard.Instance.HoldKey(White.Core.WindowsAPI.KeyboardInput.SpecialKeys.CONTROL);
Keyboard.Instance.Enter("E");
After changing we have to leave the pressed Ctrl key. Otherwise in windowsAPI will still hold the Ctrl Key.
Keyboard.Instance.LeaveKey(White.Core.WindowsAPI.KeyboardInput.SpecialKeys.CONTROL);

Prabhu CPosted May 29, 2018, 2:49 AM
This is controltype.pane object
Prabhu CPosted May 29, 2018, 2:49 AM
Panel having 4 rows and 4 columns.
Prabhu CPosted May 29, 2018, 2:48 AM
Panel object not having any descendents in UISpy?
Prabhu CPosted May 29, 2018, 2:47 AM
Hi, how can i get the rows and columns count in pane object?
Sally MittPosted Mar 21, 2013, 12:24 AM
My Winforms application does not have any AutomationID. How can I create these ids ?
Nirakar DashPosted Mar 6, 2013, 7:42 AM
Jawed, do you have any idea , how can I make the click event bit slow , because when I execute my console application , automation happens so fast.
Nirakar DashPosted Mar 4, 2013, 6:48 AM
TestWhiteCalculator throwing lots of exceptions. That's why CTRL + E is not working
Nirakar DashPosted Mar 4, 2013, 6:15 AM
Thanks a lot jawed for your quick response. What should be the better approach to drive my application through "White". For a big UI application do you think Console should be a good idea or a class library. Do you have some link Class Library project(Using White) -> Test-> My UI Application
Jawed MohammedPosted Mar 4, 2013, 5:44 AM
@Nirakar: To test application using WHite framework you have to create any application to consume White to drive your UI. that application can be Windows/web or Console or simple Class library. UIA Verify is just to get the information about the Controls/field used in your UI. based on that information you use use white features. Let me know if you need some information. Thanks!!
Nirakar DashPosted Mar 4, 2013, 5:36 AM
Hi Jawed, Lets say I have an UI application and also I have UIA Verify , then How can I test my UI application through white, without creating a console application
Chetan NayiPosted Oct 3, 2012, 11:36 PM
Thanks
Manoj Singh PanwarPosted Dec 3, 2011, 2:46 AM
Thanks for sharing Mr.Jawed
Rezwan RazuPosted Dec 2, 2011, 5:35 PM
Nice
Alok PandeyPosted Dec 2, 2011, 2:24 AM
Good Article, Jawed.
Akash AhlawatPosted Dec 2, 2011, 1:08 AM
Nice presentation..gud work Jawed
Monika AroraPosted Dec 2, 2011, 12:56 AM
Hi Jawed. Nice article.
Arjun PanwarPosted Dec 2, 2011, 12:56 AM
Very good explanation by Jawed.