

Introduction
The Intel Galileo board runs on the Linux operating System by default but we can also make it run on a more powerful version of Linux or Windows using a micro SD card. Windows is free for screen sizes less than 9” so licensing will not be a problem. You can use it for free as Linux on your Galileo board. Also the question arises here of why to use Windows OS for the IoT. The reasons can be the following:
- Familiar Operating System.
- Easy to use tools and powerful developing environment using Visual Studio that will allow you to debug your code.
- Access to many libraries that runs on Windows.
- Usually all Arduino shields are compatible, including Grove base shield.
- You are a Windows Fan.
For this article I am using Intel Galileo gen2 board. If you have a Gen1 board then the entire procedure is the same. There are many supported boards, the other Windows OS supported boards are the following:
- Raspberry Pi 2
- MinnowBoard MAX
- Intel Galileo
Let’s see how to start with Windows on our little board.
Prerequisites
Hardware:
- Intel Galileo board.
- Power Supply for Galileo.
- Ethernet Cable
- Ethernet to USB adapter
- Micro SD Card (16 GB or more)
- Micro SD card reader
- An LED
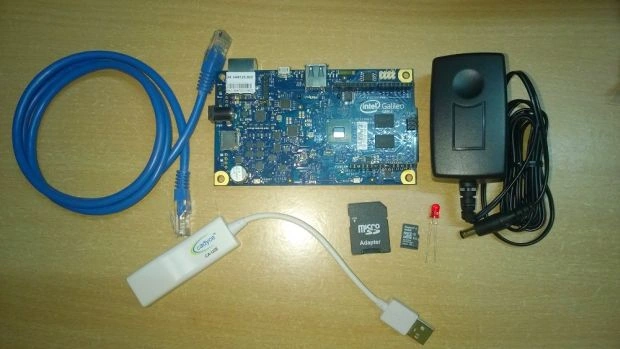
Figure: Intel Galileo board
- Visual Studio 2013
Currently the supported IDE with Intel Galileo is Visual Studio 2013 Express, Professional, Premium or Ultimate. Visual Studio 2015 is not currently supported. If you don’t have Visual Studio 2013 then you can download it from: Visual Studio Downloads .
Setting Up your PC
- Install telnet on your Computer. Telnet provides access to a command-line interface on a remote host. Using telnet we will access our board remotely.
On your PC go to Control Panel, then Program and Features, select “Turn Windows Features On or off”. The Windows Features Windows will open. Check “Telnet Client”. Click Ok and restart the computer.
 Figure: Program and Features
 Figure: InstallingTelnet Client
 - Install WindowsDeveloperProgramforIoT.msi. You need to register on the Connect Windows Developer Program for IoT with a Microsoft account.
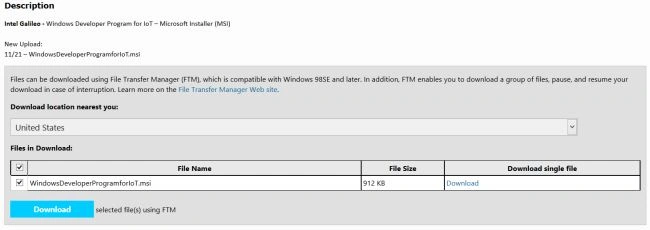 Figure: Windows Developer Program for IoT with a Microsoft account
 - After running this file you will see two main changes in your computer.
It will install a utility called Galileo Watcher that will help you to access your board and
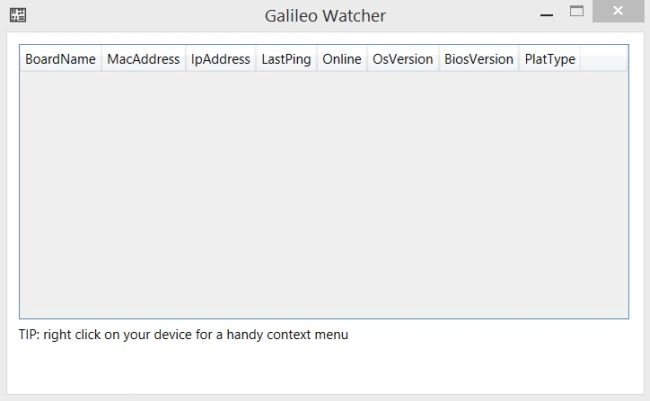 Figure: Galileo Watcherin Visual Studio there will be a template for IoT called “Galileo Wiring App” in New Projects.
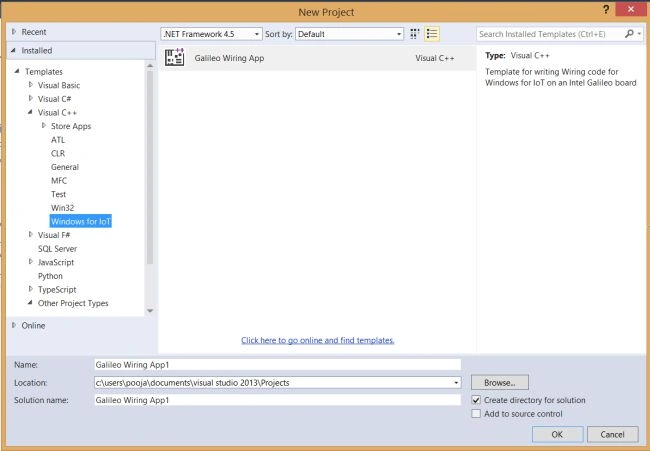 Figure: Template for IoT
Setting Up the Galileo Board
Update the firmware on the board as described here.
Creating Bootable Windows Image for Intel Galileo
Software Package:
Create a new folder in the root of the directory and name it “galileo” and place these two downloaded files in that. I placed them in C:\ drive since it is easier to access this way. My SD card came in the D:\ drive.
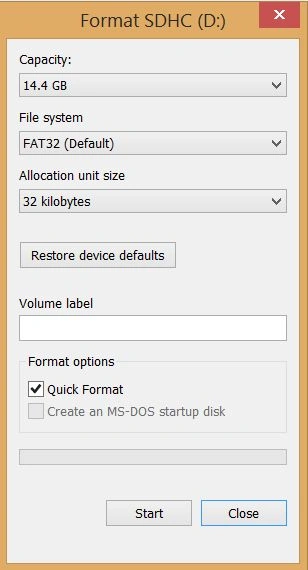
Figure: Formatting SD card
- Go to the Command Prompt, right-click and select ”Run as Administrator”.
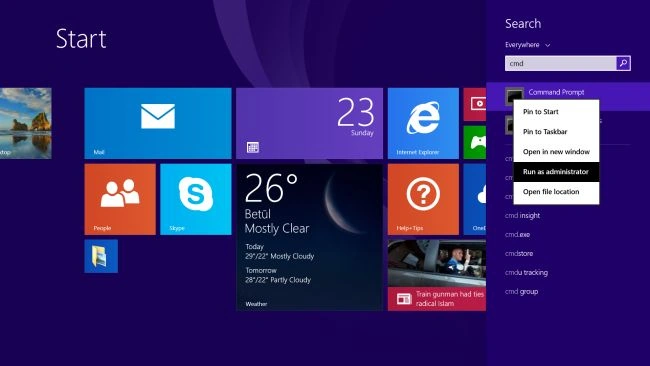 Figure: CMD Run as Administrator
 - Navigate to your “galileo” folder (where you saved the downloaded files).
- Type :
{Files containing directory}apply-bootmedia.cmd -destination {YourSDCardDrive} -image {.wimFile downloaded above} -hostname mygalileo -password admin
For example in our case:
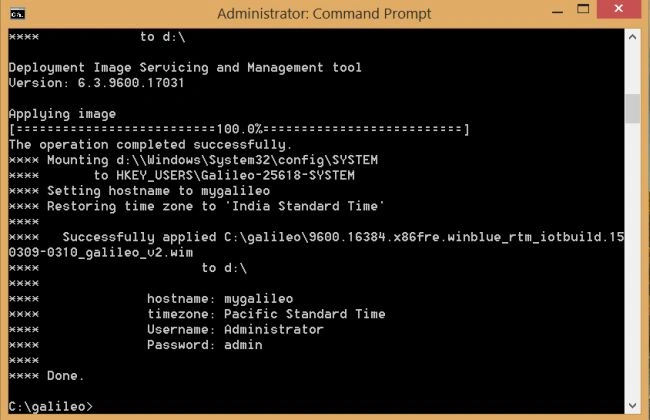
C:\galileo>apply-bootmedia.cmd -destination d:\ -image 9600.16384.x86fre.winblue_rtm_iotbuild.150309-0310_galileo_v2.wim -hostname mygalileo -password admin
 Here we are using apply-bootmedia.cmd to create the image on the destination drive on which our SD card is mounted. You need not to write the entire image name, just write “–image” and press the Tab key, the Command Prompt will complete that for you. You must pass to more parameters “hostname” and “password” for your Administrator account of Windows. It is highly recommended to use “mygalileo” as hostname and “admin” as password. Unless you do not have a valid reason stick to this. The Visual Studio template for IoT uses “mygalileo” as the default hostname, if you change it here then be sure to change it in Visual Studio debug configurations. The mounting process will start, it will take some time. Before applying the image it pauses for a minute, give it some time. This entire process will take around 10 minutes. Then it will display the hostname, timezone, username, and password.
 Connecting and booting Windows
Once your bootable image is ready you can mount it to your Intel Galileo board in the SD card slot. Connect your board to a power supply, Galileo gen1 and gen2 boards use different power supplies. If you are using a Gen2 board then use the 12-volt power supply and with Gen1 use a 5-volt power supply.
Connecting and booting Windows
Once your bootable image is ready you can mount it to your Intel Galileo board in the SD card slot. Connect your board to a power supply, Galileo gen1 and gen2 boards use different power supplies. If you are using a Gen2 board then use the 12-volt power supply and with Gen1 use a 5-volt power supply.
Figure: creating bootable win Image
Figure: Windows Image Created
- Connect one end of your network cable to Intel Galileo.
- Connect the other end of the network cable to the Ethernet port of your computer or you can use an Ethernet-USB adapter if you do not have an Ethernet port available.
- Power your board.
- Galileo will start booting from the SD card image of the Windows OS. The SD card light will start flickering during this process. When the light settles down it will finish booting, this process can take around 2 minutes.
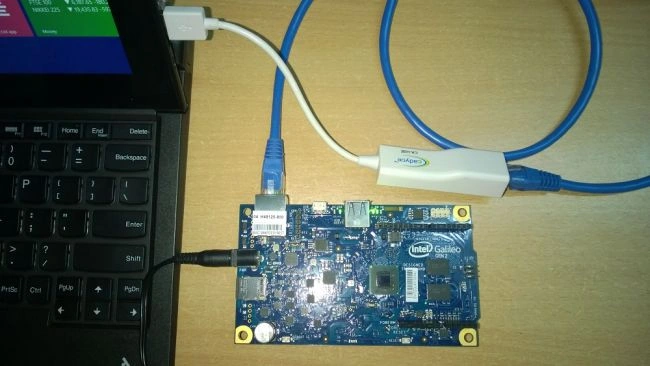 Figure: Connections
Galileo Watcher
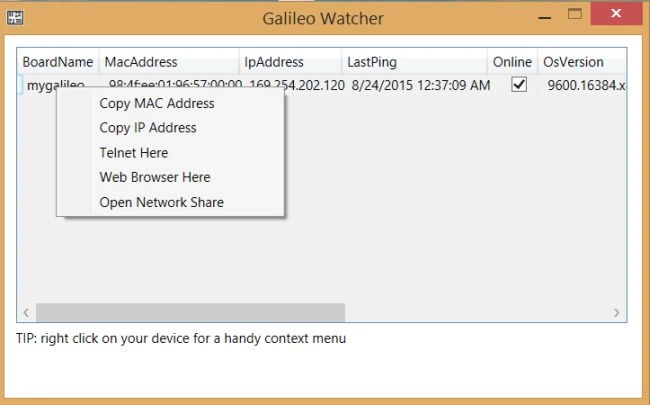
Now you can run the Galileo Watcher utility. The “Galileo Watcher” will automatically detect your board. If it doesn’t then ensure that it has network access using a firewall. This utility will display some information about your board such as its MAC address and IP address. It also has a check box to show whether your Galileo is connected or not. When you right-click on board it will open a Handy Context Menu, with this you can copy the MAC and IP address or remotely connect to your Galileo.
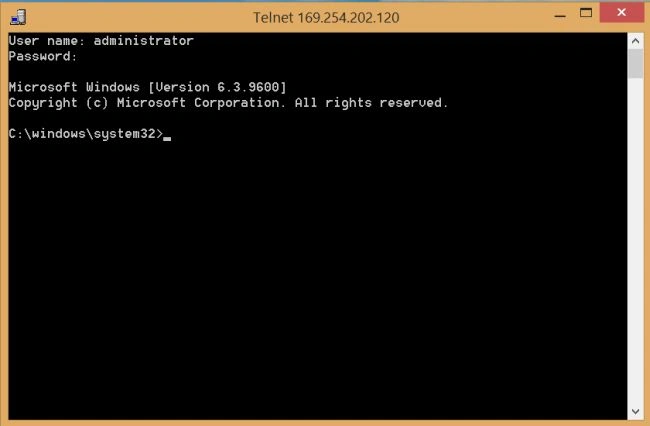
 Telnet here
It will start a telnet session with the board. You will be able to get a remote command prompt against your Galileo. It will ask for Username and password that are:
Username: Administrator
Password: admin
Telnet here
It will start a telnet session with the board. You will be able to get a remote command prompt against your Galileo. It will ask for Username and password that are:
Username: Administrator
Password: admin
 Web Browser here
There is a webserver running on MinWin, you can see a task list, process running on your board, file list and memory statistic. It is like a Task Manager for Galileo. You can just open a web browser and type http://<your galileo host name or ip address>.
Web Browser here
There is a webserver running on MinWin, you can see a task list, process running on your board, file list and memory statistic. It is like a Task Manager for Galileo. You can just open a web browser and type http://<your galileo host name or ip address>.
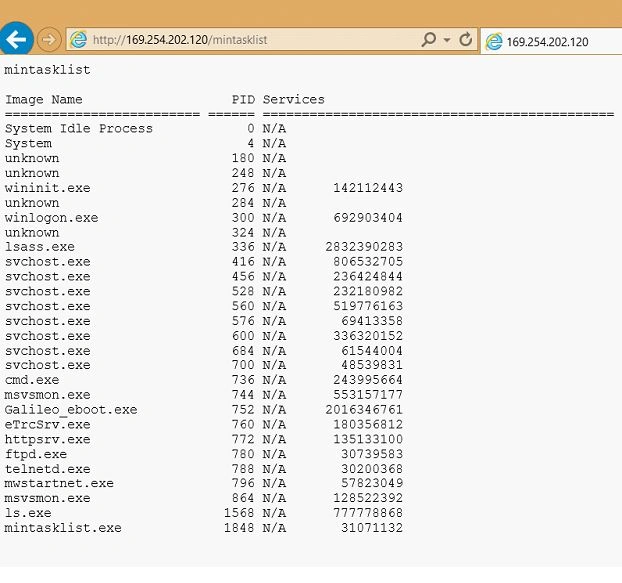 Figure: Process running on Galileo
Figure: Remotely connect to your Galileo
Figure: Telnet here
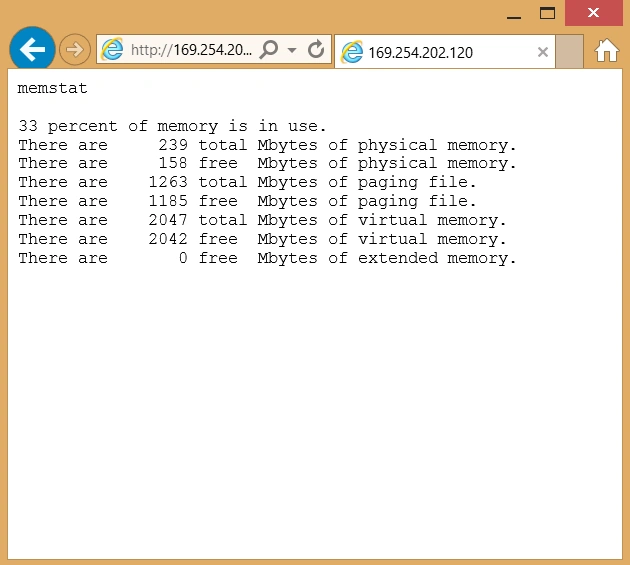
Figure: Memory statistics

Figure: Window security prompt

Figure: Network share
- Attach an LED to pin 13. They have polarity, that means we need to connect them in the right order. There are many ways to differentiate between cathode and anode of the LED, we can tell that by looking at the LED carefully in many ways.
The longer lead will be the cathode and the shorter will be the anode.When we examine the LED from the top we see the two metal posts, the smaller of the two is the anode and the bigger is the cathode
- Open Visual Studio 2013, go to File, New, then Project, under templates go to Visual C++, select Windows for IoT, then click Galileo Wiring app.
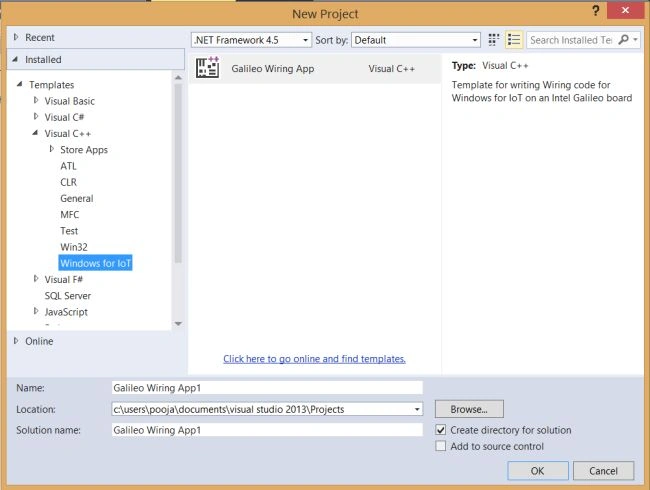 Figure: IoT Galileo Wiring app
 - It is basically a C++ console app that has references to the Galileo SDK to allow it to talk to the Arduino side of things. Underneath the project in Main.cpp you will find all of your code.
- It is a default Blink Sketch. The sketch looks nearly similar to one like in Arduino, the only difference is the Log method that writes the output to both stdOut and debugger.
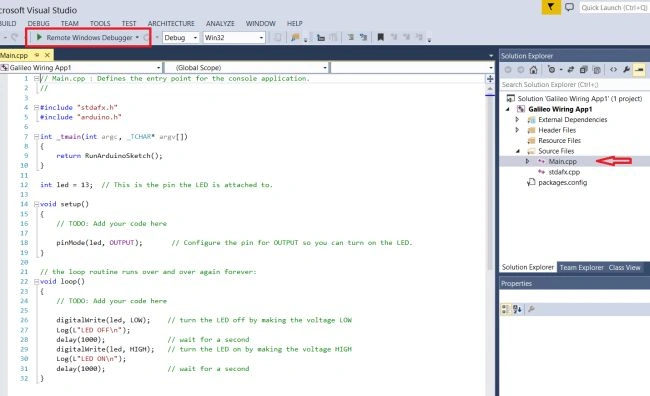 Figure: The Code
 - Run your program by clicking on Remote Windows Debugger or by pressing F5. For the first connection attempt, it will prompt for credentials.
Username: mygalileo\AdministratorPassword: adminNow you will see your LED blinking, hence you have successfully deployed your first application on Windows on Galileo.
Mahsa HassankashiPosted Sep 26, 2015, 6:06 PM
Great
Yashwanth MuthineniPosted Sep 1, 2015, 6:52 AM
Nice Explanation mam
Gopi ChandPosted Aug 25, 2015, 10:03 AM
Excellent work
Ankit BansalPosted Aug 25, 2015, 6:18 AM
good..
Mohammed IbrahimPosted Aug 25, 2015, 4:46 AM
nice
Mohammed IbrahimPosted Aug 25, 2015, 4:46 AM
nice
Vaikesh K PPosted Aug 25, 2015, 2:38 AM
Nice Work :)
Nilesh JadavPosted Aug 25, 2015, 12:16 AM
Nice one mam !
Gowtham KPosted Aug 24, 2015, 11:15 PM
Good one, Thanks for sharing
Pooja BaraskarPosted Aug 24, 2015, 1:42 PM
Afzaal Ahmad Zeeshan yes it really long but in the meantime I spent time in exploring things, that means a lot more to come these days. :)
Afzaal Ahmad ZeeshanPosted Aug 24, 2015, 1:00 PM
A good comeback, I was wondering what kept you so long! ;)
Sandeep KumarPosted Aug 24, 2015, 11:25 AM
Nice article thank you for sharing :)
Sumit JoshiPosted Aug 24, 2015, 9:56 AM
thanks for sharing.
Sibeesh VenuPosted Aug 24, 2015, 9:21 AM
Nice Share :)
Karthikeyan KPosted Aug 24, 2015, 9:06 AM
Good one...Thanks for share
Upendra Pratap ShahiPosted Aug 24, 2015, 8:40 AM
nice one dear..
Rajeesh MenothPosted Aug 24, 2015, 8:33 AM
Good Explanation
RakeshPosted Aug 24, 2015, 8:03 AM
Good explain