

Introduction
Application Life-Cycle
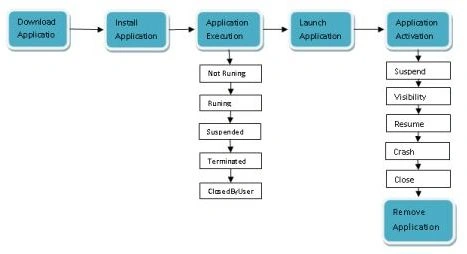 From the above diagram, you get a clear idea of the Windows Store application life-cycle stages. We will dig more into these stages of the Windows Store application life cycle below.
After having developed your Windows Store application and posted it on the Windows Store (I talked about the store in my first article) it is available for a user to download. Your application is available in the store as a package the user will download as a package having an extension .appx. This application package contains the manifest files and the application file which builds your application.
After downloading the application from the Windows Store it must be installed on the user's system for execution. In your package, as I already discussed above, is a manifest file that is used when the user installs your application or removes your application from their system.
Once the user has installed your application successfully on their systems then it is ready to be executed. I hope here I need not to tell you the meaning of execution as all of you are aware of execution. In this step, the Windows Store provides a unique execution sequence to execute the application. Generally, ApplicationExecutionState is an enum provided by Windows 8 programming interface which contains the values denoted in white boxes in the first column in the diagram. We will discuss these Application ExecutionStates one-by-one.
All of you can understand what is meant by the words Not Running; in other words it is not running currently. This step occurs in several conditions like when the user is installing your application from the store, clicks on End task in the task manager while the application is running, restarts the computer etc. This state is helpful in preparing the initial UI of your application. Do not use the event handler associated with this state to populate a large dataset for your application. We have another state and associated event handler to do that.
When your application is launched it is still in the Not Running state. The Running state occurs after it has passed from the launched or the not running state. When your user does anything with your application UI then probably we can say the application is now running else it is in the Not Running state.
This stage occurs when the user switches from your application to another application or Windows enters into a low power state. In this case, Windows will wait for 10 seconds; if the user does not return to the application within this timeframe then Windows suspends your application. In your application, if you need to save any important data or needs to maintain the state of your application then this is the right place to do that. This suspends state provides an event handler to do this kind of work.
Once your application has been suspended then to save the system resources Windows can terminate the suspended applications. This state occurs when Windows is running on low resources.
This is one of the last stages in the Windows Store ApplicationExecutionState enum where the user can terminate your application by using close gestures or by using keybord shrtcuts Alt+F4.
Let's move one step back on our root after ApplicationExecutionStates. Your application is launched by the user as we discussed above in the Not Running state. Generally, this state is used to show the application splash screens. This splash screen denotes your application is ready to display the initial UI. In this step, you can initiate the component like a splash screen but if you are loading any data from a data source then this is not the right place to do that. The data loading work for your application UI must be done out of this activation process.
It is as we saw in the last state i.e. Launch Application as well as in ApplicationExecutionStates i.e. Not Running. In these states our application is still not active; it is still in the Not Running state. After finishing our Not Running states we can force the user to activate our application by providing some events. Once the user responds to a specific event, our application becomes active. Here we have an event handler associated with application activation i.e. Activated. You can use this event handler to work with system contracts (I explained the contract in my last article "Plan for Windows Store Application").
This is the last stage in the Windows Store application life cycle where the user removes your application from their systems. Here once again the application manifest is used for removing your application.
Here I'm stopping this discussion. I hope you enjoyed this article. Next in the series, I'll return with another new and interesting topic.
From the above diagram, you get a clear idea of the Windows Store application life-cycle stages. We will dig more into these stages of the Windows Store application life cycle below.
After having developed your Windows Store application and posted it on the Windows Store (I talked about the store in my first article) it is available for a user to download. Your application is available in the store as a package the user will download as a package having an extension .appx. This application package contains the manifest files and the application file which builds your application.
After downloading the application from the Windows Store it must be installed on the user's system for execution. In your package, as I already discussed above, is a manifest file that is used when the user installs your application or removes your application from their system.
Once the user has installed your application successfully on their systems then it is ready to be executed. I hope here I need not to tell you the meaning of execution as all of you are aware of execution. In this step, the Windows Store provides a unique execution sequence to execute the application. Generally, ApplicationExecutionState is an enum provided by Windows 8 programming interface which contains the values denoted in white boxes in the first column in the diagram. We will discuss these Application ExecutionStates one-by-one.
All of you can understand what is meant by the words Not Running; in other words it is not running currently. This step occurs in several conditions like when the user is installing your application from the store, clicks on End task in the task manager while the application is running, restarts the computer etc. This state is helpful in preparing the initial UI of your application. Do not use the event handler associated with this state to populate a large dataset for your application. We have another state and associated event handler to do that.
When your application is launched it is still in the Not Running state. The Running state occurs after it has passed from the launched or the not running state. When your user does anything with your application UI then probably we can say the application is now running else it is in the Not Running state.
This stage occurs when the user switches from your application to another application or Windows enters into a low power state. In this case, Windows will wait for 10 seconds; if the user does not return to the application within this timeframe then Windows suspends your application. In your application, if you need to save any important data or needs to maintain the state of your application then this is the right place to do that. This suspends state provides an event handler to do this kind of work.
Once your application has been suspended then to save the system resources Windows can terminate the suspended applications. This state occurs when Windows is running on low resources.
This is one of the last stages in the Windows Store ApplicationExecutionState enum where the user can terminate your application by using close gestures or by using keybord shrtcuts Alt+F4.
Let's move one step back on our root after ApplicationExecutionStates. Your application is launched by the user as we discussed above in the Not Running state. Generally, this state is used to show the application splash screens. This splash screen denotes your application is ready to display the initial UI. In this step, you can initiate the component like a splash screen but if you are loading any data from a data source then this is not the right place to do that. The data loading work for your application UI must be done out of this activation process.
It is as we saw in the last state i.e. Launch Application as well as in ApplicationExecutionStates i.e. Not Running. In these states our application is still not active; it is still in the Not Running state. After finishing our Not Running states we can force the user to activate our application by providing some events. Once the user responds to a specific event, our application becomes active. Here we have an event handler associated with application activation i.e. Activated. You can use this event handler to work with system contracts (I explained the contract in my last article "Plan for Windows Store Application").
This is the last stage in the Windows Store application life cycle where the user removes your application from their systems. Here once again the application manifest is used for removing your application.
Here I'm stopping this discussion. I hope you enjoyed this article. Next in the series, I'll return with another new and interesting topic.
Join the conversation! Your thoughts help the community grow.