

As part of learning MVVM pattern I tried to search many sites and blogs and found most of them are explained in a complicated manner. After some research I cracked the very basic steps in MVVM pattern, and then trying to write MVVM tutorials for absolute beginners.
I don't think much more time or words spend for explaining various part of MVVM and the relationship between MVVM and WPF. If you go to the depth of WPF you will realize that MVVM is the best suitable pattern for WPF (You might not understand the difference between these two) .
As a formal procedure I am giving a simple diagram and definition for MVVM
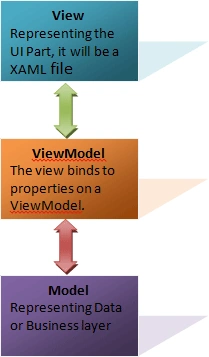
I start this tutorial with two examples, i.e WpfSimple.csproj and WpfMvvmTest.csproj
For the sake of simplicity, the first project (WpfSimple.csproj) avoids the Model object (an example with Model will come later).
In the example WpfSimple, the view contains only a Button and no code behind, but its click event is loosely bound with ViewModel. The bindings between view and ViewModel are simple to construct because a ViewModel object is set as the DataContext of a view. If property values in the ViewModel change, those new values automatically propagate to the view via data binding. When the user clicks a button in the View, a command on the ViewModel executes to perform the requested action.
The View
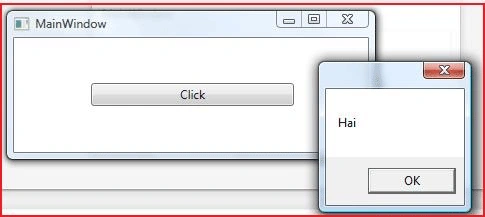
The following code snippets are coming from WpfSimple application (available with tutorial)
- <Window x:Class="WpfSimple.MainWindow"
- xmlns="http://schemas.microsoft.com/winfx/2006/xaml/presentation"
- xmlns:x="http://schemas.microsoft.com/winfx/2006/xaml"
- xmlns:local="clr-namespace:WpfSimple"
- Title="MainWindow" Height="150" Width="370">
- <Window.DataContext>
- <local:MainWindowViewModel/>
- </Window.DataContext>
- <Grid>
- <Button Content="Click"
- Height="23"
- HorizontalAlignment="Left"
- Margin="77,45,0,0"
- Name="btnClick"
- VerticalAlignment="Top"
- Width="203"
- Command="{Binding ButtonCommand}"
- CommandParameter="Hai" />
- </Grid>
- </Window>
- xmlns:local="clr-namespace:WpfSimple"
- ow.DataContext>
- <local:MainWindowViewModel/>
- /Window.DataContext>
ViewModel class used over here is MainWindowViewModel.cs
- using System;
- using System.Collections.Generic;
- using System.Linq;
- using System.Text;
- using System.Windows.Input;
- using System.Windows;
- namespace WpfSimple
- {
- class MainWindowViewModel
- {
- private ICommand m_ButtonCommand;
- public ICommand ButtonCommand
- {
- get
- {
- return m_ButtonCommand;
- }
- set
- {
- m_ButtonCommand = value;
- }
- }
- public MainWindowViewModel()
- {
- ButtonCommand=new RelayCommand(new Action<object>(ShowMessage));
- }
- public void ShowMessage(object obj)
- {
- MessageBox.Show(obj.ToString());
- }
- }
- }
Command="{Binding ButtonCommand}"
CommandParameter="Hai"
RelayCommand
In this example RelayCommand class is used for implementing ICommad object. I think it's a simple and standard approach. One more common approach is also available by using nested inner class (will explain later).
- using System;
- using System.Collections.Generic;
- using System.Linq;
- using System.Text;
- using System.Windows.Input;
- namespace WpfSimple
- {
- class RelayCommand : ICommand
- {
- private Action<object> _action;
- public RelayCommand(Action<object> action)
- {
- _action = action;
- }
- #region ICommand Members
- public bool CanExecute(object parameter)
- {
- return true;
- }
- public event EventHandler CanExecuteChanged;
- public void Execute(object parameter)
- {
- if (parameter != null)
- {
- _action(parameter);
- }
- else
- {
- _action("Hello World");
- }
- }
- #endregion
- }
- }
INotifyPropertyChanged
The INotifyPropertyChanged interface is used to notify clients, typically binding clients, which a property value has changed. The INotifyPropertyChanged interface contains an event called PropertyChanged. Whenever a property on a ViewModel / Model object has a new value, it can raise the PropertyChanged event to notify the WPF binding system of the new value. Upon receiving that notification, the binding system queries the property, and the bound property on some UI element receives the new value
From the example WpfMvvmTest project I am taking the following code
- public class Product:INotifyPropertyChanged
- {
- private int m_ID;
- private string m_Name;
- private double m_Price;
- #region INotifyPropertyChanged Members
- public event PropertyChangedEventHandler PropertyChanged;
- private void OnPropertyChanged(string propertyName)
- {
- if (PropertyChanged != null)
- {
- PropertyChanged(this, new PropertyChangedEventArgs(propertyName));
- }
- }
- #endregion
- public int ID
- {
- get
- {
- return m_ID;
- }
- set
- {
- m_ID = value;
- OnPropertyChanged("ID");
- }
- }
- public string Name
- {
- get
- {
- return m_Name;
- }
- set
- {
- m_Name = value;
- OnPropertyChanged("Name");
- }
- }
- public double Price
- {
- get
- {
- return m_Price;
- }
- set
- {
- m_Price = value;
- OnPropertyChanged("Price");
- }
- }
- }
rahul kadamPosted Jun 2, 2021, 5:51 AM
How can I use dependency injection in WPF? I want to develop billing application of packages of items. In future I want to introduce new packages.
Dinesh GabhanePosted Nov 13, 2019, 12:04 AM
Thanks for sharing
Raghava chPosted Apr 7, 2018, 9:18 PM
Hi Mujeeb nice article, in the second example xaml, missed these lines. its better to have these lines then only the example works. <Window.DataContext> <local:MainWindowViewModel/> </Window.DataContext>
gagandeep singhPosted Aug 16, 2017, 5:48 AM
Thanks, i found an interesting one here https://blossomprogramming.blogspot.in/2017/07/introduction-to-mvvm-in-wpf-model-view.html
Rahul SalinskeePosted Jan 3, 2017, 2:21 AM
Thanks Mujeeb. It was really a nice tutorial. Really helped up to some extent. Is it possible for you share some more tutorial over CRUD database operations using MVVM pattern?
Fred FlintstonePosted Jul 24, 2016, 10:24 PM
SampleMVVM.zip link broken
likhithPosted Jun 4, 2014, 5:41 AM
nice article... i am confused with Two Viewmodel... and also how can i insert the data to database in MVVM
cnu abiPosted Mar 7, 2014, 5:55 AM
Nice article, but one thing I didn’t understand without InotifyPropertyChanged and Icommand interface it works all because of binding and of event trigger at lost focus. Then what’s the purpose of using those features in MVVM pattern.
ThorstenPosted Mar 20, 2013, 6:06 AM
In MainWindow.xaml, change UpdateCommad to UpdateCommand.
sai rajPosted Feb 7, 2013, 7:46 AM
good but i couldn't run ur downloaded project
sai rajPosted Feb 7, 2013, 7:45 AM
test
Zinkovskiy AntonPosted Feb 3, 2013, 12:48 PM
WpfMVVMTest project from downloaded archive doesn't work
mohamed aliPosted Dec 1, 2012, 2:34 AM
Nice Work Mujeeb. Nice work for beginners i could see more posts from you. Thanks
Ashwni KumareditedPosted Aug 4, 2012, 8:55 AMEdited Aug 4, 2012, 8:56 AM
great work thanks
MalcolmPosted May 28, 2012, 3:32 AM
I'm glad you took the time to create this article. I find that most MVVM articles are too complex to explain the basic principles of MVVM. The important part of your tutorial is that you haven't become side-tracked with peripheral issues. You have the bare minimum to demonstrate the MVVM pattern. Thank you
michelPosted Feb 29, 2012, 3:08 AM
Good explanation for beginners. Im missing a bit in depth information though. For example about the ICommand interface.
Manish SinghPosted Dec 10, 2011, 12:26 AM
It's really help for beginners
Arjun PanwarPosted Dec 8, 2011, 11:06 PM
Really very good article
Akash AhlawatPosted Dec 8, 2011, 10:57 PM
Nice presentation Rahman
Dinesh BeniwalPosted May 9, 2011, 1:59 AM
Thanks for sharing...