Let’s start,
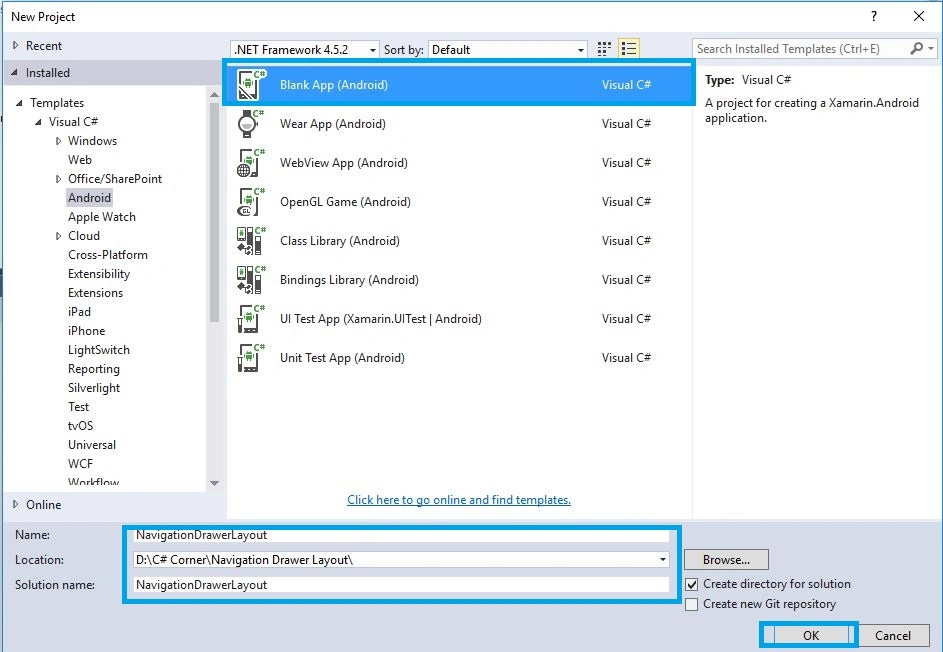
Step 1: Open Visual Studio->New Project->Templates->Visual C#->Android->Blank app
Select blank app. Give the project name and project location.
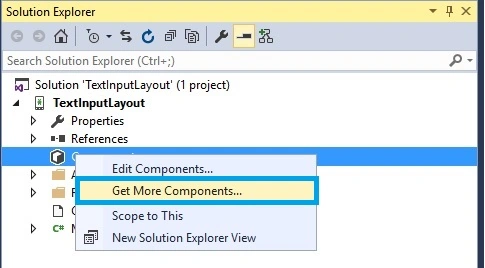
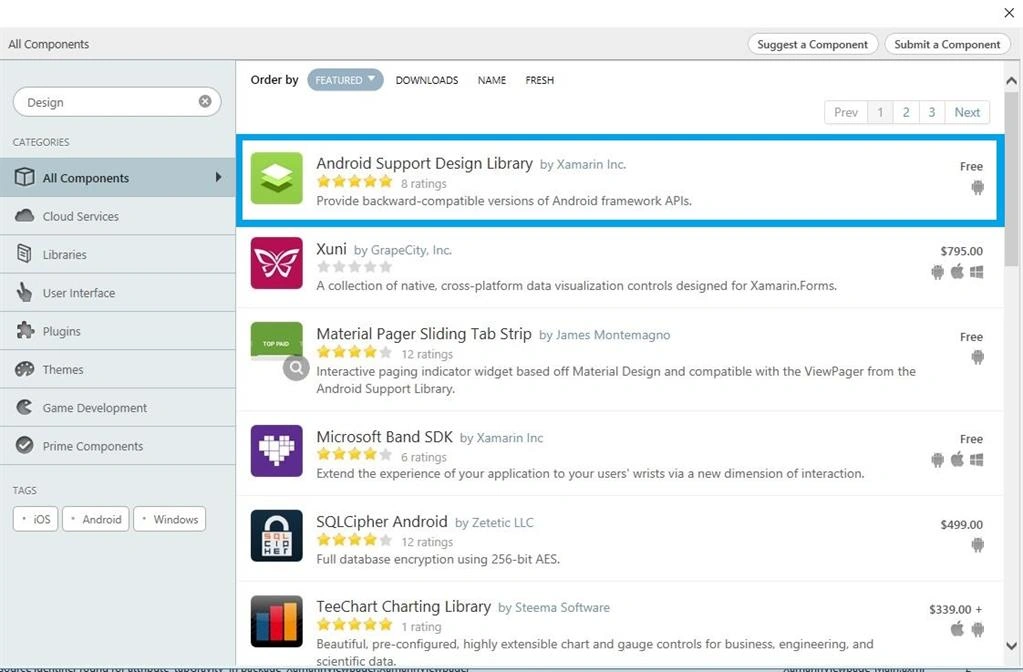
Step 2: Go to Solution Explorer-> Project Name-> Components, right click to Get More Components, open new dialog box. This dialog box is required to search the Design, add Android Support Design Library Packages.
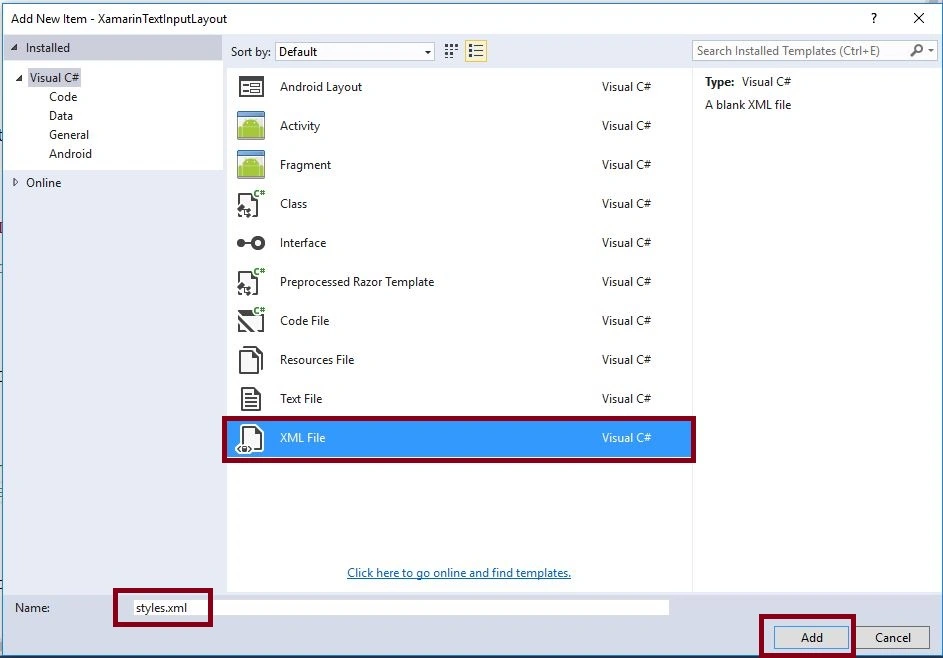
Step 3: Add Theme.AppCompat.Light.NoActionBar. Create styles.xml file. Go to Solution Explorer-> Project Name->Resources->values, right click to Add->New Item, open new dialog box. Select XML file and give the name for styles.xml,
Step 4: Create colors.xml file. Go to Solution Explorer-> Project Name->Resources->values. Right click to Add->New, open new dialog box. Select XML file give for colors.xml.
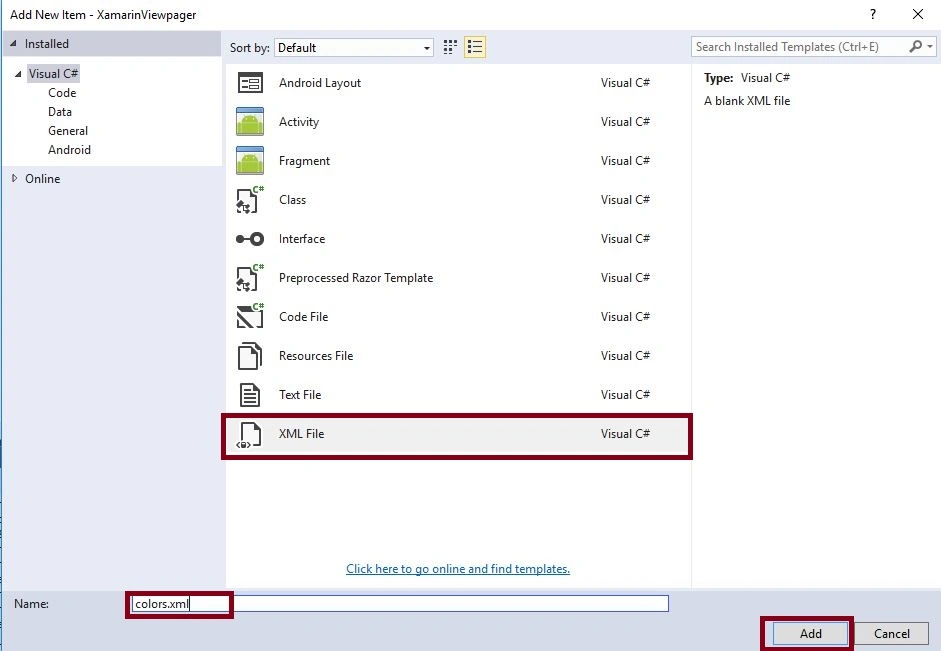
Step 5: Open Solution Explorer-> Project Name->Resources->values->colors.xml. Click to open Design View and the code, given below:
- <?xml version="1.0" encoding="utf-8" ?>
- <resources>
- <color name="window_background">#8AA5B9</color>
- </resources>
Step 6: Open Solution Explorer-> Project Name->Resources->values->styles.xml. Click to open Design View and the code, given below:
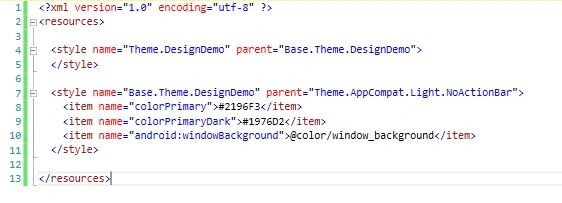
- <?xml version="1.0" encoding="utf-8" ?>
- <resources>
- <style name="Theme.DesignDemo" parent="Base.Theme.DesignDemo">
-
- </style>
- <style name="Base.Theme.DesignDemo" parent="Theme.AppCompat.Light.NoActionBar">
- <item name="colorPrimary">#2196F3</item> <item name="colorPrimaryDark">#1976D2</item> <item name="android:windowBackground">@color/window_background</item>
- </style>
- </resources>
Step 7: Open Solution Explorer-> Project Name->Resources->values->Strings.xml. Click to open Design View and the code, given below:
- <string name="drawer_open">Open</string>
- <string name="drawer_close">Close</string>
Step 8: Open the menu list to add one XML file. Go to Solution Explorer-> Project Name->Resources-> right click to Add->New Folder and give the name to the menu.
Step 9: Open Solution Explorer-> Project Name->Resources->menu. Right click to Add->New Item, open new Dialog box. Select XML file and give the name for nav_menu.xml,
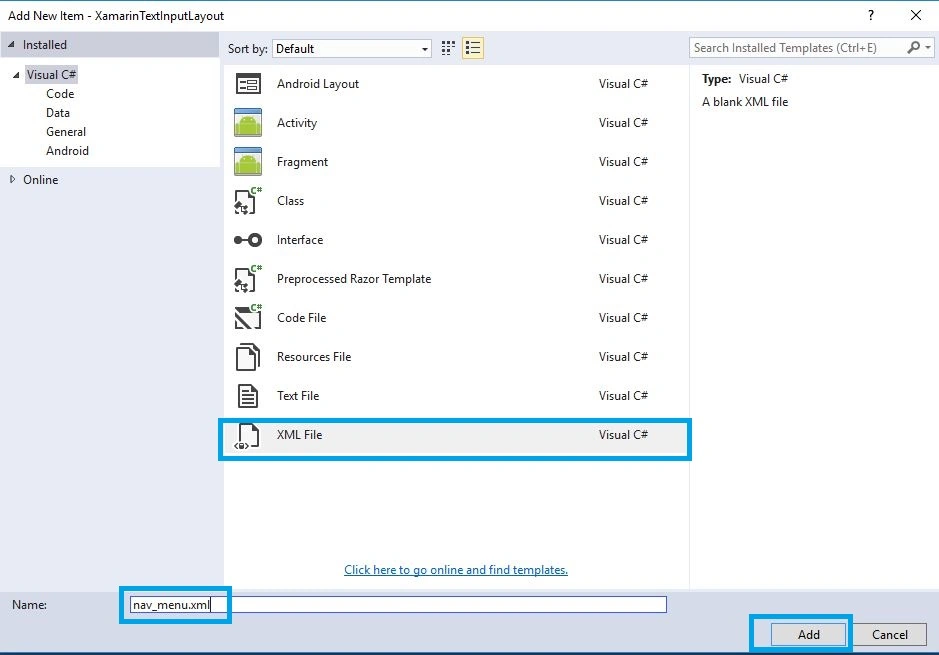
Step 10: Open Solution Explorer-> Project Name->Resources->menu->nav_menu.xml. Click to open Design View and the code, given below:
- <?xml version="1.0" encoding="utf-8" ?>
- <menu xmlns:android="http://schemas.android.com/apk/res/android">
- <group android:checkableBehavior="single">
- <item android:id="@+id/nav_home" android:icon="@drawable/ic_dashboard" android:title="Home" />
- <item android:id="@+id/nav_messages" android:icon="@drawable/ic_event" android:title="Messages" />
- <item android:id="@+id/nav_friends" android:icon="@drawable/ic_headset" android:title="Friends" />
- <item android:id="@+id/nav_discussion" android:icon="@drawable/ic_forum" android:title="Discussion" /> </group>
- <item android:title="Sub items">
- <menu>
- <item android:icon="@drawable/ic_dashboard" android:title="Sub item 1" />
- <item android:icon="@drawable/ic_forum" android:title="Sub item 2" />
- <item android:icon="@drawable/ic_done" android:title="Sub item 5" /> </menu>
- </item>
- </menu>
Step 11: Open Solution Explorer-> Project Name->Resources->layout. Right click to Add->New Item and open the new Dialog box. Select axml file and give name for nav_header.axml.
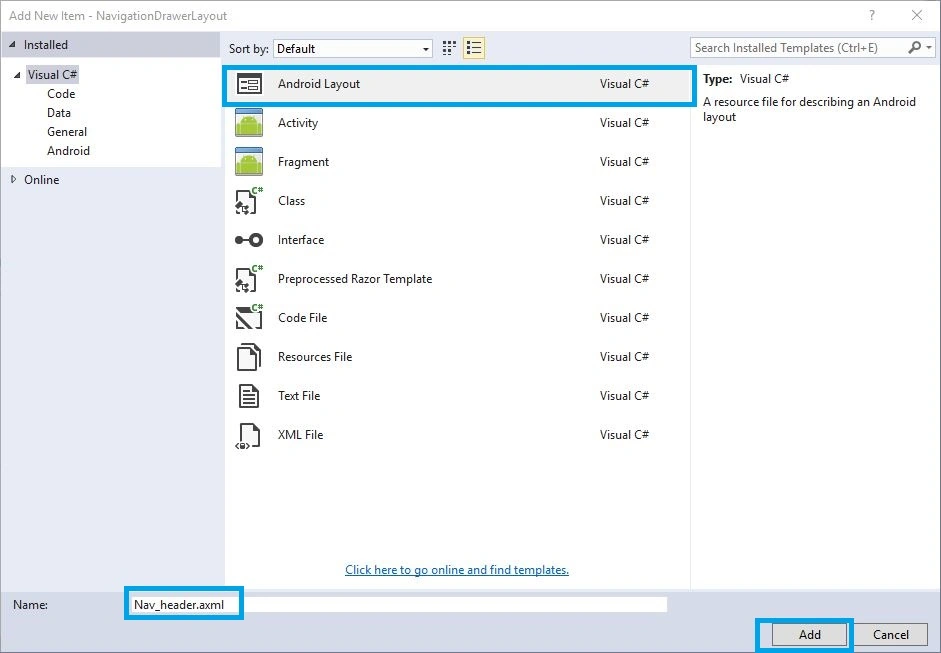
Step 12: Open Solution Explorer-> Project Name->Resources->Layout->nav_header.axml. Click to open Design View and the code, given below:
- <?xml version="1.0" encoding="utf-8"?>
- <LinearLayout xmlns:android="http://schemas.android.com/apk/res/android"
- xmlns:app="http://schemas.android.com/apk/res-auto"
- android:layout_width="match_parent"
- android:layout_height="210dp"
- android:background="#0099ff"
- android:padding="16dp"
- android:orientation="vertical"
- android:gravity="bottom">
- <TextView
- android:text="User Name"
- android:layout_width="match_parent"
- android:layout_height="wrap_content"
- android:id="@+id/navheader_username"
- android:textAppearance="@style/TextAppearance.AppCompat.Body1" />
- </LinearLayout>
Step 13: Open Solution Explorer-> Project Name->Resources->layout, right click to Add->New Item. Open new Dialog box. Select axml file and give the name for toolbar.axml,
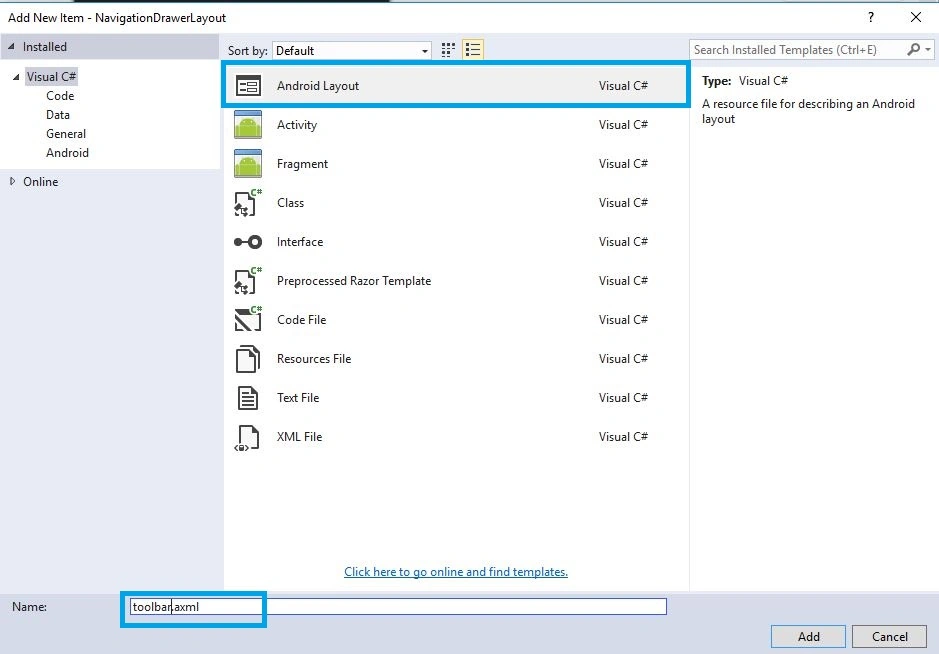
Step 14: Open Solution Explorer-> Project Name->Resources->Layout->toolbar.axml. Click to open Design View and the code, given below:
- <?xml version="1.0" encoding="utf-8"?>
- <android.support.design.widget.CoordinatorLayout xmlns:android="http://schemas.android.com/apk/res/android"
- xmlns:app="http://schemas.android.com/apk/res-auto"
- android:id="@+id/main_content"
- android:layout_width="match_parent"
- android:layout_height="match_parent">
- <android.support.design.widget.AppBarLayout
- android:id="@+id/appbar"
- android:layout_width="match_parent"
- android:layout_height="wrap_content"
- android:theme="@style/ThemeOverlay.AppCompat.Dark.ActionBar">
- <android.support.v7.widget.Toolbar
- android:id="@+id/toolbar"
- android:layout_width="match_parent"
- android:layout_height="wrap_content"
- android:elevation="4dp"
- android:background="?attr/colorPrimary" />
- </android.support.design.widget.AppBarLayout>
- </android.support.design.widget.CoordinatorLayout>
Step 15: Open Solution Explorer-> Project Name->Resources->Layout->Main.axml. Click to open Design View and the code, given below:
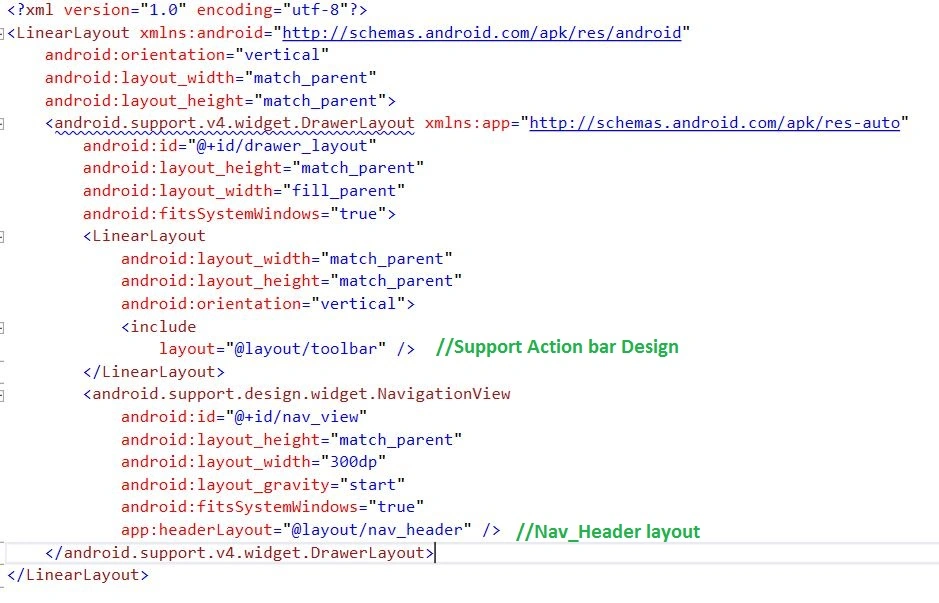
- <?xml version="1.0" encoding="utf-8"?>
- <LinearLayout xmlns:android="http://schemas.android.com/apk/res/android"
- android:orientation="vertical"
- android:layout_width="match_parent"
- android:layout_height="match_parent">
- <android.support.v4.widget.DrawerLayout xmlns:app="http://schemas.android.com/apk/res-auto"
- android:id="@+id/drawer_layout"
- android:layout_height="match_parent"
- android:layout_width="fill_parent"
- android:fitsSystemWindows="true">
- <LinearLayout
- android:layout_width="match_parent"
- android:layout_height="match_parent"
- android:orientation="vertical">
- <include layout="@layout/toolbar" />
- </LinearLayout>
- <android.support.design.widget.NavigationView
- android:id="@+id/nav_view"
- android:layout_height="match_parent"
- android:layout_width="300dp"
- android:layout_gravity="start"
- android:fitsSystemWindows="true"
- app:headerLayout="@layout/nav_header" />
- </android.support.v4.widget.DrawerLayout>
- </LinearLayout>
Step 16: After Design view creation, open Solution Explorer-> Project Name->MainActivity.cs and the steps, given below:
Step 17: Add below Namespaces and Theme Name,
- using Android.Support.V7.App;
- using Android.Support.V4.Widget;
- using V7Toolbar = Android.Support.V7.Widget.Toolbar;
- using Android.Support.Design.Widget;
- [Activity(Theme = "@style/Theme.DesignDemo"])
Step 18: Create Drawer Layout and Navigation View variable, declare the Drawer Layout and Navigation View within the OnCreate().before to change the Activity to AppCompatActivity.
- protected override void OnCreate(Bundle bundle)
- {
- base.OnCreate(bundle);
-
- SetContentView(Resource.Layout.Main);
- drawerLayout = FindViewById < DrawerLayout > (Resource.Id.drawer_layout);
-
- var toolbar = FindViewById < V7Toolbar > (Resource.Id.toolbar);
- SetSupportActionBar(toolbar);
- var drawerToggle = new ActionBarDrawerToggle(this, drawerLayout, toolbar, Resource.String.drawer_open, Resource.String.drawer_close);
- drawerLayout.SetDrawerListener(drawerToggle);
- drawerToggle.SyncState();
- navigationView = FindViewById < NavigationView > (Resource.Id.nav_view);
- setupDrawerContent(navigationView);
- }
- void setupDrawerContent(NavigationView navigationView)
- {
- navigationView.NavigationItemSelected += (sender, e) =>
- {
- e.MenuItem.SetChecked(true);
- drawerLayout.CloseDrawers();
- };
- }
- public override bool OnCreateOptionsMenu(IMenu menu)
- {
- navigationView.InflateMenu(Resource.Menu.nav_menu);
- return true;
- }
Step 19: Press F5 or build and run the Application.

Finally, we successfully created Xamarin Android Navigation Drawer Layout Android Support Design.


Bhavesh GhulPosted Jul 20, 2018, 2:45 AM
I am Create Android Navigation Drawer Layout Design Is Complied but how to Manage Select Menu that Time Selected Menu Layout Open...???
karthik bandiPosted Jul 10, 2018, 8:20 AM
Where my main.axml file contains three image buttons....Can i implement navigation drawer with existed design
karthik bandiPosted Jul 10, 2018, 8:19 AM
How can i implement this with already existed design in main.axml
Maha AzzamPosted Jun 23, 2018, 9:19 AM
I have so many errors in the cs file and the style file
am sePosted Jun 13, 2018, 8:01 AM
Hi ,in mainActivity.xaml i load a fragment under *include layout=@layout / toolbar"* but not displayed. why ?
Terrer SandmanPosted Apr 9, 2018, 6:41 AM
I followed your code and it says that the drawerLayout does not exist in the current context. Not only that, other name too.
mohtashim siddiqPosted Mar 24, 2018, 5:57 AM
I know the article is old. But if you could add some more detail it would be helpful
mohtashim siddiqPosted Mar 24, 2018, 5:56 AM
Hi I am new to xamarin. Could you just explain the article why are we adding things and whats the pupose.
zohre rafieiPosted Feb 14, 2018, 6:47 AM
Hi . thank u . i try to add a button in my main page above navigation layout but this button creat on toolbar. how i can do it well?
Hossein RezapourPosted Jan 30, 2018, 7:09 AM
Hi. I try to add a listview and textview to show any items in my main page, but i don't know how can i do that.In which part can I use this tool? how can i do this in main.xml?
ahmad hamdiPosted Jan 28, 2018, 10:55 PM
Just a question , how can make right to left navigation toolbar and menu drawer? layout thanks
ahmad hamdiPosted Jan 28, 2018, 10:54 PM
Hello mr.mani thanks for your project
Akid HouriehPosted Dec 13, 2017, 9:58 AM
How I can move it to the right side ?! please answer me
anesu mugombaPosted Nov 14, 2017, 1:46 PM
Hi. how do i change fragments on menu item click?
Ripdaman SinghPosted Sep 3, 2017, 8:00 AM
Hi, you post i so good, please help me, How to open new Activity when clicked on Menu button, and also how to add App logo on ActivityBar. Please help me as soon as.
Nelson JohnPosted Aug 26, 2017, 4:40 PM
To which layout and where do i add custom content? like adding buttons textviews etc to the body...
Ali MPosted Aug 19, 2017, 9:25 AM
How add tab to main page now? i add ActionBar.NavigationMode = ActionBarNavigationMode.Tabs; AddTab("Tab One"); AddTab("Tab Two"); AddTab("Tab Three"); but i have error
ali aliPosted Jun 28, 2017, 2:05 AM
One Question : How To set Direction Of Navigation Drawer to Right Side ?
ali aliPosted Jun 28, 2017, 2:03 AM
Thanks For Your Article , Only have One main Notice : in this Article You must use Android Support Design Library Packages Version 23.1.1.1 . at now this package Updated to 25.0.1 and this new version do not work correctly for this Article.
Vaibhav PatilPosted Jun 27, 2017, 2:28 AM
Ok thanks i'll try that
Vaibhav PatilPosted Jun 26, 2017, 2:28 PM
Please help me with this. I have JsonValue weatherResults = json["weatherObservation"]; when i try to extract data using location.Text = weatherResults["stationName"]; I get whole json string again and eventually program breaks. What should i do ? I have referenced following link : https://developer.xamarin.com/recipes/android/web_services/consuming_services/call_a_rest_web_service/
Vaibhav PatilPosted Jun 26, 2017, 4:15 AM
You're the genius :) , I have posted this question on stackoverflow no over answered it correctly. Thank you very much for answer. Are you on stackoverflow, if you're then please post your profile url, I want to follow you on stackoverflow too. Thanks you again. Keep doing good work
Vaibhav PatilPosted Jun 24, 2017, 7:22 AM
OnOptionsItemSelected(IMenuItem item) Not working. Debugger not even hitting it. I am trying to implement menu item click but nothing working. Please if possible create Navigation menu click tutorial or post some code here. TIA
Vaibhav PatilPosted Jun 20, 2017, 5:50 AM
Nice tut. Just you have to mention which library supports which sdkbuild tools. Beginners definitely stuck there.
Alireza KingPosted Jun 18, 2017, 6:28 AM
Sorry my question is wrong how can I change items background in navigation
Alireza KingPosted Jun 18, 2017, 6:25 AM
Thanks your samples are geat
Shahul KtPosted May 14, 2017, 4:47 AM
Hai i want add user name dynamically how can i do that???
Shahul KtPosted May 11, 2017, 3:31 AM
I got this error when i open main design Bridge [resources.resolve] Couldn't resolve resource @layout/tool mono.android.DesignerException: You must specifiy a valid layout reference. The layout ID @layout/tool is not valid. at mono.android.DesignerException.fromThrowable(DesignerException.java:43)
Shahul KtPosted May 11, 2017, 3:29 AM
I want add some text in main
Yuri DiasPosted May 9, 2017, 9:18 PM
I'm getting some errors because of the actionbar: 'SetSupportActionBar' does not exist in the current context, 'supportActionBar does not exist in the current context'... any suggestion ? thanks
Antonio TedeschiPosted Apr 27, 2017, 11:16 AM
Thank you. So do I have to duplicate the menu for each page?
Antonio TedeschiPosted Apr 27, 2017, 4:33 AM
I would like to set an activity when I select a menu
Antonio TedeschiPosted Apr 27, 2017, 4:32 AM
In navigationView.NavigationItemSelected += (sender, e) => { .... }
Antonio TedeschiPosted Apr 27, 2017, 3:40 AM
Where set the content when clic on item menu?
Anbu ManiPosted Jan 30, 2017, 10:33 PM
Hi...use navigationView click event
alex vidalPosted Jan 30, 2017, 5:16 PM
How to use menu item click event?
Michael PeterPosted Aug 20, 2016, 7:05 AM
fantastic!
Bhavik PatelPosted Jul 16, 2016, 10:21 PM
Nice
Ravi KandelPosted Jul 14, 2016, 9:27 AM
Thanks for info!
Anu VPosted Jul 14, 2016, 1:50 AM
Nice
kalu singh raoPosted Jul 14, 2016, 1:34 AM
Nice...
Abhijeet SinghPosted Jul 14, 2016, 1:06 AM
Good one...