

Step 1: Open form solution in Visual Studio.
Step 2: Add new item to the empty share point project.I.e is visual web part.
Step 3: Based of our need we have to design like below process.

Step 4:
Step 2: Add new item to the empty share point project.I.e is visual web part.
Step 3: Based of our need we have to design like below process.
Step 4:
- public VisualWebPart() {}
- string strbank = "India";
- [WebBrowsable(true), WebDisplayName("BankName"), WebDescription("setBankName"), Personalizable(PersonalizationScope.Shared)]
- public string proBank {
- get {
- return strbank;
- }
- set {
- strbank = value;
- }
- }
- //Bank Location
- //collection of object like dropdown
- public enum enumBankLocations {
- noida, hyderabad, chennai, newdelhi
- }
- enumBankLocations enumLocation;
- [WebBrowsable(true), WebDisplayName("Bank Location"), WebDescription("Select Bank Location"), Personalizable(PersonalizationScope.Shared)]
- public enumBankLocations proBankLocation {
- get {
- return enumLocation;
- }
- set {
- enumLocation = value;
- }
- }
- //status
- bool boolAccount = true;
- [WebBrowsable(true), WebDisplayName("Account Status"), WebDescription("Set Account Statuss"), Personalizable(PersonalizationScope.Shared)]
- public Boolean proAccStatment {
- get {
- return boolAccount;
- }
- set {
- boolAccount = value;
- }
- }
Step 5: Then go to our button functionality.
- protected void Button1_Click(object sender, EventArgs e) {
- string strstatus = "";
- if (proAccStatment == true) {
- strstatus = "AccountCreated";
- } else {
- strstatus = "Not Created";
- }
- Label1.Text = "<br>EmpName:" + TextBox1.Text + "<br>BankName:" + proBank + "<br>BankLocation" + proBankLocation + "<br>AccountStatus" + strstatus;
- }
Step 6: After Deployment success.Open Our Share point Site And Insert our custom web part.
Step 7: Edit the web part properties in right side panel like this.
Step 7: Edit the web part properties in right side panel like this.
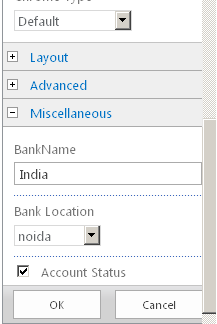
Step 8: Then This Is Our Custom Web Part Properties.
Finally, create Custom Web Part Properties to our visual web part.
Finally, create Custom Web Part Properties to our visual web part.
Join the conversation! Your thoughts help the community grow.