

Introduction
In this blog, I will demonstrate how to create user registration form with an encrypted password using ASP.NET step by step and save the encrypted password in a database table.
Step 1
Open SQL Server 2014 and create a database table UserRegistration.
- CREATE TABLE [dbo].[UserRegistration](
- [ID] [int] IDENTITY(1,1) NOT NULL,
- [Name] [nvarchar](50) NULL,
- [Email] [nvarchar](50) NULL,
- [PhoneNumber] [nvarchar](50) NULL,
- [Password] [nvarchar](50) NULL,
- [Created] [datetime] NULL,
- CONSTRAINT [PK_UserRegistration] PRIMARY KEY CLUSTERED
- (
- [ID] ASC
- )WITH (PAD_INDEX = OFF, STATISTICS_NORECOMPUTE = OFF, IGNORE_DUP_KEY = OFF, ALLOW_ROW_LOCKS = ON, ALLOW_PAGE_LOCKS = ON) ON [PRIMARY]
- ) ON [PRIMARY]
- GO
- CREATE procedure [dbo].[spRegister]
- (
- @Name nvarchar(50),
- @Email nvarchar(50),
- @PhoneNumber nvarchar(50),
- @Password nvarchar(50),
- @Created datetime
- )
- as
- begin
- insert into [dbo].[UserRegistration](Name,Email,PhoneNumber,Password,Created)
- values(@Name,@Email,@PhoneNumber,@Password,GETDATE())
- end

Step 2
Open Visual Studio 2015 to create an empty web application project and give it a meaningful name. Right-click or double-click on web config file and check for database connection in it.
- <connectionStrings>
- <add name="DBCS" connectionString="data source=DESKTOP-M021QJH\SQLEXPRESS; database=SampleDB; integrated security=true;"/>
- </connectionStrings>
Add the below line of code if you get a validation error.
- <appSettings>
- <add key="ValidationSettings:UnobtrusiveValidationMode" value="None" />
- </appSettings>
Step 3
Right-click on the project, select "Add", choose web form, and name it RegisterForm.
Add script and bootstrap 4 style plugin files.
- <link rel="stylesheet" href="https://cdnjs.cloudflare.com/ajax/libs/font-awesome/4.7.0/css/font-awesome.min.css">
- <link href="Content/bootstrap.min.css" rel="stylesheet" />
- <script src="scripts/jquery-3.3.1.min.js"></script>
- <script src="scripts/bootstrap.min.js"></script>
- <style>
- .bottom {
- margin-bottom: 5px !important;
- }
- </style>
Design the web form using textbox control, button control, and validation control. Then, apply respective bootstrap 4 classes.
- <body>
- <form id="form1" runat="server">
- <div class="container py-4">
- <div class="col-md-5 offset-md-3">
- <div class="card card-outline-secondary rounded-0">
- <div class="card-header bg-success rounded-0">
- <h4 class="text-center text-uppercase text-white">Registration</h4>
- </div>
- <div class="card-body">
- <div class="form-group bottom">
- <label>Name</label>
- <div class="input-group">
- <div class="input-group-prepend">
- <div class="input-group-text"><i class="fa fa-user"></i></div>
- </div>
- <asp:TextBox ID="txtName" runat="server" CssClass="form-control"></asp:TextBox>
- </div>
- <asp:RequiredFieldValidator ID="rfvName" ControlToValidate="txtName" CssClass="text-danger" runat="server" ErrorMessage="Please enter name"></asp:RequiredFieldValidator>
- </div>
- <div class="form-group bottom">
- <label>Email</label>
- <div class="input-group">
- <div class="input-group-prepend">
- <div class="input-group-text"><i class="fa fa-envelope"></i></div>
- </div>
- <asp:TextBox ID="txtEmail" runat="server" CssClass="form-control"></asp:TextBox>
- </div>
- <asp:RequiredFieldValidator ID="rfvEmail" Display="Dynamic" ControlToValidate="txtEmail" CssClass="text-danger" runat="server" ErrorMessage="Please enter email address"></asp:RequiredFieldValidator>
- <asp:RegularExpressionValidator ID="revEmail" ControlToValidate="txtEmail" CssClass="text-danger" runat="server" ErrorMessage="Enter valid email" ValidationExpression="\w+([-+.']\w+)*@\w+([-.]\w+)*\.\w+([-.]\w+)*"></asp:RegularExpressionValidator>
- </div>
- <div class="form-group bottom">
- <label>Phone Number</label>
- <div class="input-group">
- <div class="input-group-prepend">
- <div class="input-group-text"><i class="fa fa-phone"></i></div>
- </div>
- <asp:TextBox ID="txtPhoneNumber" runat="server" CssClass="form-control"></asp:TextBox>
- </div>
- <asp:RequiredFieldValidator ID="rfvPhoneNumber" Display="Dynamic" ControlToValidate="txtPhoneNumber" CssClass="text-danger" runat="server" ErrorMessage="Please enter phone number"></asp:RequiredFieldValidator>
- <asp:RegularExpressionValidator ID="revPhoneNumber" ControlToValidate="txtPhoneNumber" CssClass="text-danger" runat="server" ErrorMessage="Enter valid phone number" ValidationExpression="[0-9]{10}"></asp:RegularExpressionValidator>
- </div>
- <div class="form-group bottom">
- <label>Password</label>
- <div class="input-group">
- <div class="input-group-prepend">
- <div class="input-group-text"><i class="fa fa-lock"></i></div>
- </div>
- <asp:TextBox ID="txtPassword" TextMode="Password" runat="server" CssClass="form-control"></asp:TextBox>
- </div>
- <asp:RequiredFieldValidator ID="rfvPassword" ControlToValidate="txtPassword" CssClass="text-danger" runat="server" ErrorMessage="Please enter password"></asp:RequiredFieldValidator>
- </div>
- <div class="form-group bottom">
- <label>Confirm Password</label>
- <div class="input-group">
- <div class="input-group-prepend">
- <div class="input-group-text"><i class="fa fa-lock"></i></div>
- </div>
- <asp:TextBox ID="txtConfirmPassword" TextMode="Password" runat="server" CssClass="form-control"></asp:TextBox>
- </div>
- <asp:CompareValidator ID="CompareValidator1" ControlToCompare="txtPassword" Display="Dynamic" ControlToValidate="txtConfirmPassword" CssClass="text-danger" runat="server" ErrorMessage="Password does not match"></asp:CompareValidator>
- <asp:RequiredFieldValidator ID="rfvConfirmPassword" ControlToValidate="txtConfirmPassword" CssClass="text-danger" runat="server" ErrorMessage="Please enter password"></asp:RequiredFieldValidator>
- </div>
- <div class="form-group">
- <asp:Button ID="btnRegiter" CssClass="btn btn-success rounded-0 btn-block" runat="server" Text="Register" OnClick="btnRegiter_Click" />
- </div>
- <asp:Label ID="lblMessage" runat="server"></asp:Label>
- </div>
- </div>
- </div>
- </div>
- </form>
- </body>
Step 4
Double-click on the "Register" button and write the following C# code.
Add the following namespace.
- using System.Configuration;
- using System.Data;
- using System.Data.SqlClient;
- using System.Security.Cryptography;
- using System.IO;
- using System.Text;
Complete code
- using System;
- using System.Configuration;
- using System.Data;
- using System.Data.SqlClient;
- using System.Security.Cryptography;
- using System.IO;
- using System.Text;
- namespace UserRegistration_Demo
- {
- public partial class RegisterForm : System.Web.UI.Page
- {
- protected void Page_Load(object sender, EventArgs e)
- {
- if (!IsPostBack)
- {
- ClearTexbox();
- }
- }
- private void ClearTexbox()
- {
- txtName.Text = string.Empty;
- txtEmail.Text = string.Empty;
- txtPhoneNumber.Text = string.Empty;
- }
- private string Encrypt(string clearText)
- {
- string EncryptionKey = "ABCDEFGHIJKLMNOPQRSTUVWXYZ123456789";
- byte[] clearBytes = Encoding.Unicode.GetBytes(clearText);
- using (Aes encryptor = Aes.Create())
- {
- Rfc2898DeriveBytes pdb = new Rfc2898DeriveBytes(EncryptionKey, new byte[] { 0x49, 0x76, 0x61, 0x6e, 0x20, 0x4d, 0x65, 0x64, 0x76, 0x65, 0x64, 0x65, 0x76 });
- encryptor.Key = pdb.GetBytes(32);
- encryptor.IV = pdb.GetBytes(16);
- using (MemoryStream ms = new MemoryStream())
- {
- using (CryptoStream cs = new CryptoStream(ms, encryptor.CreateEncryptor(), CryptoStreamMode.Write))
- {
- cs.Write(clearBytes, 0, clearBytes.Length);
- cs.Close();
- }
- clearText = Convert.ToBase64String(ms.ToArray());
- }
- }
- return clearText;
- }
- protected void btnRegiter_Click(object sender, EventArgs e)
- {
- try
- {
- string CS = ConfigurationManager.ConnectionStrings["DBCS"].ConnectionString;
- using (SqlConnection con = new SqlConnection(CS))
- {
- SqlCommand cmd = new SqlCommand("spRegister", con);
- cmd.CommandType = CommandType.StoredProcedure;
- con.Open();
- cmd.Parameters.AddWithValue("@Name", txtName.Text.Trim());
- cmd.Parameters.AddWithValue("@Email", txtEmail.Text.Trim());
- cmd.Parameters.AddWithValue("@PhoneNumber",txtPhoneNumber.Text.Trim());
- cmd.Parameters.AddWithValue("@Password", Encrypt(txtPassword.Text.Trim()));
- cmd.Parameters.AddWithValue("@Created", DateTime.Now);
- cmd.ExecuteNonQuery();
- ClearTexbox();
- lblMessage.Text = "You have registered succussfully";
- lblMessage.ForeColor= System.Drawing.Color.Green;
- }
- }
- catch (Exception)
- {
- lblMessage.Text = "You have not registered";
- lblMessage.ForeColor = System.Drawing.Color.Red;
- }
- }
- }
- }
Step 5 - Run the project by pressing "Ctrl+F5".
Screenshot 1

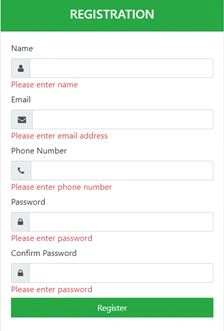
Screenshot 3

Joe YeomansPosted Dec 1, 2018, 5:36 PM
How do you do a login page?