

Introduction
In this blog, we are going to learn how to import Excel data into an SQL database table using ASP.NET and display the data in a GridView jQuery data table.
Step 1
Create database table in the SQL Server of your choice.
- CREATE TABLE [dbo].[Employee](
- [ID] [int] IDENTITY(1,1) NOT NULL,
- [Name] [nvarchar](50) NULL,
- [Position] [nvarchar](50) NULL,
- [Office] [nvarchar](50) NULL,
- [Salary] [nvarchar](50) NULL,
- CONSTRAINT [PK_Employee] PRIMARY KEY CLUSTERED
- (
- [ID] ASC
- )WITH (PAD_INDEX = OFF, STATISTICS_NORECOMPUTE = OFF, IGNORE_DUP_KEY = OFF, ALLOW_ROW_LOCKS = ON, ALLOW_PAGE_LOCKS = ON) ON [PRIMARY]
- ) ON [PRIMARY]
- GO
- CREATE procedure [dbo].[spGetAllEmployee]
- as
- begin
- select ID,Name,Position,Office,Salary from Employee
- end
Double click on webconfig file and add database connection.
- <connectionStrings>
- <add name="DBCS" connectionString="data source=FARHAN\SQLEXPRESS; database=simpleDB; integrated security=true;"/>
- </connectionStrings>
Step 3
Create an empty project in Visual Studio. Right-click the project and aa dd new item, choose web form, give it a meaningful name, and click on Add.
Add script and styles in the head section of web form:
- <link rel="stylesheet" href="https://cdnjs.cloudflare.com/ajax/libs/font-awesome/4.7.0/css/font-awesome.min.css">
- <link rel="stylesheet" href="https://maxcdn.bootstrapcdn.com/bootstrap/4.0.0/css/bootstrap.min.css">
- <script src="https://ajax.googleapis.com/ajax/libs/jquery/3.3.1/jquery.min.js"></script>
- <script src="https://maxcdn.bootstrapcdn.com/bootstrap/4.0.0/js/bootstrap.min.js"></script>
- <link rel="stylesheet" href="https://cdn.datatables.net/1.10.16/css/dataTables.bootstrap4.min.css" />
- <script src="https://cdn.datatables.net/1.10.16/js/jquery.dataTables.min.js" type="text/javascript"></script>
- <script src="https://cdn.datatables.net/1.10.16/js/dataTables.bootstrap4.min.js" type="text/javascript"></script>
Write script to apply jQuery data table with GridView:
- <script type="text/javascript">
- $(document).ready(function () {
- $("#GridView1").prepend($("<thead></thead>").append($(this).find("tr:first"))).dataTable();
- });
- </script>
Step 4
Design HTML web form by dragging and dropping the "File Upload" button and GridView control and some Bootstrap 4 classes.
- <body>
- <form id="form1" runat="server">
- <div class="container py-3">
- <h2 class="text-center text-uppercase">How to upload excel file in sql server database in asp.net</h2>
- <div class="card">
- <div class="card-header bg-primary text-uppercase text-white">
- <h5>Import Excel File</h5>
- </div>
- <div class="card-body">
- <button style="margin-bottom:10px;" type="button" class="btn btn-primary" data-toggle="modal" data-target="#myModal">
- <i class="fa fa-plus-circle"></i> Import Excel
- </button>
- <div class="modal fade" id="myModal">
- <div class="modal-dialog">
- <div class="modal-content">
- <div class="modal-header">
- <h4 class="modal-title">Import Excel File</h4>
- <button type="button" class="close" data-dismiss="modal">×</button>
- </div>
- <div class="modal-body">
- <div class="row">
- <div class="col-md-12">
- <div class="form-group">
- <label>Choose excel file</label>
- <div class="input-group">
- <div class="custom-file">
- <asp:FileUpload ID="FileUpload1" CssClass="custom-file-input" runat="server" />
- <label class="custom-file-label"></label>
- </div>
- <label id="filename"></label>
- <div class="input-group-append">
- <asp:Button ID="btnUpload" runat="server" CssClass="btn btn-outline-primary" Text="Upload" OnClick="btnUpload_Click" />
- </div>
- </div>
- <asp:Label ID="lblMessage" runat="server"></asp:Label>
- </div>
- </div>
- </div>
- </div>
- <div class="modal-footer">
- <button type="button" class="btn btn-danger" data-dismiss="modal">Close</button>
- </div>
- </div>
- </div>
- </div>
- <asp:GridView ID="GridView1" HeaderStyle-CssClass="bg-primary text-white" ShowHeaderWhenEmpty="true" runat="server" AutoGenerateColumns="false" CssClass="table table-bordered``">
- <EmptyDataTemplate>
- <div class="text-center">No record found</div>
- </EmptyDataTemplate>
- <Columns>
- <asp:BoundField HeaderText="ID" DataField="ID" />
- <asp:BoundField HeaderText="Name" DataField="Name" />
- <asp:BoundField HeaderText="Position" DataField="Position" />
- <asp:BoundField HeaderText="Office" DataField="Office" />
- <asp:BoundField HeaderText="Salary" DataField="Salary" />
- </Columns>
- </asp:GridView>
- </div>
- </div>
- </div>
- </form>
- </body>
Step 5
Double click on Upload button and write the following C# code.
Add namespace
using System.Data.SqlClient;
using System.Configuration;
using System.Data.OleDb;
using System.Data.Common;
Complete C# code
- using System;
- using System.Data;
- using System.Data.SqlClient;
- using System.Configuration;
- using System.Data.OleDb;
- using System.Data.Common;
- namespace Upload_ExcelFile_Demo
- {
- public partial class FileUpload : System.Web.UI.Page
- {
- protected void Page_Load(object sender, EventArgs e)
- {
- if (!IsPostBack)
- {
- BindGridview();
- }
- }
- private void BindGridview()
- {
- string CS = ConfigurationManager.ConnectionStrings["DBCS"].ConnectionString;
- using (SqlConnection con = new SqlConnection(CS))
- {
- SqlCommand cmd = new SqlCommand("spGetAllEmployee", con);
- cmd.CommandType = CommandType.StoredProcedure;
- con.Open();
- GridView1.DataSource = cmd.ExecuteReader();
- GridView1.DataBind();
- }
- }
- protected void btnUpload_Click(object sender, EventArgs e)
- {
- if (FileUpload1.PostedFile!=null)
- {
- try
- {
- string path = string.Concat(Server.MapPath("~/UploadFile/" + FileUpload1.FileName));
- FileUpload1.SaveAs(path);
- // Connection String to Excel Workbook
- string excelCS = string.Format("Provider=Microsoft.ACE.OLEDB.12.0;Data Source={0};Extended Properties=Excel 8.0", path);
- using (OleDbConnection con = new OleDbConnection(excelCS))
- {
- OleDbCommand cmd = new OleDbCommand("select * from [Sheet1$]", con);
- con.Open();
- // Create DbDataReader to Data Worksheet
- DbDataReader dr = cmd.ExecuteReader();
- // SQL Server Connection String
- string CS = ConfigurationManager.ConnectionStrings["DBCS"].ConnectionString;
- // Bulk Copy to SQL Server
- SqlBulkCopy bulkInsert = new SqlBulkCopy(CS);
- bulkInsert.DestinationTableName = "Employee";
- bulkInsert.WriteToServer(dr);
- BindGridview();
- lblMessage.Text = "Your file uploaded successfully";
- lblMessage.ForeColor = System.Drawing.Color.Green;
- }
- }
- catch (Exception)
- {
- lblMessage.Text = "Your file not uploaded";
- lblMessage.ForeColor = System.Drawing.Color.Red;
- }
- }
- }
- }
- }
Step 6
Run project using ctr+F5.
Here is the final output.
Screenshot 1

Screenshot 2
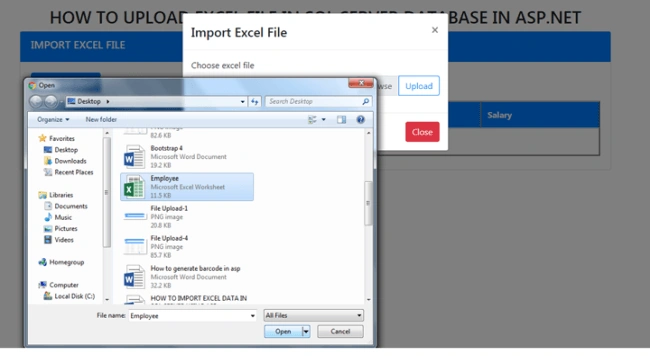
Screenshot 3

siddalingesh soraturPosted Jul 9, 2025, 3:50 PM
I am getting System.InvalidOperationException: 'The given ColumnMapping does not match up with any column in the source or destination.' error
Chetan NegiPosted Oct 3, 2022, 7:43 AM
This code is not run properply not go to dbreader
richard cruzPosted Feb 18, 2022, 5:33 AM
Can you add validation status like active and in-active and for those those data not active data will be send to log files and be tag as not in-active.
Jose FidalgoPosted Apr 20, 2021, 2:08 PM
Gives me error Microsoft.ACE.OLEDB.12.0'
Ibrahim KhalifiPosted Mar 1, 2021, 9:01 PM
Excellent job, thank you so much, it is perfect and you saved my searching time, I spent many hours and days, but finally I got it from you. Best regards;
vamsi krishnaPosted Jan 2, 2021, 7:23 AM
Sir file does not upload astise apply your code but not working but db is working how to solve
Mahendra ValviPosted Dec 10, 2020, 10:18 PM
maximum data? it is not accepting 100K records, need to do any settings at configuration file?
Umesh DaiyaPosted Mar 27, 2020, 2:34 AM
How to stop blank data entry from excel file. when i try with some space in excel sheet its enter blank records in database
Uday KrishnaPosted Aug 22, 2019, 7:19 AM
The 'Microsoft.ACE.OLEDB.12.0' provider is not registered on the local machine.this is the error im getting please help
abhijit chakrabortyPosted Jul 18, 2019, 12:09 AM
I got error "External table is not in the expected format."
Antonovici CristianPosted May 21, 2019, 4:58 AM
Super tutorial, but for me don't show file in label after select. Solved with this fix: Add in script this function: function showFile() { var fileName = document.getElementById('<%=FileUpload1.ClientID %>').value.split("\\").pop(); $(document.getElementById('<%=FileUpload1.ClientID %>')).siblings(".custom-file-label").addClass("selected").html(fileName); }; and add onchange to asp element <asp:FileUpload ID="FileUpload1" CssClass="custom-file-input" onchange="showFile()" runat="server" /> . TNX
Donda MitulPosted Mar 6, 2019, 12:13 AM
Message = "The Microsoft Access database engine could not find the object 'FlashReport'. Make sure the object exists and that you spell its name and the path name correctly. If 'FlashReport' is not a local object, check your network connection or contact the server a...
Stan LightPosted Feb 7, 2019, 3:31 PM
Farhan, Thanks for this little app but no file gets selected and nothing gets uploaded. Any suggestions?
Musadiq HussainPosted Oct 16, 2018, 11:07 AM
Dear sir,file is uploading successfully to destination folder but data is not move to sql server database table.and it does not show any error message.
sivan nspPosted Jul 4, 2018, 7:35 AM
HI, I am also working the same scenario but I am using angular 6 and asp.net core 2.1.3 Can u provide any other tutorial for export and import excel in SQL server.
sivan nspPosted Jul 4, 2018, 7:34 AM
Hi Farhan Ahmed,