

Introduction
In this blog, we will learn how to insert and retrieve data using jQuery Ajax in asp.net. We will create a web service and consume that web service in our project with the help of jQuery Ajax.
Step 1
Create a database in the SQL server of your choice.
- CREATE TABLE [dbo].[tblEmployees](
- [ID] [int] IDENTITY(1,1) NOT NULL,
- [Name] [nvarchar](50) NULL,
- [Gender] [char](10) NULL,
- [Phone] [nvarchar](50) NULL,
- [Email] [nvarchar](50) NULL,
- [Age] [int] NULL,
- [Salary] [nvarchar](50) NULL,
- CONSTRAINT [PK_tblEmployees] PRIMARY KEY CLUSTERED
- (
- [ID] ASC
- )WITH (PAD_INDEX = OFF, STATISTICS_NORECOMPUTE = OFF, IGNORE_DUP_KEY = OFF, ALLOW_ROW_LOCKS = ON, ALLOW_PAGE_LOCKS = ON) ON [PRIMARY]
- ) ON [PRIMARY]
- GO
- CREATE procedure [dbo].[spAddNewEmployee]
- (
- @Name nvarchar(50),
- @Gender char(10),
- @Phone nvarchar(50),
- @Email nvarchar(50),
- @Age int,
- @Salary nvarchar(50)
- )
- as
- begin
- insert into tblEmployees(Name,Gender,Phone,Email,Age,Salary)
- values(@Name,@Gender,@Phone,@Email,@Age,@Salary)
- end
- CREATE procedure [dbo].[spGetEmployees]
- as
- begin
- select ID,Name,Gender,Phone,Email,Age, Salary from tblEmployees
- end
Step 2
Add code in the webconfig file:
- <connectionStrings>
- <add name="DBCS" connectionString="data source=FARHAN\SQLEXPRESS; database=JQueryDB; integrated security=SSPI;" providerName="System.Data.SqlClient"/>
- </connectionStrings>
- <system.web>
- <webServices>
- <protocols>
- <add name="HttpGet"/>
- </protocols>
- </webServices>
- </system.web>
Step 3
Create class -- right click on new item, choose class, give the name employee.cs:
- public class Employee
- {
- public int ID { get; set; }
- public string Name { get; set; }
- public string Gender { get; set;}
- public string Phone { get; set; }
- public string Email { get; set; }
- public int Age { get; set; }
- public string Salary { get; set; }
- }
Step 4
Create web service and give name as EmployeeService.asmx
Add namespace
using System.Data.SqlClient;
using System.Configuration;
using System.Web.Script.Serialization;
To add employee
- [WebMethod]
- public void AddEmployee(Employee emp)
- {
- string CS = ConfigurationManager.ConnectionStrings["DBCS"].ConnectionString;
- using (SqlConnection con = new SqlConnection(CS))
- {
- SqlCommand cmd = new SqlCommand("spAddNewEmployee", con);
- cmd.CommandType = CommandType.StoredProcedure;
- cmd.Parameters.Add(new SqlParameter()
- {
- ParameterName = "@Name",
- Value = emp.Name
- });
- cmd.Parameters.Add(new SqlParameter()
- {
- ParameterName = "@Gender",
- Value = emp.Gender
- });
- cmd.Parameters.Add(new SqlParameter()
- {
- ParameterName = "@Phone",
- Value = emp.Phone
- });
- cmd.Parameters.Add(new SqlParameter()
- {
- ParameterName = "@Email",
- Value = emp.Email
- });
- cmd.Parameters.Add(new SqlParameter()
- {
- ParameterName = "@Age",
- Value = emp.Age
- });
- cmd.Parameters.Add(new SqlParameter()
- {
- ParameterName = "@Salary",
- Value = emp.Salary
- });
- con.Open();
- cmd.ExecuteNonQuery();
- }
- }
To add retrieve employee
- [WebMethod]
- public void GetAllEmployees()
- {
- List<Employee> listEmployee = new List<Employee>();
- string CS=ConfigurationManager.ConnectionStrings["DBCS"].ConnectionString;
- using(SqlConnection con=new SqlConnection(CS))
- {
- SqlCommand cmd = new SqlCommand("spGetEmployees", con);
- cmd.CommandType = CommandType.StoredProcedure;
- con.Open();
- SqlDataReader rdr = cmd.ExecuteReader();
- while(rdr.Read())
- {
- Employee employee = new Employee();
- employee.ID = Convert.ToInt32(rdr["ID"]);
- employee.Name = rdr["Name"].ToString();
- employee.Gender = rdr["Gender"].ToString();
- employee.Phone = rdr["Phone"].ToString();
- employee.Email = rdr["Email"].ToString();
- employee.Age = Convert.ToInt32(rdr["Age"]);
- employee.Salary = rdr["Salary"].ToString();
- listEmployee.Add(employee);
- }
- }
- JavaScriptSerializer js = new JavaScriptSerializer();
- Context.Response.Write(js.Serialize(listEmployee));
- }
Step 5
Add web, right click on project and add new item, choose web form, give it a name.
Add scripts and styles in the head section:
- <link rel="stylesheet" href="https://cdnjs.cloudflare.com/ajax/libs/font-awesome/4.7.0/css/font-awesome.min.css">
- <link rel="stylesheet" href="https://maxcdn.bootstrapcdn.com/bootstrap/4.0.0/css/bootstrap.min.css">
- <script src="https://ajax.googleapis.com/ajax/libs/jquery/3.3.1/jquery.min.js"></script>
- <script src="https://maxcdn.bootstrapcdn.com/bootstrap/4.0.0/js/bootstrap.min.js"></script>
- <script src="employee.js"></script>
Step 6 - Create script file employee.js
Write script to insert and retrieve data into the database:
- $(document).ready(function () {
- var employee = {};
- employee.Name = $('#txtName').val();
- employee.Gender = $('#ddlGender').val();
- employee.Phone = $('#txtPhone').val();
- employee.Email = $('#txtEmail').val();
- employee.Age = $('#txtAge').val();
- employee.Salary = $('#txtSalary').val();
- $.ajax({
- url: 'EmployeeService.asmx/AddEmployee',
- method: 'post',
- data: '{emp: ' + JSON.stringify(employee) + '}',
- contentType: "application/json; charset=utf-8",
- dataType: "json",
- success: function () {
- getAllEmployees();
- console.log(data);
- },
- error: function (err) {
- console.log(err);
- }
- });
- function getAllEmployees() {
- $.ajax({
- url: 'EmployeeService.asmx/GetAllEmployees',
- dataType: "json",
- method: 'GET',
- success: function (data) {
- var employeeTable = $('#employee tbody');
- employeeTable.empty();
- $(data).each(function (index, emp) {
- employeeTable.append('<tr><td>' + emp.ID + '</td><td>'
- + emp.Name + '</td><td>' + emp.Gender + '</td><td>'
- + emp.Phone + '</td><td>' + emp.Email + '</td><td>'
- + emp.Age + '</td><td>' + emp.Salary + '</td></tr>');
- });
- },
- error: function (err) {
- console.log(err);
- }
- });
- }
- });
Step 7 - Design HTML web form
- <body>
- <form id="form1" runat="server">
- <div class="container py-3">
- <h4 class="text-center text-uppercase">How to Insert and retrieve data using jquery ajax in asp.net </h4>
- <div class="card">
- <div class="card-header bg-danger text-white">
- <h5 class="card-title text-uppercase">Employee Information</h5>
- </div>
- <div class="card-body">
- <div class="row">
- <div class="col-md-6">
- <div class="form-group">
- <label>Name</label>
- <div class="input-group">
- <div class="input-group-prepend">
- <span class="input-group-text"><i class="fa fa-user"></i></span>
- </div>
- <asp:TextBox ID="txtName" CssClass="form-control" runat="server"></asp:TextBox>
- </div>
- </div>
- </div>
- <div class="col-md-6">
- <div class="form-group">
- <label>Gender</label>
- <div class="input-group">
- <div class="input-group-prepend">
- <span class="input-group-text"><i class="fa fa-user"></i></span>
- </div>
- <asp:DropDownList ID="ddlGender" runat="server" CssClass="custom-select">
- <asp:ListItem Value="-1">Choose Gender</asp:ListItem>
- <asp:ListItem Text="Male" Value="Male"></asp:ListItem>
- <asp:ListItem Text="Female" Value="Female"></asp:ListItem>
- </asp:DropDownList>
- </div>
- </div>
- </div>
- </div>
- <div class="row">
- <div class="col-md-6">
- <div class="form-group">
- <label>Phone Number</label>
- <div class="input-group">
- <div class="input-group-prepend">
- <span class="input-group-text"><i class="fa fa-phone"></i></span>
- </div>
- <asp:TextBox ID="txtPhone" CssClass="form-control" runat="server"></asp:TextBox>
- </div>
- </div>
- </div>
- <div class="col-md-6">
- <div class="form-group">
- <label>Email</label>
- <div class="input-group">
- <div class="input-group-prepend">
- <span class="input-group-text"><i class="fa fa-envelope"></i></span>
- </div>
- <asp:TextBox ID="txtEmail" CssClass="form-control" runat="server"></asp:TextBox>
- </div>
- </div>
- </div>
- </div>
- <div class="row">
- <div class="col-md-6">
- <div class="form-group">
- <label>Age</label>
- <div class="input-group">
- <div class="input-group-prepend">
- <span class="input-group-text"><i class="fa fa-user"></i></span>
- </div>
- <asp:TextBox ID="txtAge" CssClass="form-control" runat="server"></asp:TextBox>
- </div>
- </div>
- </div>
- <div class="col-md-6">
- <div class="form-group">
- <label>Salary</label>
- <div class="input-group">
- <div class="input-group-prepend">
- <span class="input-group-text">₹</span>
- </div>
- <asp:TextBox ID="txtSalary" CssClass="form-control" runat="server"></asp:TextBox>
- </div>
- </div>
- </div>
- </div>
- <asp:Button ID="btnAddEmployee" CssClass="btn btn-danger rounded-0" runat="server" Text="Submit" />
- </div>
- </div>
- <table id="employee" class="table table-bordered" style="margin-top:10px;">
- <thead class="bg-danger text-center text-white">
- <tr>
- <th>ID</th>
- <th>Name</th>
- <th>Gender</th>
- <th>Phone</th>
- <th>Email</th>
- <th>Age</th>
- <th>Salary</th>
- </tr>
- </thead>
- <tbody></tbody>
- </table>
- </div>
- </form>
- </body>
Step 8 - Run project ctr+F5
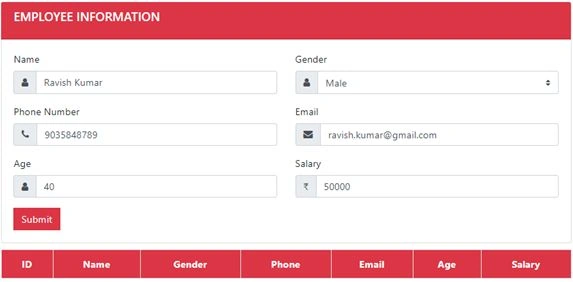
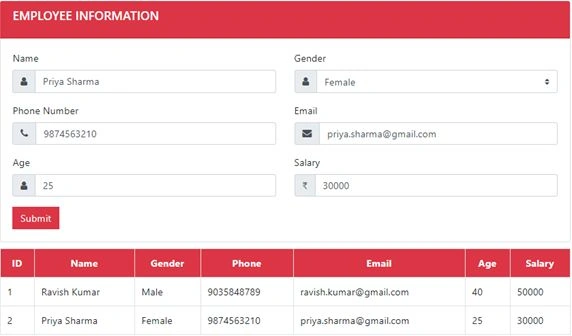
Final output
Farrukh azadPosted Feb 17, 2022, 9:51 PM
Nice job dear friend ,I like ur work
Charbel HajjarPosted Nov 10, 2021, 12:04 PM
Hello, what is the event on click ? btnAddEmployee
Rajesh KumarPosted May 19, 2021, 5:26 AM
Nice article
Arni IngasonPosted Oct 23, 2020, 5:22 PM
Hi, thanks for a good article, I get the following error: System.Data.SqlClient.SqlException: 'Cannot open database "C:\ Login failed for user
manel khayatPosted Apr 30, 2020, 5:52 PM
Insert don't work and no error shown ! and where is the onclick in the btn to execute the insert ! and why in .js there is not function addemp() !
pavuluri kumarPosted Aug 12, 2019, 5:45 AM
How to save this row html values in database tRow = tRow + '<tr class="trow' + index + '"><td><input type="hidden" id="hdnID' + index + '" value="' + rData.ID + '" />' + rData.Name + '</td><td>' + rData.Company + '</td><td>' + qty + '</div></td><td>' + cost + '</td><td><div id="lblTot' + index + '">' + total + '</div></td><td class="withest"><input type="text" onkeypress="AllowNumbers(this);" value="' + qty + '" class="divQty" rid="' + index + '" id="txtActQty' + index + '" /></td><td class="withest"><input type="text" class="divCost" rid="' + index + '" value="' + cost + '" id="txtActCost' + index + '" onkeypress="AllowDecimalNumbes(this);" /></td><td class="withest"><input type="text" value="' + total + '" class="divTotCost" id="txtActTot' + index + '" disabled /></td><td><input id="chk'+ index +'" type="checkbox" class="chkIsadded" rid="' + index + '" checked /> </td></tr>';
montazir alamPosted Jun 16, 2019, 5:51 AM
You have written code to insert data but i want to add one more column in this example which is file i want to insert file also then how can we insert file using file upload control
sunny bakshiPosted May 10, 2019, 2:30 AM
Records are Not Inserted and this error showing Failed to load resource: the server responded with a status of 500 (Internal Server Error) in Console
Tushant RajpalPosted Apr 15, 2019, 5:55 AM
Good Work!
Ishtiaq ahmadPosted Apr 15, 2019, 5:43 AM
Thank you... the record added to database successfuly but with error on line in the code: console.log(data); (JavaScript runtime error: 'data' is undefined). Also once data inserted the table remains with previous value it should be empty... Any help please
Argenis RosarioPosted Apr 6, 2019, 8:10 PM
Why does AddEmployee method runs at first sight? I mean, i ran the project and this method runs and sent me an error, but after i register one employee its ok.
Bhaskar KholiyaPosted Jan 3, 2019, 10:17 AM
Ajax Request is not going to EmployeeService.asmx