

Introduction
In this blog, I will demonstrate how to validate file upload server side in asp.net.
Step 1
Create an empty ASP.net web application in Visual Studio 2015 or the version of your choice.
Step 2
Right click on the project and add web form and give it a meaningful name.
Step 3
Add the following Bootstrap script and styles cdn link in head section
- <link rel="stylesheet" href="https://maxcdn.bootstrapcdn.com/bootstrap/4.1.0/css/bootstrap.min.css">
- <script src="https://ajax.googleapis.com/ajax/libs/jquery/3.3.1/jquery.min.js"></script>
- <script src="https://maxcdn.bootstrapcdn.com/bootstrap/4.1.0/js/bootstrap.min.js"></script>
Step 4
Design web form using file upload control, button control, and bootstrap.
- <body>
- <form id="form1" runat="server">
- <div class="container py-5">
- <h4 class="text-center text-uppercase">How to validate file uploader server side in ASP.NET</h4>
- <div class="row">
- <div class="col-sm-6 col-md-6 col-xs-12">
- <div class="form-group">
- <label>Choose File:</label>
- <div class="input-group">
- <div class="custom-file">
- <asp:FileUpload ID="FileUpload1" runat="server" CssClass="custom-file-input" />
- <label class="custom-file-label"></label>
- </div>
- <div class="input-group-append">
- <asp:Button ID="btnUpload" runat="server" Text="Upload" CssClass="btn btn-secondary" OnClick="btnUpload_Click" />
- </div>
- </div>
- <asp:Label ID="lblMessage" runat="server"></asp:Label>
- </div>
- </div>
- </div>
- </div>
- </form>
- </body
Step 5
Right click on project, and create image folder to upload image.
Step 6
Double click on upload button and write the following code
- protected void btnUpload_Click(object sender, EventArgs e)
- {
- if (FileUpload1.HasFile)
- {
- string fileExtwnsion = Path.GetExtension(FileUpload1.FileName);
- if (fileExtwnsion.ToLower()!=".jpg" && fileExtwnsion.ToLower()!=".png")
- {
- lblMessage.Text = "Only jpg and png file allowed";
- lblMessage.ForeColor = System.Drawing.Color.Red;
- }
- else
- {
- int fileSize = FileUpload1.PostedFile.ContentLength;
- if (fileSize> 2097152)
- {
- lblMessage.Text = "Maximum size 2(MB) exceeded ";
- lblMessage.ForeColor = System.Drawing.Color.Red;
- }
- else
- {
- FileUpload1.SaveAs(Server.MapPath("~/images/" + FileUpload1.FileName));
- lblMessage.Text = "File Uploaded successfully";
- lblMessage.ForeColor = System.Drawing.Color.Green;
- }
- }
- }
- else
- {
- lblMessage.Text = "File not uploaded";
- lblMessage.ForeColor = System.Drawing.Color.Red;
- }
- }
Step 7
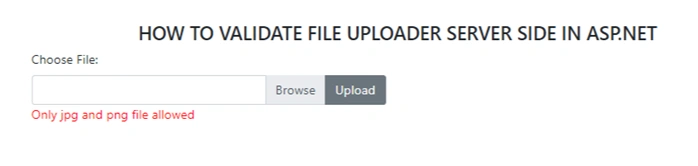
Run project ctrl F5
Screenshot 1


Deepak DeepakPosted Nov 21, 2019, 8:01 AM
Very nice thanks your dear
Akshay OswalPosted Dec 20, 2018, 11:08 AM
Lets say if you want to allow uploads of lots of MIME types, video, image, audio etc. These MIME types have multiple extensions, how is it possible to validate the upload request (file type) on the server side without specifically looking at extensions only (because there are 100+ extensions for these MIME-types). Also just validating the extension can be dangerous because an extension with .png can have executable code. I would be obliged if you have a solution for this kind of problem.
JosephsPosted Sep 10, 2018, 11:31 PM
Nice Article
Viknaraj ManogararajahPosted Jul 19, 2018, 6:52 AM
Nice Article...........