

In this post, we will discuss Interface in C#.NET and I will explain the use of interface with an example in a simple way. I hope this will be very helpful for developing real-time projects for freshers as well as experienced people.
What is the need of Interface? Why use Interface?
- It is used to Decouple the application.
- It is very useful for Dependency Injection.
- It is useful for Test isolation and Mocking.
- It is used for Extensibility
What is Interface?
- An interface can contain only the declaration of properties, methods, events, indexers etc.
- Interface member does not have the definition.
- Interface member is by default Public. We can not provide access modifier to the interface member.
- We can inherit more than one interface in a class. Once we inherit interface in a class, we must provide definition to the interface member.
- An interface cannot contain fields, operators, instance constructor etc.
In order to work with the interface, we use "Interface" keyword to create an interface. We can provide "I" as an interface naming prefix for interface names like IVendor, ICustomer etc.
Syntax
Syntax
- interface interface_name
- {
- // interface member declaration
- }
Example
Create an interface which has a name like IVendor as follows.
Create an interface which has a name like IVendor as follows.
- interface IVendor
- {
- bool AllowAccessToUser { get; set; }
- string GetVendorName(int vendorId);
- }
- public class Vendor: IVendor
- {
- public bool AllowAccessToUser { get; set; }
- public string GetVendorName(int vendorId)
- {
- string vendorName =string.Empty;
- switch (vendorId)
- {
- case 1:
- vendorName = "TATA";
- AllowAccessToUser = true;
- break;
- case 2:
- vendorName = "TCS";
- AllowAccessToUser = true;
- break;
- default:
- vendorName = "NULL";
- AllowAccessToUser = false;
- break;
- }
- return vendorName;
- }
- }
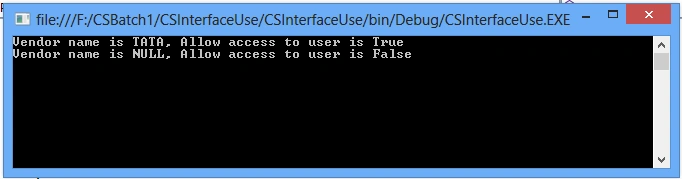
We can call the vendor class member by creating an instance of vendor class from main method. Define main method to access the vendor detail. There is one method, "GetVendorName()", based on vendorId as shown in the above example. In the same way we have created one property for user permission. Based on the vendor we can provide the access to the user.
- class Program
- {
- static void Main(string[] args)
- {
- Vendor vendor = new Vendor();
- Console.WriteLine("Vendor name is {0}, Allow access to user is {1}", vendor.GetVendorName(1),vendor.AllowAccessToUser);
- Console.WriteLine("Vendor name is {0}, Allow access to user is {1}", vendor.GetVendorName(4), vendor.AllowAccessToUser);
- Console.ReadLine();
- }
- }
How to implement more than one interface in a class.
Create two interface names as "IVendor" and "IUserPermission". Copy the above example and paste it into a separate class. Create one more interface "IUserPermission" interface having one property and remove the property used in IVendor interface. Paste into the newly-created interface; i.e., "IUserPermission". There are no major changes.
Create two interface names as "IVendor" and "IUserPermission". Copy the above example and paste it into a separate class. Create one more interface "IUserPermission" interface having one property and remove the property used in IVendor interface. Paste into the newly-created interface; i.e., "IUserPermission". There are no major changes.
This is the example to understand how to implement more than one interface in a class.
- interface IVendor
- {
- string GetVendorName(int vendorId);
- }
- interface IUserPermission
- {
- bool AllowAccessToUser { get; set; }
- }
- public class Vendor : IVendor, IUserPermission
- {
- public bool AllowAccessToUser { get; set; }
- public string GetVendorName(int vendorId)
- {
- string vendorName =string.Empty;
- switch (vendorId)
- {
- case 1:
- vendorName = "TATA";
- AllowAccessToUser = true;
- break;
- case 2:
- vendorName = "TCS";
- AllowAccessToUser = true;
- break;
- default:
- vendorName = "NULL";
- AllowAccessToUser = false;
- break;
- }
- return vendorName;
- }
- }
- class Program
- {
- static void Main(string[] args)
- {
- Vendor vendor = new Vendor();
- Console.WriteLine("Vendor name is {0}, Allow access to user is {1}", vendor.GetVendorName(1),vendor.AllowAccessToUser);
- Console.WriteLine("Vendor name is {0}, Allow access to user is {1}", vendor.GetVendorName(4), vendor.AllowAccessToUser);
- Console.ReadLine();
- }
- }
interface in csharp in a simple way part two
I hope you understood the basic concept of interface.
Jitendra WaghalePosted Aug 3, 2018, 3:41 PM
Its very helpful, Thanks!!
Nikhil SanganiPosted Apr 20, 2018, 2:45 AM
This will help all .net developer to understand interface concept and the interface is good for maintaining loose coupling of a class object and test-driven development. Thanks for sharing.
Dnyanesh GadewarPosted Apr 10, 2018, 1:37 AM
This is very helpful for beginner as well as experience developer to understand the interface concept. Thanks for sharing your valuable knowledge us.