
Create client side Web part, using React Framework commands given below.
- Open command prompt
- md LoadButtonpocwebpart
- cd LoadButtonpocwebpart
- yo @microsoft/sharepoint- choose react framework
- run code . to open Visual studio code
For this demo I have added a text field named WebpartTitle, button named ClickHere and a choicegroup field named ChoiceGroups.
- Add the Web part custom properties for these fields in manifest.json file.
- {
- "$schema": "../../../node_modules/@microsoft/sp-module-interfaces/lib/manifestSchemas/jsonSchemas/clientSideComponentManifestSchema.json",
- "id": "06cc821c-ca66-480a-aae2-33ae02f9c62f",
- "alias": "LoadbuttonpocWebPart",
- "componentType": "WebPart",
- "version": "0.0.1",
- "manifestVersion": 2,
- "preconfiguredEntries": [{
- "groupId": "06cc821c-ca66-480a-aae2-33ae02f9c62f",
- "group": { "default": "Under Development" },
- "title": { "default": "loadbuttonpoc" },
- "description": { "default": "test loading indicator functionality" },
- "officeFabricIconFontName": "Page",
- "properties": {
- "description": "loadbuttonpoc",
- "ClickHere":"java",
- "WebpartTitle":"test"
- }
- }]
- }
- Declare the properties in ts file.
- export interface ILoadbuttonpocWebPartProps
- {
- description: string;
- WebpartTitle:string;
- ChoiceGroups:string;
- }
- Definitions for the fields are added in the getPropertyPaneConfiguration() method in LoadButtonpocwebpart.ts file.
- protected getPropertyPaneConfiguration(): IPropertyPaneConfiguration {
- return {
- pages: [
- {
- header: {
- description: strings.PropertyPaneDescription
- },
- groups: [
- {
- groupName: "Web pane properties",
- groupFields: [
- PropertyPaneButton('ClickHere',
- {
- text: "ClickHere",
- buttonType: PropertyPaneButtonType.Normal,
- onClick: this.ButtonClick.bind(this)
- }),
- PropertyPaneTextField('WebpartTitle', {
- label: "Web part Title"
- }),
- PropertyPaneChoiceGroup('ChoiceGroups', {
- label: 'ChoiceGroups',
- options: [
- { key: 'dotnet', text: 'dotnet' },
- { key: 'sharepoint', text: 'sharepoint' },
- { key: 'java', text: 'java' }
- ]
- }),
- ]
- }
- ]
- }
- ]
- };
- }
- Using onclick attribute in propertypanebutton, we are binding onclick method Buttonclick.
- We can call Buttonclick method with a parameter or without any parameter.
- Pass ‘this’ parameter to get the context of the Web part, else use this.buttonlclick().
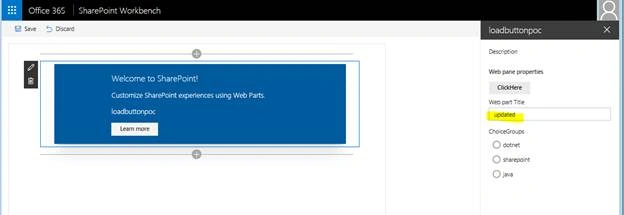
- Here, I am setting the Web part title text field with a value called ‘updated’, when a button is clicked, so I am passing the Web part context to the onclick method.
- private ButtonClick(oldVal: any): any {
- this.properties.WebpartTitle="updated";
- return "test"
- }
- In the similar way, when choicegroup field values changes, we can set the Web part title field. For this functionality, we need to add onPropertyFieldChanged.
- When choicegroups field value changes, the Web part title field is set with the selected value.
- protected onPropertyPaneFieldChanged(propertyPath: string, oldValue: any, newValue: any): void {
- if (propertyPath === 'ChoiceGroups' && newValue) {
- this.properties.WebpartTitle=newValue;
- }
- }
Deploy and testing
Save the file -> run Gulp serve->add the Web part in workbench.html -> edit the Web part properties.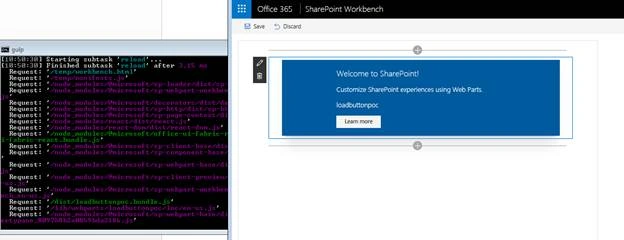
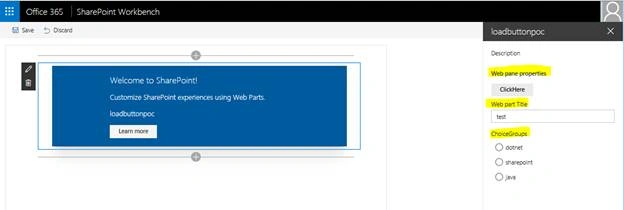
When click here button is clicked, the Web part title field value changes.
- ‘Updated’
- this.properties.WebpartTitle=”updated”
When choicegroups field value is selected as ‘dotnet’, same value is populated in the Web part title field.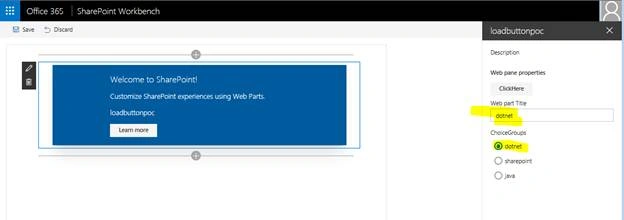
Join the conversation! Your thoughts help the community grow.