Introduction
NUnit is a great unit testing tool for .Net applications. In this article I will explain the basics of NUnit and guides you step by step how to create sample unit tests. But if unit testing is what you are looking for, you should also know the concept of Test Driven Development. Correspondingly if TDD is your aim, you must glance at NUnit too. To truly exploit the benefits of unit testing, TDD is the best approach. So this arcticle also covers the TDD concept.
What is unit testing
Unit testing is a development procedure where programmers create tests as they develop software. The tests are simple short tests that test functionality of a particular unit or module of their code, such as a class or function. The general behavior of a unit test is that it sends a predefined message to the class and verifies the response. Yes, you heard it correct! Developers are responsible for unit testing, which means you have to code extra! Some 20% extra! Hold on, there are even more benefits. ☺
Lets understand NUnit first
NUnit is a unit testing framework, developed using C#. It uses the attribute based programming model. It provides a nice clean GUI as well as a console application to test your assemblies. We will look into it a bit later. First let us create a sample test. Here I am using as an Example a Person Class. So create the following class in a project.
public class Person
{
public string Lname
{ get; set; }
public string Fname
{ get; set; }
public string Mname
{ get; set; }
public string Address
{ get; set; }
public string Email
{ get; set; }
public string Phone
{ get; set; }
public string GetFullName()
{
if(string.IsNullOrEmpty(Lname))
throw new MissingFieldException("Lname is empty");
return string.Format("{0} {1} {2}",Fname,Mname,Lname);
}
}
Step 1: Add reference to nunit.framework.dll from the bin of installed nunit application.
Step 2: Create a class to write your tests. Say you want to test a "Person" Class. Name your test class as TestPerson. Best Practice : Use a separate class library . Have separate classes to test each class in your application
Step 3: Add Attribute to Class
The test class should have the "Test Fixture" Attribute; let's understand this attribute:
[TestFixture]
- The class that is going to contain your code for testing should be attributed with this attribute
- When you attach this attribute to a class in your project, the Test Runner application will scan it for test methods
- The class must have a public default constructor
Code Snippet
[TestFixture]
public class TestPerson
}
Step 4: Write the test; create a method named testFullName(). This is the method that will contain code to test the "GetFullName()" Method. This Method should be marked with Attribute [Test]. Any method that has the actual code to perform a test should be marked with this attribute. The signature should necessarily be: public void (). Now, implement the following code in the method.
using NUnit.Framework;
namespace NunitExample
{
[TestFixture]
public class TestPerson
{
[Test]
public void TestFullName()
{
Person person = new Person ();
person.lname = "Doe";
person.mname = "Roe";
person.fname = "John";
string actual = person.GetFullName();
string expected = "John Roe Doe";
Assert.AreEqual(expected, actual,"The GetFullName returned a different Value");
}
}
}
Let us understand the code: The test method, assigns fixed values to the properties of class Person. Now we want to check that GetFullName() functions correctly. So we compare the returned value with what we expected. If that matches, the test passes or else the test fails.
To compare the results we use the "Assert" class of Nunit Framework. Assertions are central to any unit testing framework. Here, we use "AreEqual" method to compare the two results.
As seen, the AreEqual() expects 3 parameters. The third is optional. The first two are the values that we want to compare, and the third is the message to be displayed when the test fails.
There are many overloads of AreEqual method, so that you can compare different datatypes. There are many different methods of Assert Class, to support collections, exceptions, directories, files etc. We will not cover all of them here. You can easily get an idea of all these on the official Nunit Site.
Step 5 : Run the code. Compile your code. Let us use the GUI to run the code. Open the GUI, and select "New project" from file menu. Save the new project with whatever name you choose.
Then go to the project menu and select "Add Assembly" and select the assembly which contains your test class. You will see that the test class and its test methods are displayed on the left panel of the window. Select the PersonTest Class, and click on Run. All the tests within this class will be run.
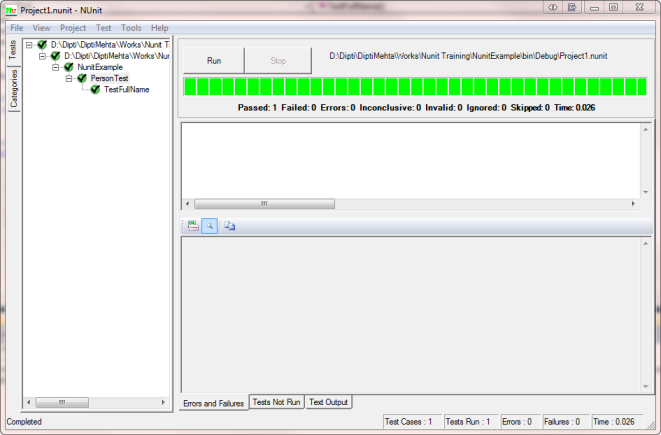
When you see all green out there, its party time! All your tests have passed. When you examine the screen in detail, you will see that it displays various parameters such as what tests have passed, failed, the time taken to execute a test, etc. Now change the preceding code in the test method, to get an invalid result. Something like
Assert.AreEqual("abcd", "actual" ,"The GetFullName returned a different Value").
Rebuild the assembly, and in the Nunit GUI, click on File->Reload tests. Now run it again, just to see how the screen looks when the test fails.
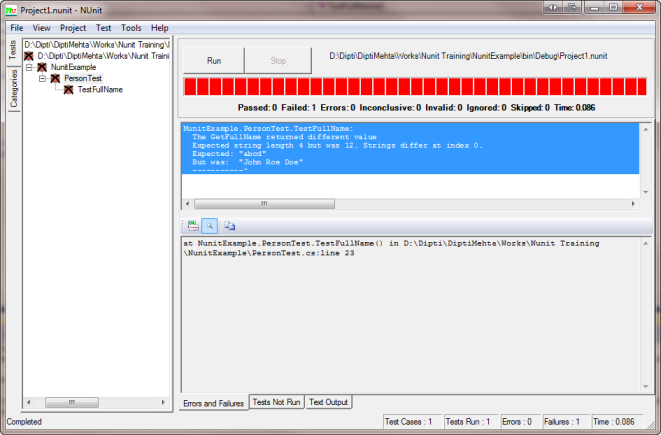
See the red; it also displays the message you specified.
Fine; now you know how to run and code your unit tests. Let's have a quick glance at a few other important and very useful attributes.
Some important Attributes
Setup Attribute:
[SetUp]
public void init()
{
Person person = new Person();
}
As you can see in the code, the Setup attribute should be used for any initialization kind of functions. Any code that must be executed prior to executing a test, can be put in the functions marked with [Setup]. This frees you from repeating these lines of code in each test. Please note carefully, that this code is executed, before each test.
Tear Down: This attribute is exactly opposite to Setup Attribute. This code is executed after execution of each code. In this method, for example, you can write code, to close any FileSystem Object or Database connection.
Exception Expected: At times, we may want to test that a method should throw an exception in a particular scenario. We can test this using this attribute.
Example:
[Test]
[ExpectedException(typeof(MissingFieldException))]
public void TestFullNameForException()
{
    Person person = new Person();
    person.Lname = "";
    person.Mname = "Roe";
    person.Fname = "John";
string actual = person.GetFullName();
}
This code does not have any Assert statement. This is will pass, if the "MissingFieldException" is thrown upon calling "GetFullName()". If no exception is thrown, the test will fail.
Ignore: Any test that you want to temporarily bypass can be marked with this attribute.
Some obvious Advantages
- Afraid of change? Not anymore!
- If there is any change in the code then the effects are known immediately.
- "A test is not something you "do", it is something you "write" and run once, twice, three times, etc."
Best Practice: Tools like Nant can be used for automated scheduled builds. With every build, Nant will run the Nunit tests, and results produced in an xml file!
Test Driven Development - TDD
The concept of test driven can simpy be put in the following two lines. "The first step is to quickly add a test, basically just enough code to fail. Next you run your tests, often the complete test suite although for sake of speed you may decide to run only a subset, to ensure that the new test does in fact fail. You then update your functional code to make it pass the new tests. The fourth step is to run your tests again. If they fail you need to update your functional code and retest. Once the tests pass the next step is to start over (you may first need to refactor any duplication out of your design as needed, turning TFD into TDD)".
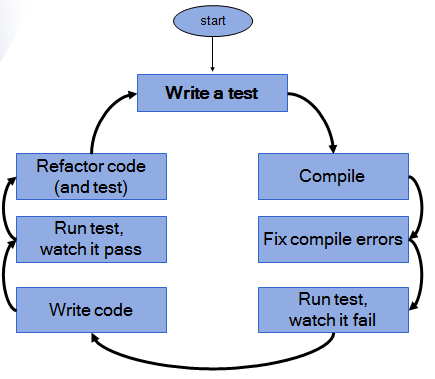
This is an iterative process that you continue until all your tests pass.
Some proven advantages of TDD:
- Unit tests find problems early in the development cycle.
- An automated unit test suite watches over your code in two dimensions: time and space.
- Developers will be less afraid to change existing code
- The development process becomes more flexible.
- Improves your project's truck factor
- The need for manual testing.
- That software development will become more predictable and repeatable
- Shorter development cycle
Something of interest to project mangers reading this :
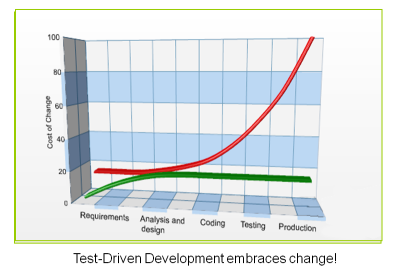
The green graph, shows the TDD cycle, while the red one, is the traditional development method of coding and then testing.
Caution
Before concluding the article, one small word of caution: • Having all the greens, doesn't mean that software is ready to be delivered. • Unit testing DOES NOT replace a traditional testing system.
Coming Soon
Once you start using TDD, you might encounter some challenges. You might need to implement proper design patterns and mocking, to successfully implement unit testing and TDD. My next article will cover that. Be patient, it will come soon.