Here I am sharing with you all, how to implement Event Handler Feature in sharepoint and how to activate it.
Below example shows how to add a simple event handler that prevents items from being deleted from a list. Two procedures are involved in this task:
- Creating an event handler in Microsoft Visual Studio
- Adding the event handler as a Feature in SharePoint
To create the event handler in Visual Studio
- Create a new project in Visual Studio by clicking File, pointing to New, and then clicking Project.
- In the New Project dialog box, select Visual C# in the Project types box, select Class Library in the Templates box, type DeletingEventHandler in the Name box, and then click OK.
- In Solution Explorer, select DeletingEventHandler, and click Add Reference on the Project menu.
- In the Add Reference dialog box, select Microsoft.SharePoint on the .NET tab and then click OK.
- In the Code Editor, import the Microsoft.SharePoint namespace as follows.
Change the name of the class like DeleteItemEvent and Inherit it from the SPItemEventReceiver class, as follows.
public class DeleteItemEvent : SPItemEventReceiver
Now add code within the class to override the ItemDeleting method given Belowe.
public class DeleteItemEvent : SPItemEventReceiver
{
public override void ItemDeleting(SPItemEventProperties properties)
{
properties.Cancel = true;
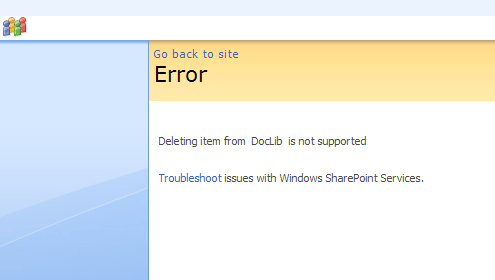
properties.ErrorMessage = "Deleting item from" + " " + properties.ListTitle + " " + "is not supported";
}
}
Now go to Project menu in visual studio, in this last option is DeleteItemEvent Properties click the Signing tab, select Sign the assembly, select Choose a strong name key file, and then click <New...>.
In the Create Strong Name Key dialog box, type DeletingEventHandler.snk in the Key file name box, optionally specify a password for the key, and then click OK.
To build the project, click Build Solution on the Build menu, or press CTRL+SHIFT+B.
Find the \DeletingEventHandler\bin\Debug folder in the Visual Studio Projects folder, and drag the DeletingEventHandler.dll file to Local_Drive:\WINDOWS\assembly to place the DLL in the global assembly cache.
To add the event handler as a Windows SharePoint Services Feature
- Create a folder in Local_Drive:/Program Files/Common Files/Microsoft Shared/web server extensions/12/TEMPLATE/FEATURES called DeletingEventHandler.
- Create a Feature.Xml file in this folder like the following that identifies the Feature and its element manifest file and sets the Feature scope to Web site.
<Feature Scope="Web"
Title="Deleting Event Handler"
Id="GUID"
xmlns="http://schemas.microsoft.com/sharepoint/">
<ElementManifests>
<ElementManifest Location="Elements.xml"/>
</ElementManifests>
</Feature>
Here generate a GUID by running guidgen.exe located in Local_Drive:\Program Files\Microsoft Visual Studio 8.
The Elements.xml file is given below. It is referenced in Feature.xml file in ElementManifest Location tag.
<Elements xmlns="http://schemas.microsoft.com/sharepoint/">
<Receivers ListTemplateId="101">
<Receiver>
<Name>DeletingEventHandler</Name>
<Type>ItemDeleting</Type>
<SequenceNumber>22500</SequenceNumber>
<Assembly>ItemAddedEvent, Version=1.0.0.0, Culture=neutral,
PublicKeyToken=d6009c72158cb154</Assembly>
<Class>ItemAddedEvent.ItemAddedEvent</Class>
<Data></Data>
<Filter></Filter>
</Receiver>
</Receivers>
</Elements>
Here in Name tag you have to give DLL name. In assembly change info of same for that. Find DLL in GAC and right click on DLL and click on property in that give all the information related to assembly.
In Class tag you have to give Namespace.classname.
In the first tag Receivers "ListtemplatedId" means on which list you have to perfom the Event Handler like Document Library, Custom List, PictureLibrary...etc. Here 101 means Document Library. List of ListTemplated Id are given below.
- 100 Generic list
- 101 Document library
- 102 Survey
- 103 Links list
- 104 Announcements list
- 105 Contacts list
- 106 Events list
- 107 Tasks list
- 108 Discussion board
- 109 Picture library
- 110 Data sources
- 111 Site template gallery
- 112 User Information list
- 113 Web Part gallery
- 114 List template gallery
- 115 XML Form library
- 116 Master pages gallery
- 117 No-Code Workflows
- 118 Custom Workflow Process
- 119 Wiki Page library
- 120 Custom grid for a list
- 130 Data Connection library
- 140 Workflow History
- 150 Gantt Tasks list
- 200 Meeting Series list
- 201 Meeting Agenda list
- 202 Meeting Attendees list
- 204 Meeting Decisions list
- 207 Meeting Objectives list
- 210 Meeting text box
- 211 Meeting Things To Bring list
- 212 Meeting Workspace Pages list
- 301 Blog Posts list
- 302 Blog Comments list
- 303 Blog Categories list
- 1100 Issue tracking
- 1200 Administrator tasks list
In command prompt, navigate to \Program Files\Common Files\Microsoft Shared\web server extensions\12\BIN on the local drive, and type each of the following commands to install the Feature in the deployment, activate the Feature on a specified subsite, and reset Microsoft Internet Information Services (IIS) so that the changes take effect:
- stsadm -o installfeature -filename DeletingEventHandler\Feature.xml
- stsadm -o activatefeature -filename DeletingEventHandler\Feature.xml -url http://Server/Site/Subsite
- iisreset
Try to delete a Document in Document Library on the specified Web site to see the effect of the event handler feature. Output will look like this.