What is MVVM Pattern?
MVVM (Model-View-View Model) is the design Pattern code model used for WPF/Silverlight UI. MVVM is the guideline a developer should follows in order to achieve a more testable, debug gable, manageable, readable Application.
MVVM is implemented with zero code behind. Yes, no button click event hander in the code behind file, no form/windows load logic, no UI binding logic, and no UI validation or type casting code in the code behind file. Yes, I mean absolutely no code or logic in the UI mainpage.xaml.cs file.
The reason we don't want to put code-behind in our project is so that one can write a unit test against the code and create instances and run methods on our instances in a unit test.
The following features are used in order to achieve the MVVM pattern with no logic on the UI code behind file and to make sure that the presentation layer and logic remain loosely couple.
-
Using the strong two-way binding capability of the WPF/Silverlight UI (through XAML)
-
Implementing an IValueConvert for binding (eg: string converted to a Color instance, and also avoid type casting)
-
Use INotification in our model or Dependency Property
-
Set the data context at the xaml level
-
Set Static resources at the xaml level
-
ICommand for avoiding the code behind event handler.
-
Use of validation=true in xaml(presentation layer)
Before MVVM, the MVP pattern was famous for its use in WinForm and WPF applications (it never took full advantage of the two-way binding feature of WPF). The MVC pattern is still well-known for its use with Asp.net Application.
Below are some drawbacks of the old fashion WinForm or WPF/Silverlight applications that didn't leverage the power of the mvvm pattern.
-
The presentation and the code behind logic is tightly coupled
-
If we change the UI control we are forced to change the logic in the code behind
-
It makes it hard to imagine a way of having more than one view sharing the same logic.
-
It's not possible to write a unit test for a view that uses code behind because the presentation layer is tightly couple to the control.
-
In previous practice with the WPF application, the view (xaml) often acted as a data store.
Advantages of MVVM pattern
-
Proper layering of the view and the data. The data is not stored in the view, The view is just for presenting the data.
-
Clean testable and manageable code.
-
No code behind so the presentation layer and the logic is loosely coupled.
-
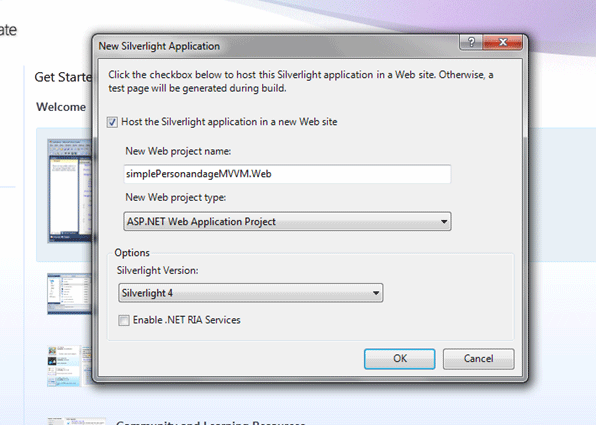
Step 1: Create a Silverlight Application in Viual studio 2010 and name it as "simplePersonandageMVVM"
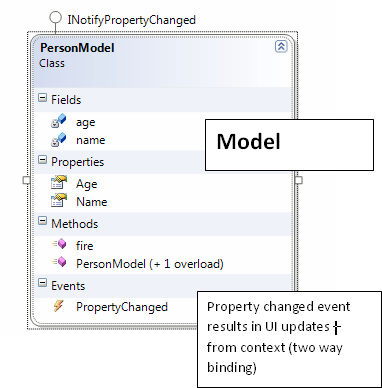
Step 2: Once the project is created, add a class file and call it as "PersonModel.cs" and paste the code below. (this would be the model that represents the data object)
using System.ComponentModel;
namespace simplePersonandageMVVM
{
public class PersonModel : INotifyPropertyChanged
{
string name;
public string Name
{
get { return this.name; }
set
{
this.name = value;
fire("Name");
}
}
int age;
public int Age
{
get { return this.age; }
set
{
this.age = value;
fire("Age");
}
}
public PersonModel() { }
public PersonModel(string name, int age)
{
this.name = name;
this.age = age;
}
public void fire(string x)
{
if (PropertyChanged != null)
{
PropertyChanged(this, new PropertyChangedEventArgs(x));
}
}
public event PropertyChangedEventHandler PropertyChanged;
}
}
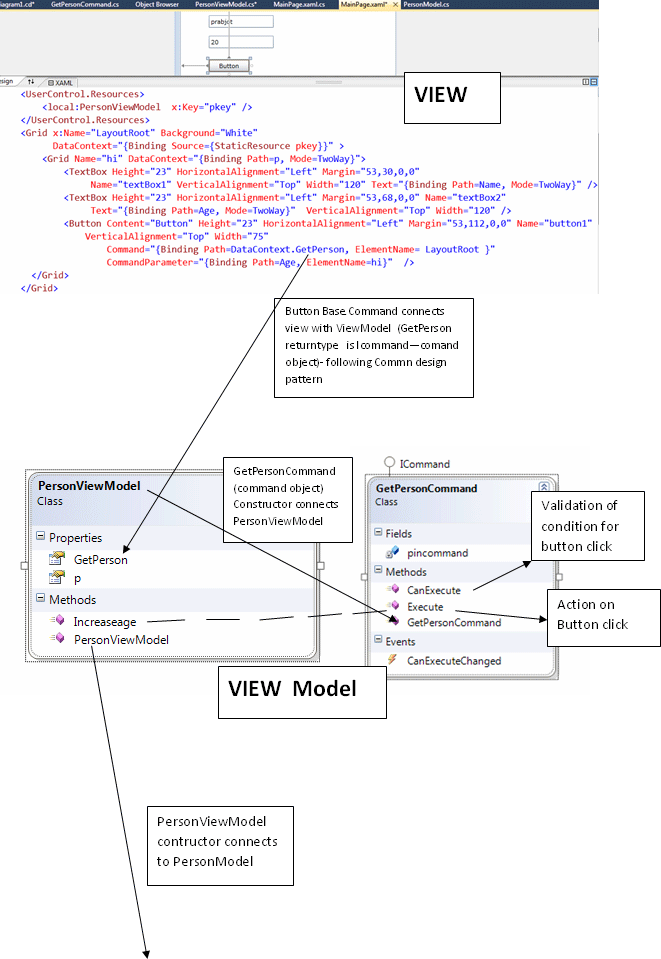
Step 3: Create another class call it as "PersonViewModel.cs" shown below. This class is the viewModel and serves as an adapter between view(presentation layer) and the Model(entity class).
namespace simplePersonandageMVVM
{
public class PersonViewModel
{
public PersonModel p { get; set; }
public PersonViewModel()
{
p = new PersonModel("prabjot", 20);
}
public ICommand GetPerson
{
get { return new GetPersonCommand(this); }
}
public void Increaseage(PersonModel d)
{
d.Age++;
string x = d.Age.ToString();
MessageBox.Show(x);
}
}
}
Step 4: Create a Command object class implementing the ICommand interface and call it as "GetPersonCommand.cs". This class overrides two ICommand methods: Execute and CanExecute. The method CanExecute checks if the person's age is greater than 25 years old. If the condition if its met, then only the button click is enabled. The Execute method takes care of execution upon clicking a the button.
namespace simplePersonandageMVVM
{
public class GetPersonCommand : ICommand
{
PersonViewModel pincommand;
public GetPersonCommand( PersonViewModel Pcame)
{
pincommand= Pcame;
}
public bool CanExecute(object parameter)
{
if(pincommand.p.Age > 25)
{
return false ;
}
else
{
return true;
}
}
public event EventHandler CanExecuteChanged;
public void Execute(object parameter)
{
pincommand.Increaseage(pincommand.p);
}
}
}
Step 5: Finally your xaml file looks like this:
<UserControl x:Class="simplePersonandageMVVM.MainPage"
xmlns="http://schemas.microsoft.com/winfx/2006/xaml/presentation"
xmlns:x="http://schemas.microsoft.com/winfx/2006/xaml"
xmlns:d="http://schemas.microsoft.com/expression/blend/2008"
xmlns:mc="http://schemas.openxmlformats.org/markup-compatibility/2006"
xmlns:local="clr-namespace:simplePersonandageMVVM"
mc:Ignorable="d"
d:DesignHeight="300" d:DesignWidth="400">
<UserControl.Resources>
<local:PersonViewModel x:Key="pkey" />
</UserControl.Resources>
<Grid x:Name="LayoutRoot" Background="White"
DataContext="{Binding Source={StaticResource pkey}}" >
<Grid Name="hi" DataContext="{Binding Path=p, Mode=TwoWay}">
<TextBox Height="23" HorizontalAlignment="Left" Margin="53,30,0,0"
Name="textBox1" VerticalAlignment="Top" Width="120" Text="{Binding Path=Name, Mode=TwoWay}" />
<TextBox Height="23" HorizontalAlignment="Left" Margin="53,68,0,0" Name="textBox2"
Text="{Binding Path=Age, Mode=TwoWay}" VerticalAlignment="Top" Width="120" />
<Button Content="Button" Height="23" HorizontalAlignment="Left" Margin="53,112,0,0" Name="button1"
VerticalAlignment="Top" Width="75" Command="{Binding Path=DataContext.GetPerson, ElementName= LayoutRoot }"
CommandParameter="{Binding Path=Age, ElementName=hi}" />
</Grid>
</Grid>
</UserControl>
Please note that the videos series on Silverlight including video for this example with explanation of the command pattern plus other MVVM pattern examples with Database and wcf and linq with entity is all available on
www.elearningfromhome.com