From long time I was looking after this as curiosity, and now after some google I have understood how this can be done, I will be summarizing points and procedure which is used to create anonymous site by using existing SharePoint web application.
This is the scenario which is most useful when you want to use only one content database and have two applications, one application will be working as CMS (Content Management System) and other will be like public facing Internet site. So in such cases content creators, site administrators will be adding /modifying contents and then those will be reflected on public facing site.
So let's start by creating a SharePoint Web Application, which we will be using as CMS site
- Go to central Administration and click on Application Management Tab
- Find option to create or extend web application and click on it
- After clicking , you will see two options like create or extend web application , select create new
- Now create new application on any port which you want with and be careful while configuring security , select Authentication Provider as NTLM and Allow Anonymous access to NO
- Provide valid user name and password and click on create. , then after creating web application create root site collection with Publishing Portal Template.
Now browse to the root site collection and click on site settings and then click on modify all site settings.
In People and Groups section, click ion Advanced Permissions, then in this list click on settings, and then click on Anonymous Access and then select Entire Web Site.
(Note: If you are not able to see anonymous access option anymore after clicking on settings then do the following settings.
a. Open central administration and click on application management tab
b. Find Authentication Providers option and click on that (Under Application Security Section)
c. Select Default Zone and select Anonymous Access to true
d. Then go back to your CMS site and again go to advance permissions , settings , now you will see anonymous access , select entire web site and click ok
e. Now go to authentication provider and set anonymous access in default zone to false which you set to true in step c , and click ok )
So as of now we have created and configured our CMS site, now we will extend this created web application for anonymous access.
- Open Central Administration again and click on Application Management Tab
- Click on create or extend web application
- Now click on extend existing web application
- Select web application which we just created in Web Application section
- In IIS Website section , select create new IIS Site and give port number as 80 . (Note: you can give any port number which you want and also host header as you wish)
- Now In security configuration settings section, do the settings as
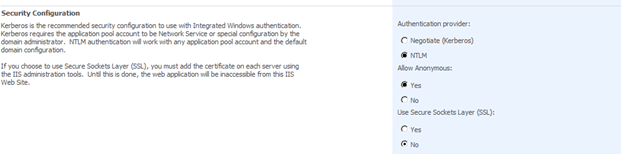
(Here select allow anonymous as Yes, shown in above picture)
- In Load balance URL section, select zone as Internet and click ok to extend web application.
Now we have extended CMS web application for anonymous access.
If you open IIS Manager, there you will see this site created.
(To Enable Forms Authentication on this anonymous site do the following steps).
Open IIS Manager and click on anonymous site, go to Authentication.
Set Anonymous Authentication as Enabled and Forms Authentication as Enabled and all other as Disabled.
(Note: when you enable Forms Authentication on extended site then you must provide name of Membership Provider and name of Role Provider , for example : you can use ASP.NET OOB membership and role providers but you should have to have membership services configured on SQL Server , this link and this link explains more on this)
And you are done.
Try browsing this site and enjoy..