The Silverlight Toolkit released on November 2008 comes with a data visualization assembly called Microsoft.Windows.Controls.DataVisualization.dll that hosts the functionality related to charts in Silverlight. This article demonstrates how to draw charts using the Silverlight Toolkit.
Note: This article is written by using the Silverlight Toolkit November 2008 that you can download from here: Silverlight Toolkit - Release: Silverlight Toolkit November 2008. This control may be a part of Silverlight in near future versions.
Adding Silverlight Toolkit Reference
Before you can use any charting related functionality in a Silverlight application, you must download the Silverlight Toolkit. After that you need to add a reference to an assembly.
To add a reference, right click the References folder of your project in Solution Explorer and select Add Reference. This action will open the Add Reference dialog as you can in the following Figure 1. On this dialog, select Browse option and browse the Microsoft.Windows.Controls.DataVisualization.dll assembly from the folder where you installed the Silverlight Toolkit. This assembly resides in the Binaries folder.
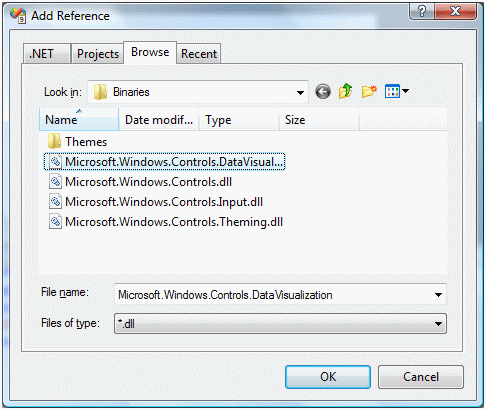
Figure 1
Once you add the reference, you will see the Microsoft.Windows.Controls.DataVisualization added to your References dialog as you see in Figure 2.

Figure 2
Now, the next step is to import the Microsoft.Windows.Controls.DataVisualization and the Microsoft.Windows.Controls.DataVisualization.Charting namespaces to the page. Once you type xmlns= in your page, you will see these namespaces in the Intellisense. Select and add both of them to your page as you can see in Figure 3.
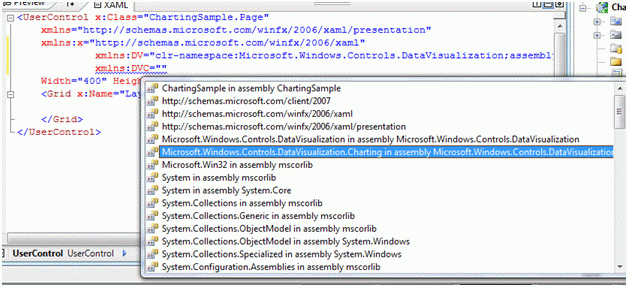
Figure 3
The final reference added to the page looks like following. As you can see here, I added name of this reference to ToolkitRef.
xmlns:DV="clr-namespace:Microsoft.Windows.Controls.DataVisualization;assembly=Microsoft.Windows.Controls.DataVisualization"
xmlns:DVC="clr-namespace:Microsoft.Windows.Controls.DataVisualization.Charting;assembly=Microsoft.Windows.Controls.DataVisualization"
Now you will see ToolkitRef in your page and once you select it, you will notice all Charting related elements added to the Intellisense. To add a Chart control to your page, just select the Chart control from the list. The list of charting related elements looks like Figure 4.
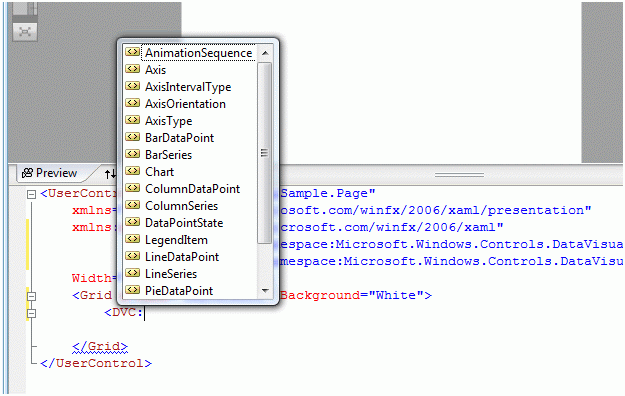
Figure 4
Creating a Chart
The Chart element represents a Silverlight Chart control in XAML.
< DVC:Chart></DVC:Chart>
The code snippet in Listing 1 creates a Chart and sets its width, height, and background properties of the Chart control.
<DVC:Chart x:Name="MyChart" Width="400" Height="250"
Background="YellowGreen" >
</DVC:Chart>
Listing 1
The output of Listing 1 looks like Figure 5.

Figure 5
Chart Types
The Series attribute of the Chart element is used to create a chart type. If you see in Figure 6, you will notice BarSeries, ColumnSeries, LineSeries, PieSeries, and ScatterSeries attributes and based on the attribute, the chart will be created.
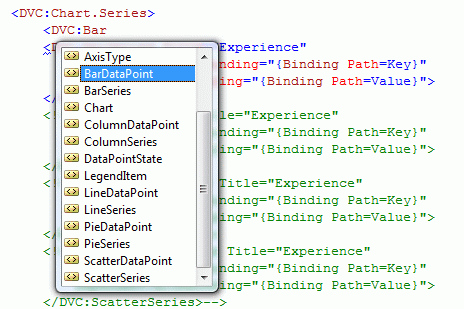
Figure 6
Line Chart
The code snippet in Listing 2 creates a line chart by setting Chart.Series to LineSeries. As you may see, the binding is occurred on Key and Value fields of a data source.
<DVC:Chart Canvas.Top="80" Canvas.Left="10" x:Name="mcChart"
Width="400" Height="250"
Background="LightSteelBlue">
<DVC:Chart.Series>
<DVC:LineSeries Title=" Monthly Count"
IndependentValueBinding="{Binding Path=Key}"
DependentValueBinding="{Binding Path=Value}">
</DVC:LineSeries>
</DVC:Chart.Series>
</DVC:Chart>
Listing 2
The code snippet in Listing 2 creates a collection in KeyValuePair form and sets the ItemsSource property of the chart series. Same data can be used for other chart types.
private void LoadLineChartData()
{
((LineSeries)mcChart.Series[0]).ItemsSource =
new KeyValuePair<DateTime, int>[]{
new KeyValuePair<DateTime, int>(DateTime.Now, 100),
new KeyValuePair<DateTime, int>(DateTime.Now.AddMonths(1), 130),
new KeyValuePair<DateTime, int>(DateTime.Now.AddMonths(2), 150),
new KeyValuePair<DateTime, int>(DateTime.Now.AddMonths(3), 125),
new KeyValuePair<DateTime, int>(DateTime.Now.AddMonths(4), 155) };
Listing 7
The output looks like Figure 7.
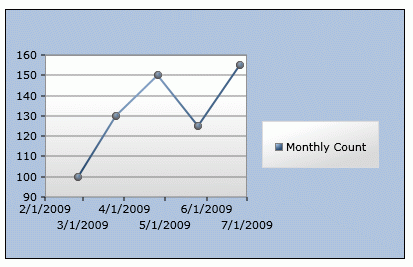
Figure 7
Summary
In this article, we learned how to build a line chart using charting toolkit available in Silverlight 2.