Introduction
I finally got my hands on the new Visual Studio 2010 Beta 1, and decided to dig deep into Silverlight technology. I had spent some time playing with Silverlight development in the past, but over the next 3 months I will be doing some heavy Silverlight development, so I will share more of what I learn in these winter months. This first article talks about the new Silverlight DataGrid control and how to add data to it. By the way, there is an excellent overall article on how to take advantage of the DataGrid and its many properties by Mahesh Chand. Check it out if you want to learn more about using the Silverlight DataGrid. This article will stick close to the data aspect of the grid.
Our first step in creating a silverlight app is to go into the new VS 2010 and choose New -->Project. Then simply choose Silverlight Application as shown in figure 1.
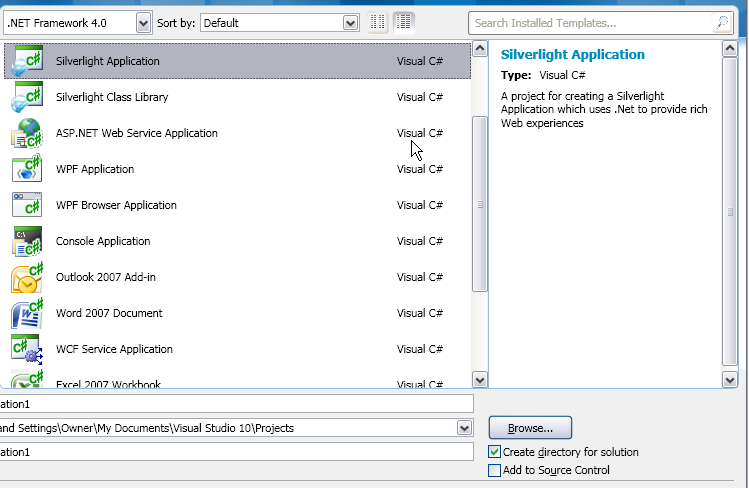
Figure 1 - Creating our Silverlight App in VS 2010
This creates a silverlight application with a single Xaml Page (Page.xaml) and some C# code behind (Page.xaml.cs). We will be working off this page for the purpose of our demonstration. First we'll go to the toolbox and drag a DataGrid onto the Canvas. We'll also create two buttons: Add and Remove Customer. Note that if you click on any of the elements, either buttons or DataGrid, a property window becomes available in which you can alter the properties of the controls. This was not available in VS2008 Silverlight development and makes VS2010 an actual viable development environment for Silverlight. You used to have to do all your design work in Expression Blend or in XAML by hand. This proved to be a painful and frustrating experience. Not so in VS2010. You can once again enjoy the development experience you had with Windows Forms development (Yipee!!).
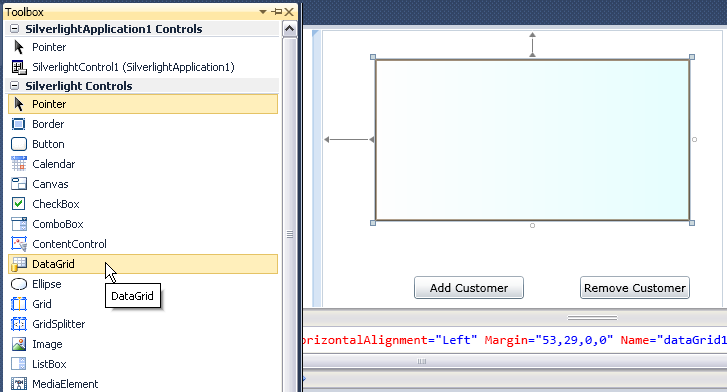
Figure 2 - Designing our Silverlight Page
Adding the Data
Now that we have a Data Grid to use called dataGrid1, we can prepare some data to display in the grid. In this example, we'd like to display customer information. Each row of the DataGrid will represent one customer. First we'll need a customer entity to work with, so we'll create a Customer class. We'll use automatic properties for each property used to describe customer information such as name or email.
Listing 1 - The Customer Class
using System.Collections.Generic;
using System.Linq;
using System.Text;
namespace SilverlightApplication1
{
public class Customer
{
public string FirstName { get; set; }
public string LastName { get; set; }
public string Email { get; set; }
public string Phone { get; set; }
public string Street { get; set; }
public string City { get; set; }
public string State { get; set; }
public string Zip { get; set; }
}
}
|
Now that we have our customer, we are ready to create a datasource to attach to our DataGrid. You can use any collection in .NET that supports IEnumerable to be the datasource for our DataGrid, but you'll want to use an ObservableCollection if you want to have the ability to add and remove customers from the collection and have them be reflected in the Grid. Listing 2 shows our initial data source observable collection of customers.
Listing 2 - Observable Collection of Customers for the DataGrid
{FirstName="Joe", LastName="Smith", City="Austin", State="Texas", Zip="78704"},
new Customer(){FirstName="Bob", LastName="Smith", City="Austin", State="Texas", Zip="78704"},
new Customer(){FirstName="Bill", LastName="Smith", City="Austin", State="Texas", Zip="78704"}};
|
We can attach this collection to the Datagrid by simply assigning it to the ItemSource property in the DataGrid:
Listing 3 - Assigning the data to the DataGrid's ItemSource
{
InitializeComponent();
dataGrid1.ItemsSource = _customers;
}
|
Now we have all the pieces in place to display the DataGrid on our Silverlight Web Page. Let's look at the results shown in figure 3. All the customers in the _customers collection are displayed initially in our application. To edit a cell, we simply click in the cell we want to edit and type our changes. These changes will then be reflected in our _customers collection.
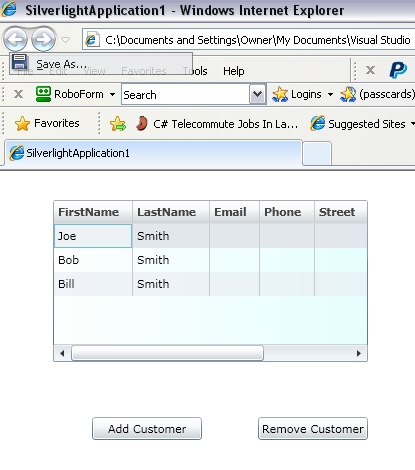
Figure 3 - Silverlight Customer Grid
Add/Remove Row Functions
In order to implement Add Customer and Remove Customer functions, we need to add code to the button event handlers. The code for adding and removing customers is shown in listing 4 below as part of our Page class.
Listing 4 - Add and Remove Customer Event Handlers
{
_customers.Add(new Customer() { FirstName = "<new name>" });
}
private void btnRemove_Click(object sender, RoutedEventArgs e)
{
_customers.Remove(dataGrid1.SelectedItem as Customer);
}
|
Because we are using an ObservableCollection, we only need to alter the contents of the collection, and the results will be immediately reflected in the DataGrid. To Add a new customer, we construct a new Customer object and add it to the _customers collection. To remove a customer, we find the selected customer row, and remove it from _customers collection.
Conclusion
Silverlight opens a new world to developers wanting to do web development.
a) It makes client side development MUCH easier.
b) It leverages the .NET technology we know and love.
I've spent the last year using Javascript, JQuery, and CSS to do client side development and between worrying about the idiosyncrasies of different browsers, using built in browser tools to get your styles just right and writing type-unsafe javascript code, as well as the limitations of what you can do with browser technology, I've had enough. The future of solid and rich web development is not ever going to be found in the raw browser. It will be much more readily found in applications that can be embedded in the browser. I'm looking forward to leveraging the power of Silverlight in the months to come.