

Today, I have provided an article showing you how to insert and display data in a DataGridView control using a WCF service from C# code. To insert and display data in a DataGridView control using a WCF service, we must do the following 3 things:
- Create Database Table
- Create WCF Service
- Create Windows Forms Application
In the first step we will create a table in SQL Server; after that we create a simple function to insert and display data in a DataGridView control using a WCF service. In a web application, add a reference for the service to insert and display data in the DataGridView control. Let's take a look at a practical example. The example application is developed in Visual Studio 2010 and SQL Server 2008.
Step 1: Creating Database Table
- Database name: Registration
- Database table name: RegistrationTable
RegistrationTable Table

Step 2: Creating WCF Service
Now you have to create a WCF Service:
- Go to Visual Studio 2010
- New-> Select a project
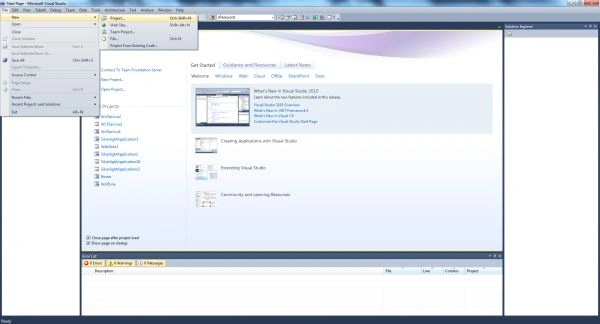
Now click on the project and select WCF Service Application and provide a name for the service:

Now click on the Ok Button. Then you will get 3 files in Solution Explorer.
- IService.cs
- Service.svc
- Service.svc.cs
The following image shows the following files:

For inserting data into the database you need to write the following code in the IService1.cs file which contains the two sections:
- OperationContract
- DataContract
The OperationContract section is used to add service operations and a DataContract is used to add types to the service operations.
Iservice1.cs File
Now we create a function in the OperationContract section of the Iservice1.cs file:
- using System;
- using System.Collections.Generic;
- using System.Linq;
- using System.Runtime.Serialization;
- using System.ServiceModel;
- using System.ServiceModel.Web;
- using System.Text;
- using System.Data.SqlClient;
- using System.Data;
- namespace WCFServiceForInsert
- {
- // NOTE: You can use the "Rename" command on the "Refactor" menu to change the interface name "IService1" in both code and config file together.
- [ServiceContract]
- public interface IService1
- {
- [OperationContract]
- string InsertUserDetails(UserDetails userInfo);
- [OperationContract]
- DataSet SelectUserDetails();
- }
- // Use a data contract as illustrated in the sample below to add composite types to service operations.
- [DataContract]
- public class UserDetails
- {
- int userid;
- string username;
- string password;
- string country;
- string email;
- [DataMember]
- public int UserID
- {
- get { return userid; }
- set { userid = value; }
- }
- [DataMember]
- public string UserName
- {
- get { return username; }
- set { username = value; }
- }
- [DataMember]
- public string Password
- {
- get { return password; }
- set { password = value; }
- }
- [DataMember]
- public string Country
- {
- get { return country; }
- set { country = value; }
- }
- [DataMember]
- public string Email
- {
- get { return email; }
- set { email = value; }
- }
- }
- }
In this file we define the definition of the function InsertUserDetails(UserDetails userInfo).
And replace the code with the following:
- using System;
- using System.Collections.Generic;
- using System.Linq;
- using System.Runtime.Serialization;
- using System.ServiceModel;
- using System.ServiceModel.Web;
- using System.Text;
- using System.Data.SqlClient;
- using System.Data;
- namespace WCFServiceForInsert
- {
- // NOTE: You can use the "Rename" command on the "Refactor" menu to change the class name "Service1" in code, svc and config file together.
- public class Service1 : IService1
- {
- public DataSet SelectUserDetails()
- {
- SqlConnection con = new SqlConnection("Data Source=.;Initial Catalog=registration;User ID=sa;Password=wintellect");
- con.Open();
- SqlCommand cmd = new SqlCommand("Select * from RegistrationTable", con);
- SqlDataAdapter sda = new SqlDataAdapter(cmd);
- DataSet ds = new DataSet();
- sda.Fill(ds);
- cmd.ExecuteNonQuery();
- con.Close();
- return ds;
- }
- public string InsertUserDetails(UserDetails userInfo)
- {
- string Message;
- SqlConnection con = new SqlConnection("Data Source=.;Initial Catalog=registration;User ID=sa;Password=wintellect");
- con.Open();
- SqlCommand cmd = new SqlCommand("insert into RegistrationTable(UserName,Password,Country,Email) values(@UserName,@Password,@Country,@Email)", con);
- cmd.Parameters.AddWithValue("@UserName", userInfo.UserName);
- cmd.Parameters.AddWithValue("@Password", userInfo.Password);
- cmd.Parameters.AddWithValue("@Country", userInfo.Country);
- cmd.Parameters.AddWithValue("@Email", userInfo.Email);
- int result = cmd.ExecuteNonQuery();
- if (result == 1)
- {
- Message = userInfo.UserName + " Details inserted successfully";
- }
- else
- {
- Message = userInfo.UserName + " Details not inserted successfully";
- }
- con.Close();
- return Message;
- }
- }
- }
Press F5 to run the service. A WCF Test Client form will be displayed and it will load the service.

Now double-click the InserUserDetails() method under IService1. The InserUserDetails tab will be displayed.

The service was added successfully.
Now open the service in the browser.
Now right-click on the service1.vcs -> open in browser:
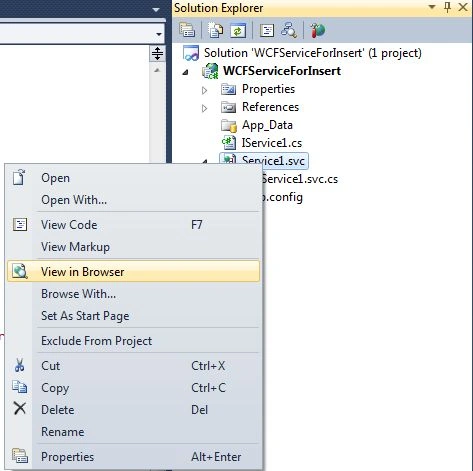
Now copy the URL.

URL
http://localhost:2268/Service1.svc
Step 3: Create Windows Forms Application (Accessing the Service)
Now, you have to create a windows Forms Application.
- Go to Visual Studio 2010
- New-> Select a project-> Windows Forms Application
- Click OK

Now add a new page to the website:
- Go to the Solution Explorer
- Right-click on the Project name
- Select add new item
- Add new windows form and give it a name
- Click OK

Now again go to the Solution Explorer and click on the add the service reference.

The following window will be opened:

Now paste the above URL in the address and click on the "Go" button:

Click on the Ok Button. Now the reference has been added in the Solution Explorer.

Now create a new Windows Form and drag and drop controls onto the Windows Form. The designing form looks like below:

Double-click on the "Save" button, and add the following code with the click event handler:
- using System;
- using System.Collections.Generic;
- using System.ComponentModel;
- using System.Data;
- using System.Drawing;
- using System.Linq;
- using System.Text;
- using System.Windows.Forms;
- namespace WindowsFormsApplication1
- {
- public partial class Registration : Form
- {
- ServiceReference1.Service1Client obj = new ServiceReference1.Service1Client(); // Add service reference
- public Registration()
- {
- InitializeComponent();
- showdata();
- }
- private void showdata() // to show the data in the DataGridView
- {
- DataSet ds = new DataSet();
- ds = obj.SelectUserDetails();
- dataGridView1.DataSource = ds.Tables[0];
- dataGridView1.AutoResizeColumns(DataGridViewAutoSizeColumnsMode.AllCells);
- }
- private void button1_Click(object sender, EventArgs e)
- {
- ServiceReference1.UserDetails objuserdetail=new ServiceReference1.UserDetails(); // add type reference
- objuserdetail.UserName =textBoxUserName.Text ;
- objuserdetail.Password =textBoxPassword.Text ;
- objuserdetail.Country =textBoxCountry .Text ;
- objuserdetail.Email =textBoxEmail .Text ;
- obj.InsertUserDetails(objuserdetail);
- showdata();
- }
- }
- }
Press CTRL+F5 to run the application.

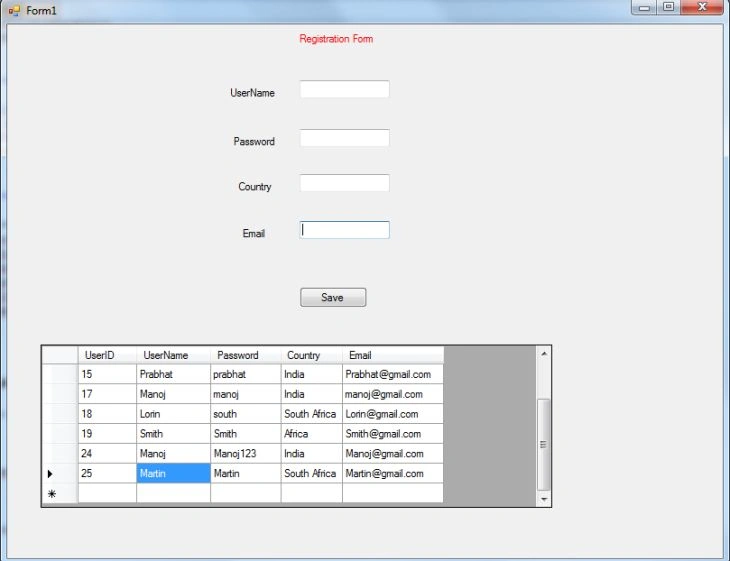
Now enter the UserName, Password, country and Email and click on the save Button.

Now click on the save Button. Data will be saved in the database table and also displayed in the DataGridView on the form.
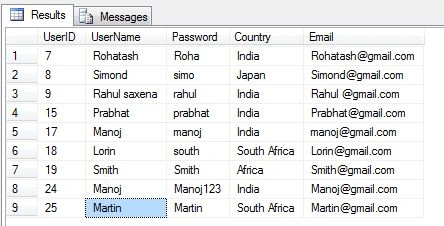
Data has been inserted into the SQL Server database table and check it.
sai jamesPosted Jun 1, 2021, 10:37 AM
Can you please share an example of WCF method return multiple values using a sql join based on condition, or based on the id passed
abbath sinPosted Jun 29, 2020, 10:57 PM
Is it possible to send data(arrays) from a form and get it from another?
Pankajkumar PatelPosted Sep 9, 2019, 1:22 AM
Good article
sachith wickramaarachchiPosted Apr 4, 2018, 2:01 PM
Thanks.. good post
indika bileetaPosted Jun 14, 2016, 6:14 AM
Thanks Good work
Gowtham RajamanickamPosted Apr 26, 2016, 3:14 AM
good article
Rohatash KumarPosted Feb 18, 2013, 4:55 AM
thanks jitendra
jitendraPosted Feb 14, 2013, 1:15 PM
Thank very much sir , because I have learn windows application with WCF cause of your article.