

Introduction
Prism (Composite Application Guidance for WPF and Silverlight) is designed to build applications in WPF and Silverlight that have a single code base. It helps to develop the client application in a modular fashion so that complexity of a large application can be divided in to simpler modules.
Note: Please download Composite Application Library (CAL) from http://compositewpf.codeplex.com/releases
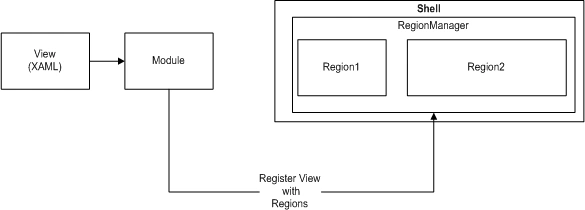
Architecture: Following diagram shows basic architecture that I am going to explain:
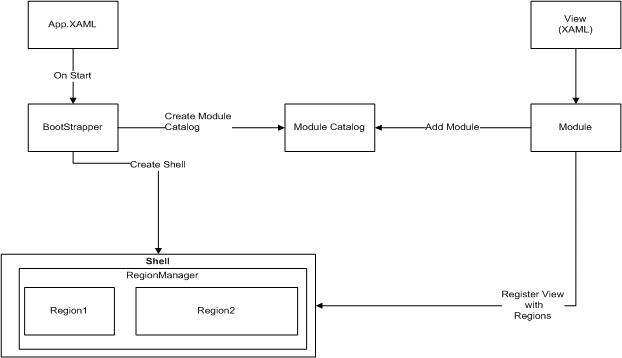
- App.XAML: Call BootStrapper on Application_Startup
- BootStrapper: This is a class file that calls Shell (Shell.XAML) and so creates catalogue of module.
- Shell: This is like a Master Page having regions.
- Region: It is like placeholders to register views.
- View: This is XAML file having User Interface
- Module: Each module can have one or more View(s) which are registered to Region (in the Shell) through RegionManager
Step 1: Create Silverlight Application
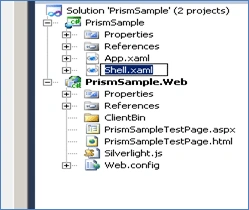
Create Silverlight application named "PrismSample" and rename MainPage.XAML to Shell.XAML
Step 2: Add CAL references to Silverlight Application
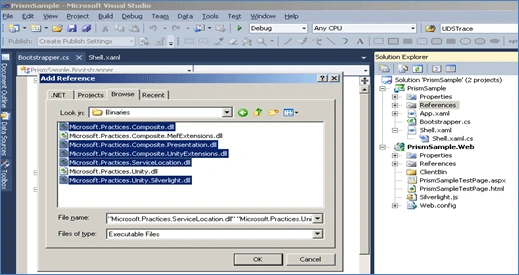
Add following References to PrismSample project
- Microsoft.Practices.Composite.dll
- Microsoft.Practices.Composite.Presentation.dll
- Microsoft.Practices.Composite.UnityExtensions.dll
- Microsoft.Practices.ServiceLocation.dll
- Microsoft.Practices.Unity.Silverlight.dll
Step 3: Create Bootstrapper class
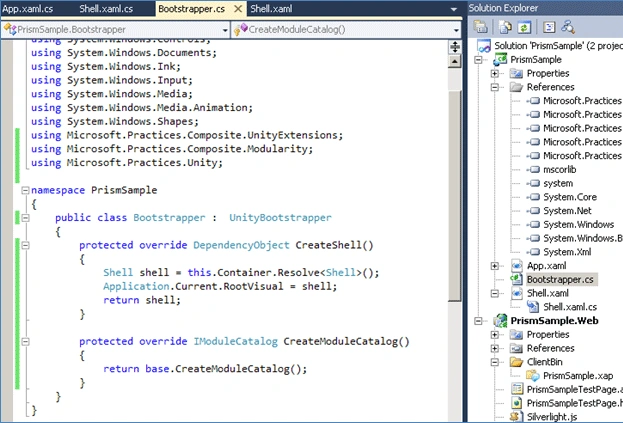
In this step we creating following scenario

- Add Bootstrapper.cs class file to PrismSample project.
- Implement UnityBootstrapper.
- Override CreateShell methods : Set startup object as Shell.XAML.
- Override CreateModuleCatalog methods. For now leave code as it is.
Step 4: Change App.xaml.cs
In this step we creating following scenario

In the Application_Startup event call Bootstrapper class to run it.

Step 5: Add Silverlight Application library project named "PrismModules"
- Add Silverlight library project and name it "PrismModules"
- Create folder Views
- Add MainView.XAML and MenuView.XAML file to Views folder
- Add MainModule.cs and MenuModule.cs file to the project
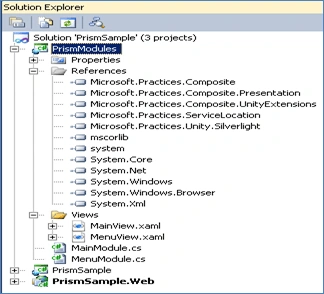
Step 6: Change MenuView.XAML and MainView.XAML
In the step 6, 7, 8 we are creating following scenario
Add TextBlock to MenuView.XAML to display text "Menu Region".
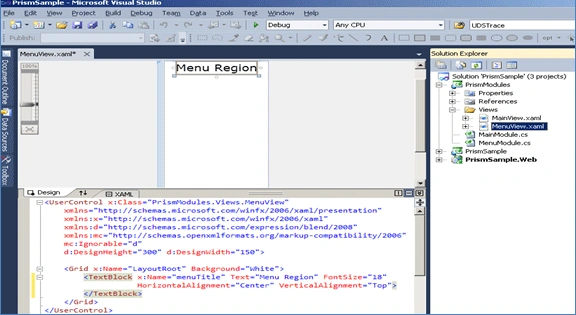
Similarly change MainView.XAML to show Textblock "Main Region".
Step 7: Change MenuModule.cs and MainModule.cs
- In the MenuModule.cs class implement IModule and Implement Initialize method of IModule
- Add property RegionManager of type IRegionManager
- Set RegionManager in the constructor
- In the Initialize method, register MenuView to MenuRegion as shown below.
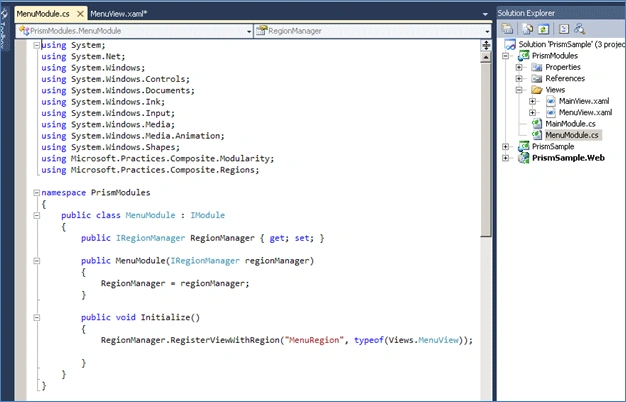
Similarly follow steps for MainModule.cs
Step 8: Change Shell.XAML to add Region
- In the Shell.XAML file add ItemsControl for MenuRegion and MainRegion
- In the each ItemsControl add Attached property RegionManager.RegionName and set value to MenuRegion and MainRegion for respective ItemsControl
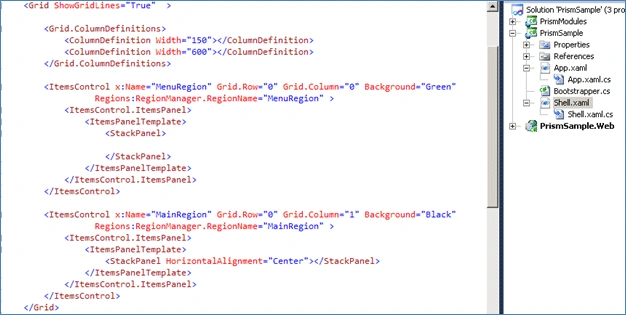
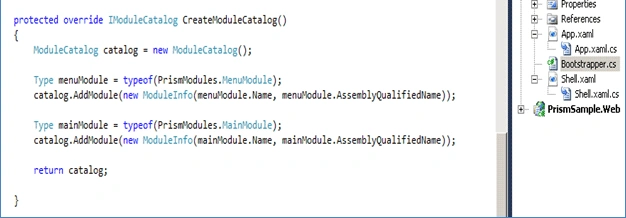
Step 9: Change CreateModuleCatalog method in Bootstrapper.cs
In this step we are creating following scenario

In the CreateModuleCatalog method, add MenuModule and MainModule to ModuleCatalog
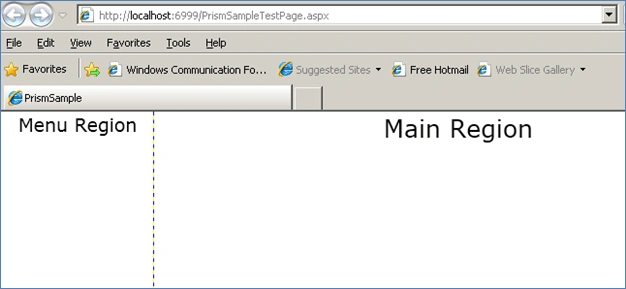
Step 10: Run the application
Finally run the application to see Menu and Main region in the Shell
Conclusion: In this article I have tried to explain the basic components of Prism and how they are wired to each other to create Silverlight UI.
Divya BaburajanPosted Jan 30, 2014, 7:18 AM
easy to understand thanks :)
softkarthiPosted Apr 20, 2011, 3:44 AM
could you help me to load log in page after authentication, shell module have to loaded.
shanmuganathan krishnanPosted Aug 19, 2010, 5:22 AM
Simple and super -Shanmuganathan Krishnan
Durga MaddhaliPosted Jul 15, 2010, 7:59 PM
This was the best PRISM tutorial I have ever read.Simple, complete and easy way of implementation.Thanks Sanket.
Prashant JainPosted Jul 12, 2010, 6:44 AM
Nice one. I found the correct thing on internet would appreciate if the sample can be made available for 3.5 framework also. I am not working on VS2010 Regards Prashant
Mahesh ChandPosted Jul 8, 2010, 10:05 AM
Well written and explained Sanket. Thank you for sharing with us.