Description:
So In the Previous article you have seen how the administration department of the company can provide the Droppoint and route information data.
Now in this article you will see how the employee of the company will book the taxicab by making the entity class relation between the Employee class and the Cab class.
Content:
Step 1:
Create a Cab and an Employee class under the model folder just like Figure 1 (marked with red). The Cab class has the list of Employee class and the Employee class has the reference of a Cab class for making the relation.

Figure 1:
Step 2:
Copy the code shown below in the Cab class:
[ScaffoldColumn(false)]
public int CabId { get; set; }
public long BookId { get; set; }
[Required(ErrorMessage = "BookTime is required")]
public TimeSpan BookTime { get; set; }
[Required(ErrorMessage = "JourneyTime is required")]
public long JourneyTime { get; set; }
//public int TripId { get; set; }
//public virtual Trip Trip { get; set; }
#region 1->m Relation between Cab and Emp
public virtual List<Employee> Employee_List { get; set; }
#endregion
//#region 1->m Relation between Cab and Route
//public virtual List<Route> Route_List { get; set; }
//#endregion
public void Create()
{
throw new System.NotImplementedException();
}
public void Cancel()
{
throw new System.NotImplementedException();
}
public void Details()
{
throw new System.NotImplementedException();
}
public void CheckGender()
{
throw new System.NotImplementedException();
}
Step 3:
Copy the code shown below in the Employee class:
[Key]
[ScaffoldColumn(false)]
public int EmpId { get; set; }
[Required(ErrorMessage = "EmployeeName is required")]
public string EmployeeName { get; set; }
[Required(ErrorMessage = "EmployeeID is required")]
public int EmployeeID { get; set; }
[Required(ErrorMessage = "ProjectName is required")]
public string ProjectName { get; set; }
[Required(ErrorMessage = "Gender is required")]
public string Gender { get; set; }
#region m->1 Relation between Cab
public int CabId { get; set; }
public virtual Cab Cab { get; set; }
#endregion
Step 4:
Now we have to create the mapping of these two classes for generating a table for the backend database.
Now go to "DatabaseContext" folder. Under this folder we already have a mapping class named "DatabaseContext".
Paste the code shown below under the existing code of that class.
public DbSet<Cab> Cab { get; set; }
public DbSet<Employee> Employee { get; set; }
Step 5: So now we have a Model class and the Mapping class. Now it's the time for creating the Controller class for BookCab.
For that first we have to create a link named "BookCab". Go to the "_Layout.cshtml" file under the shared folder. Paste the code shown below there.
Just like Figure 2 (marked with red).
<li>@Html.ActionLink("Book Cab", "Index", "Cab")</li>
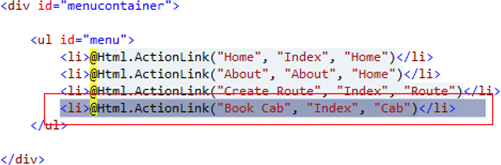
Figure 2:
Step 5:
Now go to the Controller folder and create a controller file named "CabController".
In that class first create a CabDbContext object.
CabDbContext _db = new CabDbContext();
Now replace the Index method by placing the code shown below under the "cabcontroller" class.
public ActionResult Index()
{
try
{
ViewBag.Message = " Employee List";
var v = ViewData.Model = _db.Employee.ToList();
// return View(v);
return View();
}
catch (Exception)
{
return View();
}
}
Step 6:
Now create a new folder named "Cab" under the View folder. After that create a new Razore file named "Index" under the "cab"
folder just like in Figure 3 (marked with red).
Now copy the code shown below under the index file.
@model IEnumerable<CabAutomationSystem.Employee>
@{
ViewBag.Title = "Index";
}
<h2>Index</h2>
<p>
@Html.ActionLink("Create New", "Create")
</p>
<table>
<tr>
<th></th>
<th>
EmpId
</th>
<th>
EmployeeName
</th>
<th>
EmployeeId
</th>
<th>
ProjectName
</th>
<th>
Gender
</th>
<th>
BookTime
</th>
<th>
Journey TIme
</th>
<th>
Book Id
</th>
</tr>
@foreach (var item in Model) {
<tr>
<td>
@* @Html.ActionLink("Edit", "Edit", new { /* id=item.PrimaryKey */ }) |
@Html.ActionLink("Details", "Details", new { /* id=item.PrimaryKey */ }) |
@Html.ActionLink("Delete", "Delete", new { /* id=item.PrimaryKey */ })*@
</td>
<td>
@item.EmpId
</td>
<td>
@item.EmployeeName
</td>
<td>
@item.EmployeeID
</td>
<td>
@item.ProjectName
</td>
<td>
@item.Gender
</td>
<td>
@item.Cab.BookTime
</td>
<td>
@item.Cab.JourneyTime
</td>
<td>
@item.Cab.BookId
</td>
</tr>
}
</table>
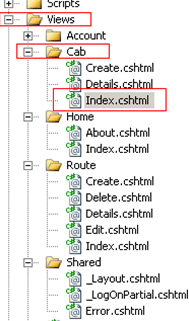
Figure 3:
Step 7:
Now In the "cabcontroller.cs" class replace the two Create methods and paste the code shown below.
public ActionResult Create()
{
ViewBag.Route = _db.Cab.OrderBy(g => g.JourneyTime).ToList();
ViewBag.DropPoint = _db.Employee.OrderBy(a => a.EmployeeName).ToList();
var Employee = new Employee();
var Cab = new Cab();
//var Route = new Route();
return View(Employee);
}
//+
// POST: /Cab/Create
[HttpPost]
public ActionResult Create(Employee Employee)
{
try
{
// TODO: Add insert logic here
if (ModelState.IsValid)
{
//Save Employee
TimeSpan ts = new TimeSpan();
ts=DateTime.Now.TimeOfDay;
Employee.Cab.BookTime = ts;
Employee.Cab.BookId = ts.Milliseconds ;
_db.Employee.Add(Employee);
_db.SaveChanges();
return RedirectToAction("Index");
}
//return RedirectToAction("Index");
ViewBag.Route = _db.Cab.OrderBy(g => g.JourneyTime).ToList();
ViewBag.DropPoint = _db.Employee.OrderBy(a => a.EmployeeName).ToList();
return View(Employee);
}
catch
{
return View();
}
}
Step 8:
Now create a new Razor file named "create.cshtml" under the "cab" folder under the "view" folder.
Now paste the code shown below in to that file.
@model CabAutomationSystem.Employee
@{
ViewBag.Title = "Create";
}
<h2>Create</h2>
<script src="@Url.Content("~/Scripts/jquery.validate.min.js")" type="text/javascript"></script>
<script src="@Url.Content("~/Scripts/jquery.validate.unobtrusive.min.js")" type="text/javascript"></script>
@using (Html.BeginForm()) {
@Html.ValidationSummary(true)
<fieldset>
<legend>Employee</legend>
<div class="editor-label">
@Html.LabelFor(model => model.EmployeeName)
</div>
<div class="editor-field">
@Html.EditorFor(model => model.EmployeeName)
@Html.ValidationMessageFor(model => model.EmployeeName)
</div>
<div class="editor-label">
@Html.LabelFor(model => model.EmployeeID)
</div>
<div class="editor-field">
@Html.EditorFor(model => model.EmployeeID)
@Html.ValidationMessageFor(model => model.EmployeeID)
</div>
<div class="editor-label">
@Html.LabelFor(model => model.ProjectName)
</div>
<div class="editor-field">
@Html.EditorFor(model => model.ProjectName)
@Html.ValidationMessageFor(model => model.ProjectName)
</div>
<div class="editor-label">
@Html.LabelFor(model => model.Gender)
</div>
<div class="editor-field">
@Html.EditorFor(model => model.Gender)
@Html.ValidationMessageFor(model => model.Gender)
</div>
@*<div class="editor-label">
@Html.LabelFor(model => model.Cab.BookTime )
</div>
<div class="editor-field">
@Html.EditorFor(model => model.Cab.BookTime)
@Html.ValidationMessageFor(model => model.Cab.BookTime)
</div>*@
<div class="editor-label">
@Html.LabelFor(model => model.Cab.JourneyTime )
</div>
<div class="editor-field">
@Html.EditorFor(model => model.Cab.JourneyTime)
@Html.ValidationMessageFor(model => model.Cab.JourneyTime)
</div>
@*<div class="editor-label">
@Html.LabelFor(model => model.Cab.BookId)
</div>
<div class="editor-field">
@Html.EditorFor(model => model.Cab.BookId)
@Html.ValidationMessageFor(model => model.Cab.BookId)
</div>*@
<p>
<input type="submit" value="Create" />
</p>
</fieldset>
}
<div>
@Html.ActionLink("Back to List", "Index")
</div>
Step 9:
So now we have now the necessary methods under the "cabcontroller.cs" file.
At present we are not creating the details, edit and delete functionally of that. Because those features will mainly be used by the employee. Employees should provide the date. Later the administration team can edit the record of an particular employee's cabbook details.
So here is the cabcontroller.cs class code for now.
using System;
using System.Collections.Generic;
using System.Linq;
using System.Web;
using System.Web.Mvc;
using CabAutomationSystem.Models;
using CabAutomationSystem.DatabaseContext;
namespace CabAutomationSystem.Controllers
{
public class CabController : Controller
{
//
// GET: /Cab/
CabDbContext _db = new CabDbContext();
public ActionResult Index()
{
try
{
ViewBag.Message = " Employee List";
var v = ViewData.Model = _db.Employee.ToList();
// return View(v);
return View();
}
catch (Exception)
{
return View();
}
}
//
// GET: /Cab/Details/5
//public ActionResult Details(int id)
//{
// Employee Employee = _db.Employee.Find(id);
// if (Employee == null)
// return RedirectToAction("Index");
// return View("Details", Employee);
//}
//
// GET: /Cab/Create
public ActionResult Create()
{
ViewBag.Route = _db.Cab.OrderBy(g => g.JourneyTime).ToList();
ViewBag.DropPoint = _db.Employee.OrderBy(a => a.EmployeeName).ToList();
var Employee = new Employee();
var Cab = new Cab();
//var Route = new Route();
return View(Employee);
}
//+
// POST: /Cab/Create
[HttpPost]
public ActionResult Create(Employee Employee)
{
try
{
// TODO: Add insert logic here
if (ModelState.IsValid)
{
//Save Employee
TimeSpan ts = new TimeSpan();
ts=DateTime.Now.TimeOfDay;
Employee.Cab.BookTime = ts;
Employee.Cab.BookId = ts.Milliseconds ;
_db.Employee.Add(Employee);
_db.SaveChanges();
return RedirectToAction("Index");
}
//return RedirectToAction("Index");
ViewBag.Route = _db.Cab.OrderBy(g => g.JourneyTime).ToList();
ViewBag.DropPoint = _db.Employee.OrderBy(a => a.EmployeeName).ToList();
return View(Employee);
}
catch
{
return View();
}
}
//
// GET: /Cab/Edit/5
public ActionResult Edit(int id)
{
return View();
}
//
// POST: /Cab/Edit/5
[HttpPost]
public ActionResult Edit(int id, FormCollection collection)
{
try
{
// TODO: Add update logic here
return RedirectToAction("Index");
}
catch
{
return View();
}
}
//
// GET: /Cab/Delete/5
public ActionResult Delete(int id)
{
return View();
}
//
// POST: /Cab/Delete/5
[HttpPost]
public ActionResult Delete(int id, FormCollection collection)
{
try
{
// TODO: Add delete logic here
return RedirectToAction("Index");
}
catch
{
return View();
}
}
}
}
Step 10:
Now run the code. You will see a new link added named "Book Cab" just like Figure 4 (marked with red):

Figure 4:
Step 11:
SO when you click the Book cab or else the "CreateRoute" link in the cab database all the tables will be created
with a relation just like Figure 5 (marked with red).
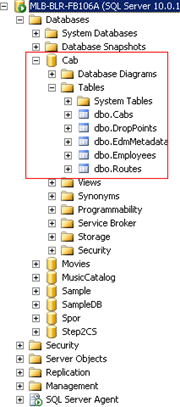
Figure 5:
Step 12:
Now click the link "BookCab". IN that page click "add new". You will be redirected to the "Create" page.
Type your data (as in Figure 6) and press submit; what you will see will be like Figure 7.
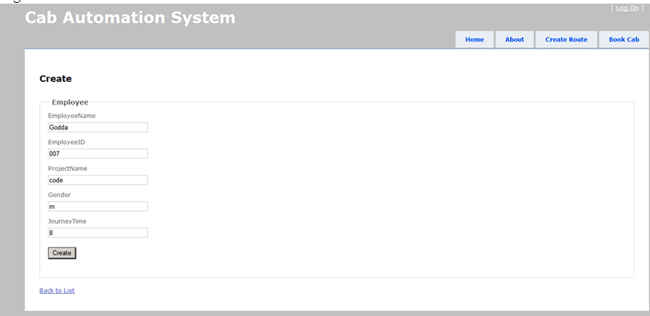
Figure 6:
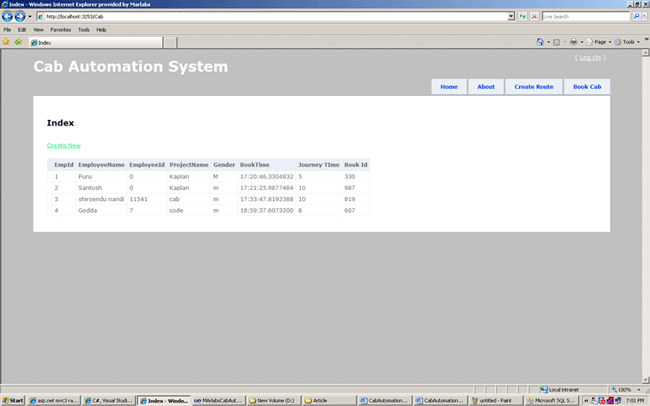
Figure 7:
Conclusion:
So here we have seen how the employee will book the cab.
Here in this article I have used the Journey time field as a text box . IN the next article I will change it to a DropDownList.
Here after inserting your cab book details you will see in the list view that a Book time will be generated automatically
as in Figure 8 (marked with red).
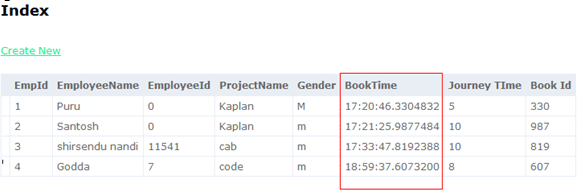
Figure 8:
Here also when an employee books the cab he will get his Book Id by a popup message. Currently
I am displaying it in the list.