Introduction
In year 2003, we were writing a large Web application using ASP.NET 1.0 and I remember we needed something like a wizard control in it and we created a wizard like control using some Panel controls and previous and next buttons. The data was preserved from one control to the other by using pulbish/global variables.
Now, in ASP.NET 2.0, we have the Wizard control. You should use the Wizard control when there is a need of sequential steps to be followed in an application. In this article, I will show you how to build an online Quiz application using the Wizard control.
When to use Wizard Control?
The Wizard control is a perfect fit when you need to develop a web site that requires multiple steps to collect and display the data. For example, building a job board web site where an applicant has to fill out information in multiple steps such as personal information, education, experience, resume details and so on. An online Quiz application is another perfect example, where you would want to use a Wizard control.
Advantages of using a Wizard Control
In situations like above, you may want to use the Wizard control because has built-in support for:
- a header for the title of a particular step
- a sidebar for leftbar navigation
- collection of steps
- types of steps
Creating a Wizard
If you do not have Visual Studio 2005 and using any HTML editor to write your ASP.NET application, simply follow these steps to create a wizard. This section also shows what designer does for you under the hood.
Creating a Wizard
The <asp:Wizard /> tag is represents the Wizard control. The following code shows how to create a Wizard control.
<
asp:Wizard ID="Wizard1" runat="server">
</asp:Wizard>
Similar to other ASP.NET controls, we can set the properties of the control as following:
<asp:Wizard ID="Wizard1" runat="server" ActiveStepIndex="1" Height="106px" Width="387px
</asp:Wizard>
Adding Wizard Steps
A Wizard control is nothing without the wizard steps. The Wizard control is made with some wizard steps. In ASP.NET, the <asp:WizardStep /> tag represents a wizard step and they are within a <WizardSteps /> tag.
The next step is to add the wizard steps to a Wizard. The code in Listing 1 adds three wizard steps to the Wizard control:
<asp:Wizard ID="Wizard1" runat="server">
<WizardSteps>
<asp:WizardStep runat="server" Title="Step 1">
</asp:WizardStep>
<asp:WizardStep runat="server" Title="Step 2">
</asp:WizardStep>
<asp:WizardStep runat="server" Title="Step 3">
</asp:WizardStep>
</WizardSteps>
</asp:Wizard>
Listing 1. Adding three wizard steps to a Wizard control.
The output of code listed in Listing 1 generates Figure 1. As you can see from this image, there are three steps and the page also has a Next button. Now you can navigate from one step to another using the Step links or using the Next button.
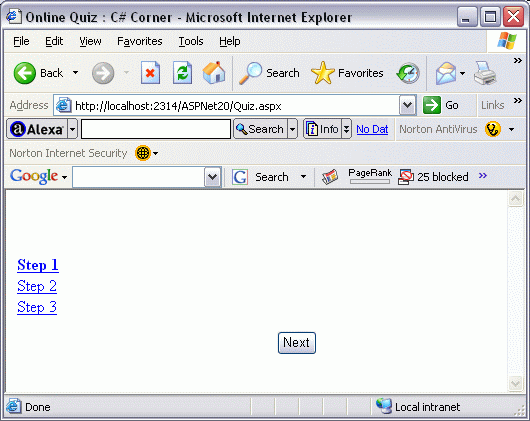
Figure 1. A Wizard with 3 steps.
If you click on the Next button, the step 2 looks like Figure 2. Now you can see from this figure, it has Preview and Next button to navigate to previous and next steps obviously.
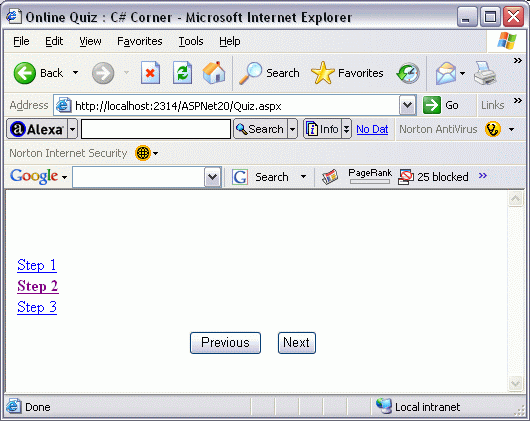
Figure 2. Step 2 of the Wizard control.
The last step of the Wizard looks like Figure 3, which has Previous and Finish buttons.
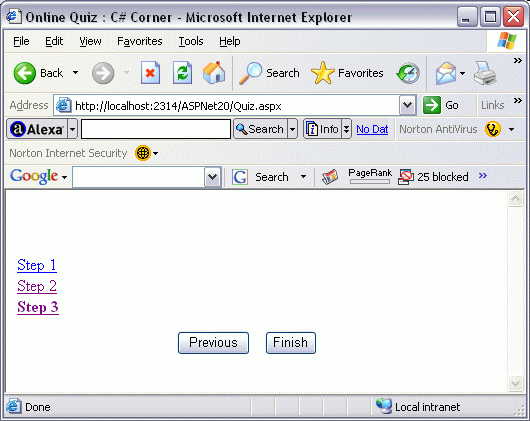
Figure 3. Step 3 of the Wizard control.
Wizard Properties
Some of the common properties of the Wizard control are described below:
Creating a Wizard using Visual Studio 2005
If you have Visual Studio 2005, you can create a Wizard control by using the designer and drag the Wizard control from the Toolbox to the page.
After you drop Wizard control on a page, you will see a Wizard Tasks list, which includes Add/Remove WizardSteps, Convert to StartNavigation Template, Convert to StepNavigation Template, Convert to FinishNavigation template, and Convert to SideBar Template. See Figure 1.
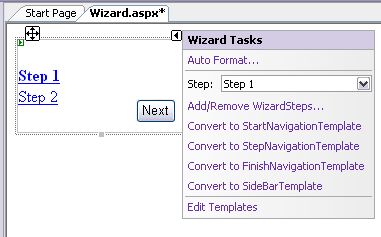
Figure 1. Wizard Steps
Clicking on Add/Remove WizardSteps launches WizardStep Collection Editor (see Figure 2), which allows you to add and and remove WizardSteps.
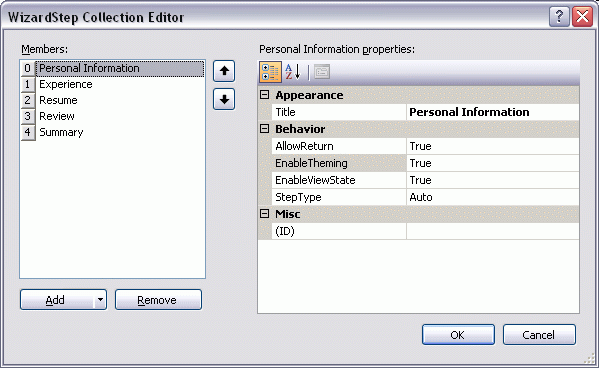
Figure 2. WizardSteps Collection Editor
After adding 3 WizardSteps, our page looks like Figure 3.

Figure 3. Wizard with 3 WizardSteps
Online Job Application
Now let's see the Wizard control in action. In this step, we are going to build an online job application, where a candidate can apply for a job by filling couple of sheets, attach his/her resume, and send the resume to the hiring company.
So the applcation will have following five steps:
- Personal Information
- Experience
- Resume
- Review
- Summary
The first step of the application is to collect applicant's personal information including name, address, and contact details.
In second step, we are going to collect applicant's experience details.
The third step allows applicant to upload his resume.
The fourth step is the review step where the applicant can review the details and submit the application after the review.
The last step is the summary page with the message.
Conclusion
In this article, I discussed how to create and use ASP.NET 2.0 Wizard control. First part of the article showed how to take advantage of Visual Studio IDE and create the Wizard control using the designer and second part of the article showed how to create a Wizard control if you do not have the IDE.