
Applies To
The Information provided in this article applies to the following technologies: Asp.net 2.0, Asp.net 'Atlas' CTP, Visual Studio Professional 2005 and Visual Web Developer 2005
Introduction
'Atlas' is a codename for a framework that extends asp.net for client-side Web application development. The framework introduces features such as bridging, gadgets, a declarative scripting model and extensions to JavaScript, while offering a set of client- and server-side classes for creating cross-browser compatible AJAX-style applications.
This article introduces the 'Atlas' framework by exploring its client and server class libraries, the programming model the framework allows developers to adopt, some common development scenarios and by walking through a sample 'Atlas' enabled Web application.
Client- and Server-based Web applications
Web application development can target the http client (browser) and the server. Asp.net Web applications are server-based (run at the host) hence requiring a complete post-back for every event that is fired by a server control on the client. Such a scenario is depicted below in figure 1.
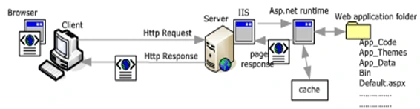
Figure 1. An http post-back for an asp.net Web application
Running Web applications exclusively on the server, with no or very little processing on the client, does not come without performance penalties. Such drawbacks can easily be spotted in asp.net Web applications: a flickering, paused, unresponsive and relatively poor UI, or not so easily: a busy wire by post-back data and an overloaded server.
Getting over these performance hurdles in asp.net applications means porting some of the processing load to the client and exploiting technologies offered by the client platform. The client platform is programmable through scripting; JavaScript is a standardized object oriented language of choice for the task.
You may wonder what these client platform technologies are. The Client platform (browser) provides the following technologies:
- The Document Object Model: A standardized language independent set of objects that allow developers to dynamically control the structure, content and style of HTML documents.
- The Dynamic Hypertext Mark-up Language Object Model: A browser vendor specific set of features that serve as an extension to the DOM. Data bindings, UI effects, such as filters and transitions, HTML element behaviors and events are the features provided within this Object Model.
- The XmlHttpRequest Object: It allows the retrieval and submission of XML data through Http without requiring a complete postback or re-rendering of the entire Web document.
- A JavaScript interpreter: Contained in all Web browsers, it processes commands written in JavaScript. JScript is the Microsoft version of JavaScript, which was originally created by Netscape. Both versions conform to the ECMAScript standard for a vendor neutral, cross platform, general purpose scripting language.
These technologies are collectively known as AJAX, for Asynchronous JavaScript and XML; 'Atlas' is a framework for creating Web applications that exploit these technologies. Figure 2 below illustrates an 'Atlas' enabled asp.net Web application.
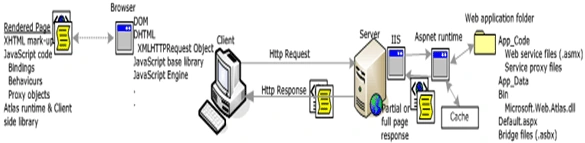
Figure 2. Http request and response for an 'Atlas' enabled, client-based asp.net Web application
An overview of the 'Atlas' Framework
The framework consists of the Microsoft.Web.Atlas.dll assembly. It holds, server-side managed and client-side JavaScript APIs.
'Atlas' namespaces, in figure 3 below, as seen in Visual Studio's object browser window.
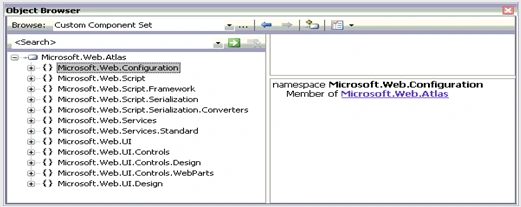
Figure 3. Namespaces within the Microsoft.Web.Atlas.dll assembly
The Server-side Library
Within the namespaces shown in figure 3 the framework offers various classes that serve as the server-side library. The library provides configuration, Web service and control classes that work along the client-side JavaScript API.
The Web service classes expose asp.net features such as authentication, profiles, culture and globalization to client-side JavaScript code for asynchronous access. 'Atlas' server control classes, in the other hand, emit JavaScript when rendered and are provided to spare the developer from writing complex client-side scripts.
The Server-side library also provides 'Atlas' extender controls, which give asp.net controls additional client-side functionality.
The following Controls are part of the server-side library:
- The ScriptManager control: All 'Atlas' features on a Web page, such as partial page updates, custom and library client script referencing and rendering, Web service referencing -- for client-side asynchronous access and exception handling are managed by this control. Every single asp.net Web page or user control that requires implementing 'Atlas' functionality needs to declare a single instance of this control. To use a ScriptManager control on a page use the following declarative syntax:
<atlas:ScriptManager
ID="ScriptManager instance identifier"
<!--enables or disables partial page rendering using UpdatePanel controls-->
EnablePartialRendering="boolean true or false"
<!--If set to false the AtlasRuntime.js file, which provides basic 'Atlas functionality is referenced by default.
If set to true the Atlas.js file, which provides the entire 'Atlas' feature set is referenced by default.
The default value is true-->
EnableScriptComponents="boolean true or false"
OnPageError="invoked event handler on PageError "
runat="server" >
<Scripts>
<atlas:ScriptReference
<!--to reference custom script files-->
Path="path to .js file"
<!--to reference client library files that are not included automatically-->
ScriptName="name of script file e.g. AtlasUIGlitz"/>
</Scripts>
<Services>
<atlas:ServiceReference
<!--If set to true the control generates a JavaScript proxy object for asynchronous access for the referenced Web Service.
If set to false it doesn't.-->
GenerateProxy="boolean true or false"
Path="path to a Web service (e.g. asmx) file"
Type="Web service class name"
/>
</Services>
<ErrorTemplate>
<!--Markup for rendering unhandled exception messages for asynchronous postback.
Partial rendering should be enabled. The template has to define an input button with an attributes ID of value "okButton" and runat of value "server" to close the message. -->
</ErrorTemplate>
</atlas:ScriptManager>
- The UpdatePanel control: When partial rendering for a Web page is enabled through the ScriptManager control the UpdatePanel control can be used in tandem to specify regions of the page that can be updated independently using asynchronous post-backs. The following declarative syntax is used to define an UpdatePanel control in a Web page:
<atlas:UpdatePanel
ID="UpdatePanel instance identifier"
<!-- If Mode attribute is set to Always asynchronous postbacks triggered within the region update its contents automatically;
If it is set to Conditional the region is updated in response to a registered trigger -->
Mode="Always|Conditional"
<!-- If RenderMode attribute is set to Block the content within the UpdatePanel is rendered using a <DIV> element;
If it is set to Inline a <SPAN> element is used as a container for the content within the UpadatePanel -->
RenderMode="Block|Inline"
runat="server">
<ContentTemplate>
<!-- Content to be rendered within the region-->
</ContentTemplate>
<!—A Collection of objects that trigger an asynchronous update on the panel. These Objects don't need to be declared within the region. -->
<Triggers>
<ControlValueTrigger
ControlID="object instance identifier"
PropertyName="property value that triggers the update"/>
<ControlEventTrigger
ControlID="object instance identifier"
EventName="the name of the event that triggers the update"/>
</Triggers>
</atlas:UpdatePanel>
<atlas:TimerControl
Enabled="boolean true or false"
ID="Control instance identifier"
<!--If the Enabled property is set to true the control is defined on the client-side. If not it isn't.-->
Interval="Interval in milliseconds. the default is 60000."
OnTick="invoked server-side event handler name" runat="server"/>
- Extender Controls: They extend asp.net controls with added client-side functionality. The AutoCompleteExtender control, for example, enables auto-completion behaviour on asp.net Textbox controls, while the DragOverlayExtender control enables drag-and-drop behaviour.
Developers can also create custom asp.net 'Atlas' control extenders using a Visual studio 2005 project template provided with the 'Atlas' control toolkit.
The client-side Library
The client library consists of a set of (.js) JavaScript files packaged as resources within the Microsoft.Web.Atlas.dll assembly.
The objects contained within this class library provide the following features:
- JavaScript language extensions: allow developers to program in JavaScript and at the same time use OO constructs such as namespaces, classes, enumerations, interfaces and data types.
<script type="text/xml-script">
<page xmlns:script="http://schemas.microsoft.com/xml-script/2005">
<references>
</references>
<components>
</components>
</page>
</script>
The entire client library is contained within the Atlas.js file and is referenced by default when a ScriptManager control is defined on a page. Alternatively, to reduce the amount of script that is rendered on the client, we can set the EnableScriptComponents of the ScriptManager control to false and use a stripped-down version of the library, contained in the AtlasRuntime.js file. Additional, specialized, library files such as AtlasDragandDrop.js, AtlasUIMap.js, AtlasUIGlitz.js, etc. can be referenced by name using the Scripts collection attribute of the ScriptManager control.
Mash-ups and Gadgets
'Atlas' introduces two new features: bridging and gadgets. Bridging allows Web applications to consume data from multiple remote Web services, while being connected to a single host. These sorts of Web applications, which consume one or more remote services, are often referred to as Mash-ups. To serve the purpose the framework introduces the bridge file, identified by the .asbx extension. Bridge files are XML files that allow us to define connections to services and data transformations declaratively. Figure 4 below illustrates a Web application consuming (mashing-up) data from multiple remote Web services through 'Atlas' bridging:
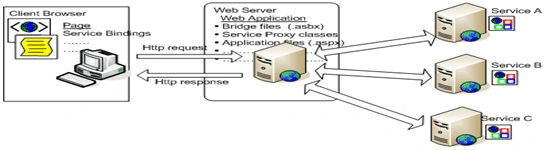
Figure 4. Consuming data from multiple remote services
There are different types of gadgets targeting different platforms. A web-based gadget is a portable web-application that can be deployed on any gadget hosting site such as, for example, live.com or start.com. A web-based gadget consists of the following:
- An Xml Manifest: containing information on the gadget itself (title, description, publisher, build information, etc.) and links to the gadget components (.jss and .css files). The following is a sample manifest for a fictitious gadget (widget):
<?xml version="1.0" ?>
<rss version="2.0" xmlns:binding="http://live.com">
<channel>
<title>Widget alpha</title>
<link>http://www.contoso.com</link>
<description>What does this gadget do?</description>
<language>en-gb</language>
<pubDate>Date</pubDate>
<!--Javascript function entry point; used by the host to load the gadget . -->
<binding:type>Widget.alpha</binding:type>
<item>
<description>The JavaScript code component</description>
<link>http://www.contoso.com/Gadgets/Widget/alpha.js</link>
</item>
<item>
<description>This adds style to the gadget</description>
<link>http://www.contoso.com/Gadgets/Widget/alpha.css</link>
</item>
</channel>
</rss>
-
JavaScript Code: contained within the .js file that the manifest links to; it defines the portable component to be hosted.
- Style Sheet: It defines the style that the host uses to render the gadget.
'Test-driving' the Framework
This walkthrough introduces the 'Atlas' UpdatePanel control and partial page rendering in asp.net applications.
The example provided is an Amazon E-Commerce Service Web client application that searches for restaurants in the United States using City, Cuisine and Neighbourhood search parameters. The sample application makes use of an UpdatePanel control for asynchronous postbacks and partial page rendering; this improves the user experience by making the application more immediate and interactive.
Requirements:
- Microsoft Visual Studio 2005, the .Net Framework 2.0 and the latest 'Atlas' CTP.
- Registration (free) with the Amazon Web Services for the Access Key ID that will allow you to access the E-Commerce Service.
Configuring the Web Site:
Create a new Web site by using the 'Atlas' project template that is installed with the framework's CTP:
- Open Visual studio 2005.
- Click on the File menu, point to New and then Click on Website.
- From the New Web site dialog box choose the 'Atlas' project template, Location, project name and Language (VB or C#) of choice. The language used in this example is C#.
Figure 5, below, shows the New Web Site dialog in Visual Studio 2005.
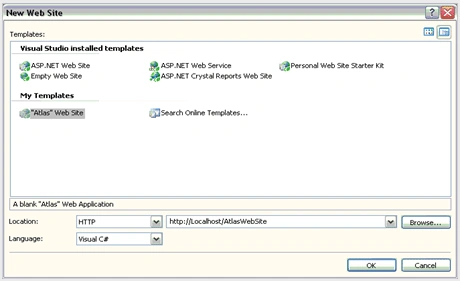
Figure 5. The New Web Site dialog window
Configuring the service for SOAP requests:
- Log on to the account you have created with Amazon Web Services and use the link provided to save the WSDL file in your computer.
- Using the WSDL.exe tool from the .Net Framework 2.0 SDK command prompt window generate a proxy class for the service from the WSDL file that you saved in step 1:
Wsdl <options> <URL | path>
- From the project you have created in Visual Studio open the Solution Explorer window, right-click on the project file, point to Add asp.net folder and click on App-Code.
- Right-click on the App-Code folder in the Solutions Explorer window and click on Add Existing Item.
- From the Add Existing item dialog box browse to the proxy file that you created earlier, select it by clicking on it and click on Add; this will add the service proxy file to the project.
Creating the UI for the client:
- In Solutions Explorer double-click on the Default.aspx file to open it in the Visual Studio designer window.
- Make sure you are in source view and copy and paste the following code within the <form id="form1" runat="server"></form> of the document:
<atlas:ScriptManager ID="ScriptManager1" EnablePartialRendering="true" runat="server" EnableScriptComponents="true"/>
<asp:Label ID="Label1" runat="server" Width="366px" Font-Bold="True" Font-Names="Verdana Ref" Font-Size="Small" Height="19px">SEARCH FOR RESTAURANTS WITH AMAZON.COM</asp:Label><br />
<br />
<asp:Label ID="Label2" runat="server" Text="Access Key ID:" Width="128px" Font-Names="Verdana Ref"></asp:Label>
<asp:TextBox ID="TxtBAccessKey" runat="server" Width="182px" Font-Names="Verdana Ref"></asp:TextBox>
<asp:RequiredFieldValidator ID="RequiredFieldValidator1" runat="server" ErrorMessage="*"
Width="16px" ControlToValidate="TxtBAccessKey"></asp:RequiredFieldValidator><br />
<asp:Label ID="Label3" runat="server" Text="Cuisine:" Font-Names="Verdana" Width="58px"></asp:Label>
<!—-The ListBoxCuisine ListBox holds all possible entries for the Cuisine parameter supported by the amazon ECS-->
<asp:ListBox ID="ListBoxCuisine" runat="server" Rows="1" Width="206px" OnSelectedIndexChanged="ListBoxCuisine_SelectedIndexChanged" Font-Names="Verdana Ref" AutoPostBack="True">
<asp:ListItem Text="American cuisine" Value="American cuisine"></asp:ListItem>
<asp:ListItem Text="Asian cuisine" Value="Asian cuisine"></asp:ListItem>
<asp:ListItem Text="Seafood" Value="Seafood"></asp:ListItem>
<asp:ListItem Text="Greek" Value="Greek"></asp:ListItem>
<asp:ListItem Text="Indian" Value="Indian"></asp:ListItem>
<asp:ListItem Text="Italian" Value="Italian"></asp:ListItem>
<asp:ListItem Text="Japanese" Value="Japanese"></asp:ListItem>
<asp:ListItem Text="Chinese" Value="Chinese"></asp:ListItem>
</asp:ListBox>
<br />
<asp:Label ID="Label5" runat="server" Font-Names="Verdana" Text="City:"
Width="61px"></asp:Label>
<!—The Amazon E-Commerce Service supports only the cities defined as list items of the ListBox control-->
<asp:ListBox ID="listBoxCity" runat="server" Height="19px" Width="221px" AutoPostBack="True" EnableTheming="False" Rows="1" OnSelectedIndexChanged="listBoxCity_SelectedIndexChanged" Font-Names="Verdana Ref" >
<asp:ListItem Text="
<asp:ListItem Text="
<asp:ListItem Text="
<asp:ListItem Text="
<asp:ListItem Text="
<asp:ListItem Text="
</asp:ListBox>
<br />
<asp:Label ID="Label6" runat="server" Font-Names="Verdana Ref" Text="Neighbourhood:" Width="59px"></asp:Label>
<asp:TextBox ID="TextBox3" runat="server" Width="143px" Font-Names="Verdana Ref"></asp:TextBox>
<asp:Button id="submitSearch" runat="server" Height="23px" Text="Submit"
Width="54px" OnClick="submitSearch_Click" Font-Names="Verdana Ref" />
<br />
- Switch to design view; the designer should yield the UI shown in figure 6.
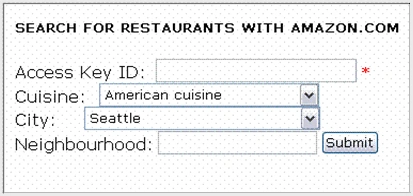
Figure 6. Shows the UI for the sample application
Configuring the UpdatePanel control:
- Switch to source view; below the <br /> tag at the end of the mark-up add the following:
<atlas:UpdatePanel ID="UP1" EnableViewState="true" Mode="Conditional" RenderMode="Inline" runat="server">
<ContentTemplate>
</ContentTemplate>
<Triggers>
</Triggers>
</atlas:UpdatePanel>
The UpdatePanel control is updated conditionally when an event from a registered control is triggered. Registered events are handled on the server through asynchronous postback.
-
Between the <ContentTemplate></ContentTemplate> elements of the UpdatePanel control add the following mark-up:
<atlas:UpdateProgress>
<ProgressTemplate >
<asp:Label ID="Label4" runat="server" Font-Names="Verdana Ref" Font-Size="X-Small"
Text="Loading..." Width="81px"></asp:Label>
</ProgressTemplate>
</atlas:UpdateProgress>
<br />
<asp:Repeater ID="RP1" runat="server">
<ItemTemplate>
</ItemTemplate>
</asp:Repeater>
<asp:Label ID="NoResults" runat="server" Width="449px" Font-Names="Verdana Ref" ></asp:Label>
<br /> <br />
<asp:Label ID="PriceRange" runat="server" Font-Names="Verdana Ref" Font-Size="X-Small"></asp:Label>
<br />
<br />
<asp:Label ID="labelError" runat="server" Width="451px" Font-Names="Verdana Ref"></asp:Label>
The UpdateProgress control displays a busy indicator (Loading…) while the region is being updated.
The Repeater and Label controls will hold the results of the search and potential error messages. -
To register the controls that will trigger the partial update place the following snippet between <Triggers></Triggers> elements of the UpdatePanel control:
<atlas:ControlEventTrigger ControlID="submitSearch"
EventName="Click" />
<atlas:ControlEventTrigger ControlID="listBoxCity" EventName="SelectedIndexChanged" />
<atlas:ControlEventTrigger ControlID="listBoxCuisine" EventName="SelectedIndexChanged" />
Adding code to the client application:
By switching to design view double click on the rendered Web form to display the code for the page (Default.aspx.cs). Select the Ctrl+A to select all of the, automatically, rendered code. Press Delete on your keyboard to clear out the document. Add the following code to consume the Amazon ECS service and display search results:
using System;
using System.Data;
using System.Configuration;
using System.Web;
using System.Web.Security;
using System.Web.UI;
using System.Web.UI.WebControls;
using System.Web.UI.WebControls.WebParts;
using System.Web.UI.HtmlControls;
public partial class _Default : System.Web.UI.Page
{
protected AWSECommerceService AmazonECS = new AWSECommerceService();
protected ItemSearch Search = new ItemSearch();
protected ItemSearchRequest SearchRequest = new ItemSearchRequest();
protected ItemSearchResponse SearchResponse;
protected void submitSearch_Click(object sender, EventArgs e)
{
Search.AWSAccessKeyId = TxtBAccessKey.Text.ToString();
SearchRequest.SearchIndex = "Restaurants";
SearchRequest.Cuisine = ListBoxCuisine.SelectedValue;
SearchRequest.City = listBoxCity.SelectedValue;
SearchRequest.Neighborhood = TextBox3.Text.ToString();
SearchRequest.ResponseGroup = new String[] { "ItemAttributes" };
Search.Request = new ItemSearchRequest[1] { SearchRequest };
try
{
SearchResponse = AmazonECS.ItemSearch(Search);
if (SearchResponse.Items == null)
{ labelError.Text = "A Server error has occured."; }
else
{
Items responseItems = SearchResponse.Items[0];
Item[] response = responseItems.Item;
if (response != null)
{
foreach (Item I in response)
{
NoResults.Text = "";
Label Results = new Label();
Label Sep = new Label();
Results.Text = "<strong>" + I.ItemAttributes.Title.ToUpper() + "</strong>" + "<br/>"
+ I.ItemAttributes.Address.Address1.ToString() + "<br/>"
+ I.ItemAttributes.Neighborhood + "<br/>"
+ "Tel:" + " " + I.ItemAttributes.PhoneNumber + "<br/>"
+ "Price Rating:" + " " + priceRating(I.ItemAttributes.PriceRating)+"<br/>"+"<br/>";
Sep.Text = "<br/>";
RP1.Controls.Add(Results);
RP1.Controls.Add(Sep); }
PriceRange.Text ="Price per person (based on entree, appetizer or salad, one non-alcoholic drink plus tax and tip)";
}
else
{
NoResults.Text = "No search results found.";
PriceRange.Text = "";
}} }
catch (Exception ex)
{
labelError.Text = ex.Message.ToString();
} }
private string priceRating(string str)
{
if (str=="1"){
return "under $15";}
else if(str=="2"){
return "$15-30";}
else if(str=="3"){
return "$30-45";}
else if(str=="4"){
return "over $45";}
else{return null;}
}
protected void listBoxCity_SelectedIndexChanged(object sender, EventArgs e)
{}
protected void ListBoxCuisine_SelectedIndexChanged(object sender, EventArgs e)
{}
}
- To run the application, open the Default.aspx page in design view. Select the TxtBAccessKey TextBox control; In the Properties window add your Amazon Web Service Access Key ID to the Text property for the control.
- Press F5 on your Keyboard to run the application.
- Using the application is very much straightforward. Select type of cuisine from the Cuisine: Listbox, a city from the City: Listbox and click on the Submit Button; optionally you can refine your searches by neighbourhood.
To consume the Amazon ECS Web service from the browser:
- Use a bridge file to specify the proxy class for consuming the remote Web service, the methods to call on the service and what to do with the returned data.
- Reference the bridge file using the ScriptManager control.
- Use html controls, JavaScript and client-side 'Atlas' data components to consume the service.
Conclusion
Asp.net 'Atlas' is a framework for creating client-based Web applications. The framework introduces features such as bridging, gadgets, a declarative scripting model and extensions to JavaScript, while offering client- and server-side APIs for creating cross-browser compatible AJAX-style applications.
This article serves as a broad outline of the framework; the walkthrough introduces partial page rendering using the 'Atlas' UpdatePanel control, which is the simplest way of adding AJAX functionality and improving the user experience of asp.net Web applications.
NaveenPosted Jun 9, 2009, 9:45 AM
hi this is naveen, i am new to dotnet 2008, i don't no how to work with MVC with asp.net please offer me a solution to work with it.......! with regards, Naveen. N
Jim JohnsonPosted Aug 10, 2006, 5:59 PM
Thanks for the article. I'm bookmarking it for valuable reference on Atlas. Because of the article, I thought to ask if you might look at http://forums.asp.net/thread/1356742.aspx . It's about valuable function that I cannot find a way to combine with Atlas. Specifically it's about how updatepanel execution seems to override and/or cancel client-side setTimeout and setInterval executions. I've made several posts on this in different forums and had minimal response, so it's a either some oversight on my part or a significant architectural feature which might itself be worth an article. Any suggestions would be appreciated. Thanks!
Mahesh ChandeditedPosted May 24, 2006, 8:55 AMEdited Aug 11, 2006, 6:52 AM
Very informative article. We definitely need more articles on new technologies like Atlas.
Ashish SinghalPosted May 24, 2006, 12:27 AM
Appreciated.