
1. Introduction
This document will cover practical approach to White box Testing Techniques using Microsoft Visual Studio 2005 Test Team Suite. It covers concepts with a simple, easy to follow example.
As Microsoft Visual Studio 2005 Test Team Suite is new to the market, there is not enough and useful documentation for testing. So we are sharing our experience in this paper.
2. Topics Covered
- White box Testing concepts,
- Types and techniques,
- Basics and benefits of Unit testing
- Tool overview Microsoft Visual Studio 2005,
- Features of MSVSTS 2005
- Hands-on on Unit Testing features of MSVS 2005
- Best Practices
- Conclusion
3. What is White box testing?
White box testing is a technique for Unit Testing used to validate that a particular module of source code is working properly. The idea is to write test cases for all functions and methods so that whenever a change causes a regression, it can be quickly identified and fixed. Ideally, each test case is separate from the others. This type of testing is mostly done by the developers and not by end-users.
- A.K.A. "Glass Box testing" or "Structural testing" or "Clear Box Testing"
- Focuses on Lines of Code
- Looks at specific conditions
- Looks at the mechanics of the Application
- Useful in the early stages of testing.
4. Benefits
The goal of unit testing is to isolate each part of the program and show that the individual parts are correct. Unit testing provides a strict, written contract that the piece of code must satisfy. As a result, it affords several benefits.
4.1. Cheaper cost
There is not additional cost for Team Test Suite. It is a component that comes along with the MS Visual Studio IDE.
4.2. Disciplined Development
Well defined deliverable for the developer and more quantifiable progress. Often, just considering a test case will identify issues with an approach/design.
4.3. Facilitates change and Reduces code fragility
Unit testing allows the programmer to refractor code at a later date, and make sure the module still works correctly (i.e. regression testing).
4.4. Simplifies integration
Unit testing helps eliminate uncertainty in the pieces themselves and can be used in a bottom-up testing style approach. By testing the parts of a program first and then testing the sum of its parts, integration testing becomes much easier.
4.5. Documentation
Unit testing provides a sort of "living document". Clients and other developers looking to learn how to use the class can look at the unit tests to determine how to use the class to fit their needs and gain a basic understanding of the API.
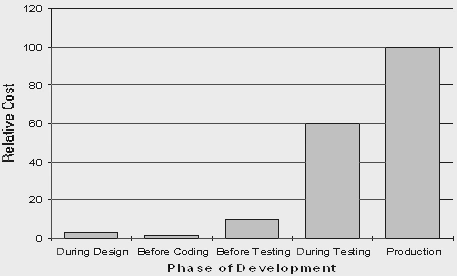
4.6. Relative cost to fix defects graph
A high percentage of errors are caught in the review process:
According to Fagan (1976) 67%,
Jones (1977) 85%
The earlier an error is caught the cheaper it is to fix.
5. White Box Testing Techniques Types
BS7925-2 lists all the white box test techniques
- Statement Testing
- Branch / Decision Testing
- Branch Condition Testing
- Branch Condition Combination Testing
- Modified Condition Decision Testing
- Linear Code Sequence & Jump
- Data Flow Testing
- Cyclometric Complexity Technique
5.1. Why do we need White Box techniques?
- Provide formal structure to testing code
- Enable us to measure how much of a component has been tested
5.2. Systematic techniques exist white box testing:
- Give us a systematic approach to testing
- Test cases are developed in a logical manner
- Enable us to have a sub-set of tests that have a high probability of finding faults
- By using defined techniques we should be able to produce corresponding measurements, Means we can see how testing is progressing
5.3. Designing test cases:
To plan and design effective cases requires a knowledge of the
- Programming language used
- Databases used
- Operating system(s) used
- And ideally knowledge of the code itself
6. Types
6.1. Statement Testing
- "A test case design technique for a component in which test cases are designed to execute statements"
- Test cases are designed and run with the intention of executing every statement in a component
- Statement Testing example:
a;
if (b)
{
c;
}
d;
Any test case with b TRUE will achieve full statement coverage
NOTE: Full statement coverage can be achieved without exercising with b FALSE
6.2. Branch / Decision testing
- A technique used to execute all branches the code may take based on decisions made.
- Test Cases designed to ensure all branches & decision points are covered
Branch / Decision testing example
a;
if (b)
{
c;
}
d;
Note: 100% statement coverage requires 1 test case (b = True)
100% branch / decision coverage requires 2 test cases: (b = True & b = False)
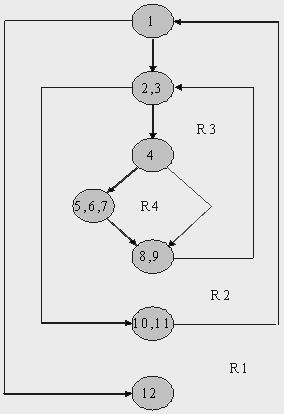
6.3. Cyclometric Complexity Technique:
A quantitative measure of the logical complexity of a program.
There are three algorithms for its calculation.
V(G) = E - N + 2
V(G) = Np + 1
V(G) = R
V(G) = the cyclometric complexity
N = Number of flow graph nodes
Np = Number of flow graph predicate nodes
E = Number of flow graph edges
R = Number of flow graph regions
Example:
void Sort(int items[],int toPos)
{ int pos = 0, minPos = 1;
/* iterate over the vector */
1 while( pos < toPos ) {
2 minPos = pos + 1;
/* find the smallest item */
3 while( minPos <= toPos ) {
4 if(items[pos] < items[minPos]){ /* swap items */
5 int temp = items[pos];
6 items[pos] = items[minPos];
7 items[minPos] = temp;
8 } /*end if*/
9 minPos++;
10 } /*end while inner loop */
11 pos++;
12 } /*end while outer loop */
}
V(G)= Cyclometric complexity
N = Number of flow graph nodes =7
Np = Number of flow graph predicate nodes =3
A predicate node represents a point where flow may continue on two or more paths.
E = Number of flow graph edges =9
R = Number of flow graph regions =4
V(G) = E - N + 2 = 9 - 7 + 2 = 4
V(G) = Np + 1 = 3 + 1 = 4
V(G) = R = 4
I.E. V(G) = 4
Flow Graph
7. Microsoft Visual Studio 2005 Overview
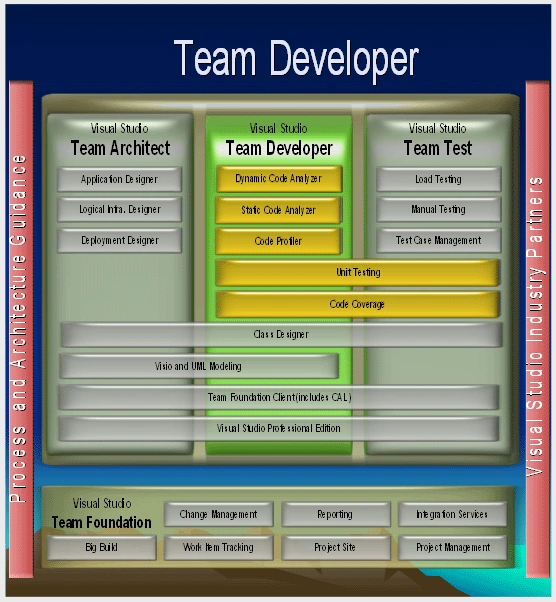
MSVS 2005 is an expansion of Visual Studio Professional including support for various roles in the development process.
Product goals:
- Facilitate better team communication
- Integrate tools:
Team System Suite used for Testing is an add-on component of Visual Studio IDE. - Improve reporting and tracking
- Establish and enforce process
- Enable customization and extensibility
7.1. Architecture
7.2. What is Team Test Suite?
With the latest release of Visual Studio Test System (VSTS) comes a full suite of functionality for Visual Studio Team Test (TT).
Team Test is a Visual Studio integrated unit-testing framework that enables:
- Code generation of test method stubs.
- Running tests within the IDE.
- Incorporation of test data loaded from a database.
- Code coverage analysis once the tests have run.
In addition, Team Test includes a suite of testing capabilities not only for the developer, but the test engineer as well. E.g.: Manual testing
8. Hands-on Approach
In this section, we are going to walk through how to create Team Test unit tests. We begin by creating a sample VB project, and then generating the unit tests for methods within that project. This will provide readers new to Team Test and unit testing with the basic syntax and code. It also provides a good introduction on how to quickly set up the test project structure.
One of the key features of Team Test is the ability to load test data from a database and then use that data within the test methods. After demonstrating basic unit testing, we describe how to create test data and incorporate it into a test.
8.1. Pre Requisites
- Visual Studio 2005 Team Suite Version 8.0
- Microsoft .NET Framework Version 2.0
- MS SQL Server 2005
8.2. Steps involved
1. Open Visual Studio IDE
Click Start-->Programs-->Microsoft Visual Studio 2005-->Microsoft Visual Studio 2005
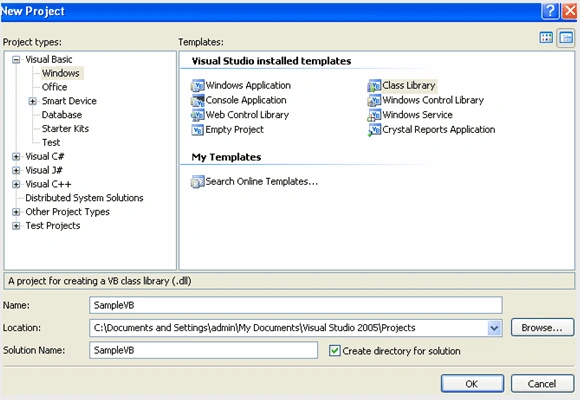
2. Creating a Sample VB Project
File-->New Project-->Chose from Templates as below
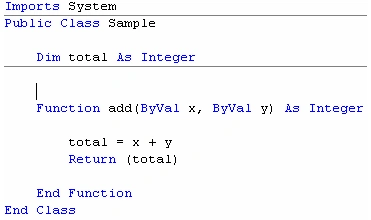
3. Add a simple "add" method to the code. This method accepts 2 arguments, adds them and returns the total.
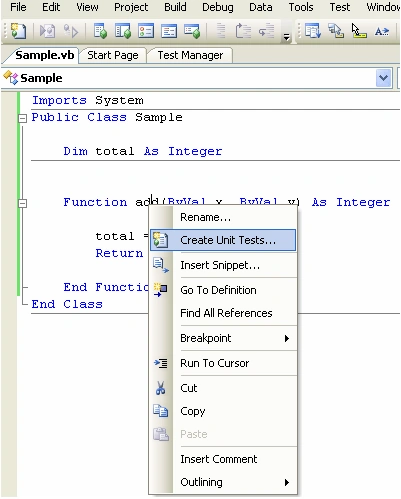
4. Create Unit Test for "add" method by right clicking on the method
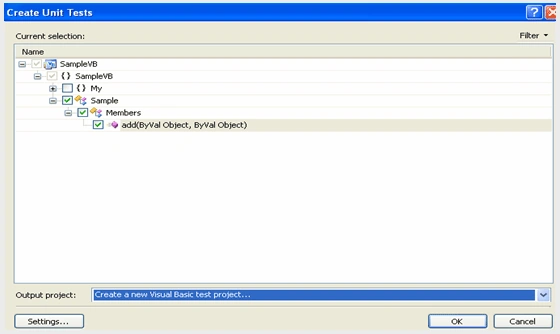
5. This will display a dialog box for generating unit tests into a different project (see Figure below). By default, the Output project setting is for a new Visual Basic project, but C# and C++ test projects are also available. For this article, we will select as Visual Basic project click the OK button.
6.
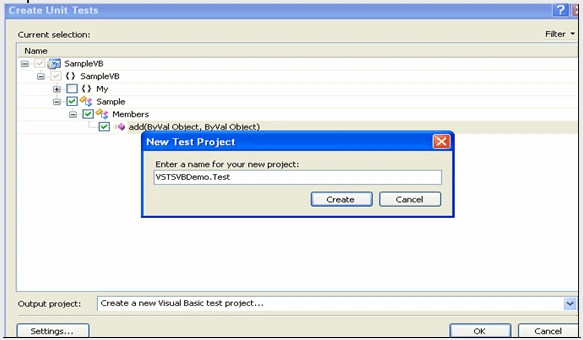
7. Now enter a Test project name of VSTSVBDemo.Test for the project name.
8. The generated test project contains following files related to testing.
| File Name | Purpose |
| AuthoringTest.txt | Provides notes about authoring tests including instructions on adding additional tests to the project. |
| sampleTest.vb | Includes generated test for testing the add(x,y) method along with methods for test initialization and cleanup. |
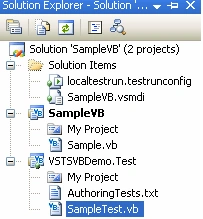
9. In addition to some default files; the generated test project contains references to both the Microsoft.VisualStudio.QualityTools.UnitTestFramework and the SampleVB project, which the unit tests are executing against. The former is the testing framework assembly the test engine depends on when executing the unit tests. The latter is a project reference to the target assembly we are testing.
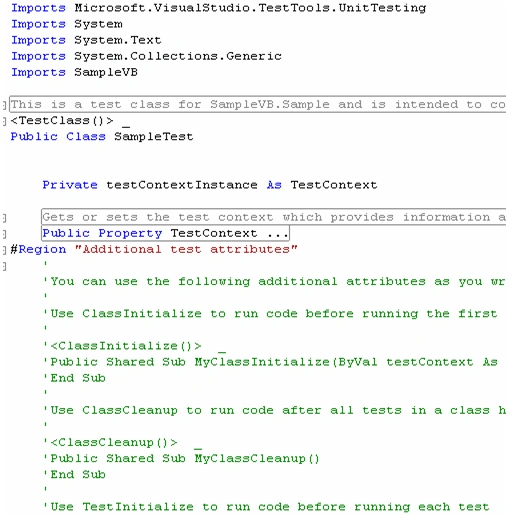
There are two important attributes related to testing with Team Test.
First, the designation of a method as a test is through the TestMethodAttribute attribute. In addition, the class containing the test method has a TestClassAttribute attribute.
Both of these attributes are found in the:
Microsoft.VisualStudio.QualityTools.UnitTesting.Framework namespace.
Team Test uses reflection to search a test assembly and find all the TestClass decorated classes, and then find the corresponding TestMethodAttribute decorated methods to determine what to execute.
One other important criterion, validated by the execution engine but not the compiler, is that the test method signature be an instance method that takes no parameters.
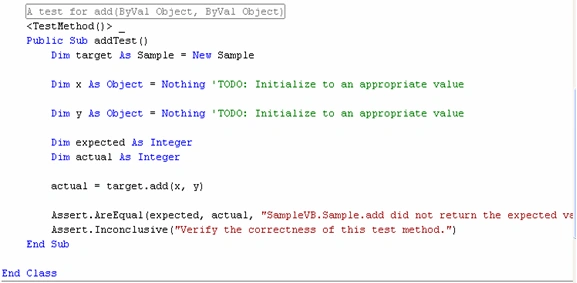
The test method AddTest() instantiates the target SampleVB class before checking for assertion.
When the test is run, the Assert.Inconclusive() provides an indication that it is likely to be missing the correct implementation.
10. Providing input values to test method
Updated addTest() Implementation after editing to provide input values
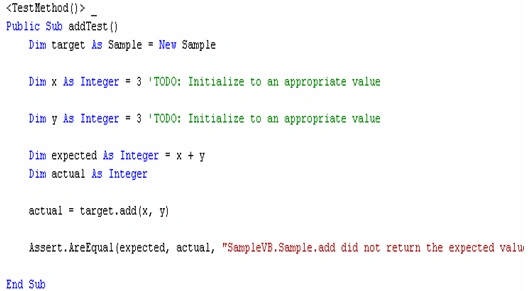
Note that the checks are done using the Assert.AreEqual() method.
11. Running Tests:
To run all tests within the project simply requires running the test project. To enable this action, we need to:
Right-click on the VSTSVBDemo.Test project within the solution explorer and click Set as Startup Project.
Next, use the Debug->Start (F5) or Debug->Start Without Debugging (Ctrl+F5) menu items to begin running the tests.
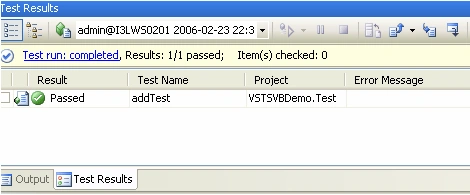
To view additional details on the test, we can double click on it to open up the AddTest() Results:
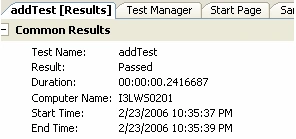
Please note that the message in the assert statement does not appear for a "passing" test. It appears only when a test fails along with "Expected" and "Actual" values.
Lets assume that by mistake(even though its highly unlikely) we have put total=x*y instead of x+y in source code file. Let's try to run the same test and see the results:
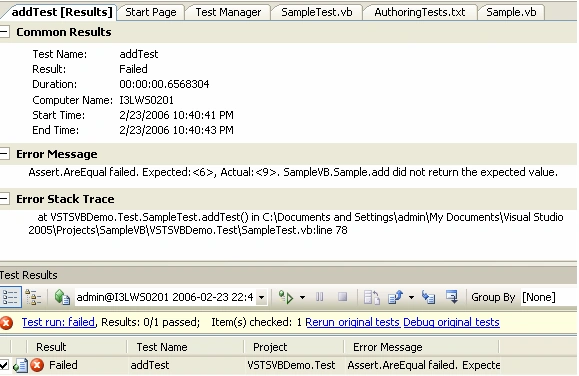
Yes, as expected, test fails. Please read the results above for details.
12. Loading Test data from Database:
We are loading test data from SQL server database as below:
In Test View, right Click on AddTest()-->Properties-->Chose Data Connection String, Data Table Name and Data Access method as sequential or random.
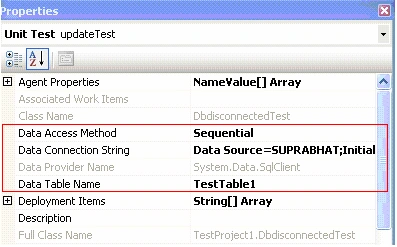
This adds a line before test method as below:
<DataSource("System.Data.SqlClient", "Data Source=SUPRABHAT;Initial Catalog=I3LEMPLOYEES;User ID=userid;Password=" ", "TestTable1", DataAccessMethod.Sequential)> <testMethod> Public sub Addtest()
The Test Data is loaded from a Data table called: "TestTable1"
Here is the sample data in TestTable1:
Value1
Value2
1
10
22
25
589
236
56
202
45
56
879
563
13. Associating data with AddTest()
Within test method, change x and y as below:
Dim x As Integer = convert.ToInt32(testContextInstance.DataRow("Value1")
Dim y As Integer = convert.ToInt32(testContextInstance.DataRow("Value2")
The important characteristic here is the TestContext.DataRow calls. TestContext is a property that the generator provided when we Created Tests.
The test execution engine at runtime automatically assigns the property. so that within a test we can access data associated with the test context.
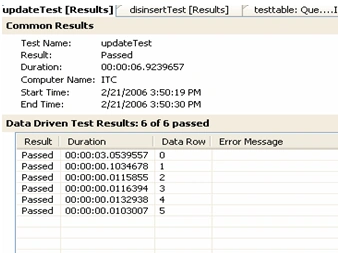
Now Run the testmethod. Please note results are available for each data row as below:
14. Code Coverage
- On the Test menu, point to select Active Test Run Configuration. A submenu displays the entire test run configurations in the solution.
- Click Code Coverage.
- Under Select artifacts to instrument, check the box next to the solution.dll whose path is indicated as <Solution Directory>\ solutionname\bin\Debug.
- Click Apply and click Close.
- In Test Manager, check the boxes beside Testmethod/s, and click the Run Tests button or chose Run tests without debugging from Debug Menu.
- On the Test Results toolbar, Right Click on Addtest() --> Code Coverage Results. The Code Coverage Results window opens.
- In the Code Coverage Results window, the Hierarchy column displays one node that contains data for all the code coverage achieved in the latest test run. The test run node is named using the format <user name>@<computer name> <date> <time>. Expand this node.
- Expand the node for the assembly, solution.dll.
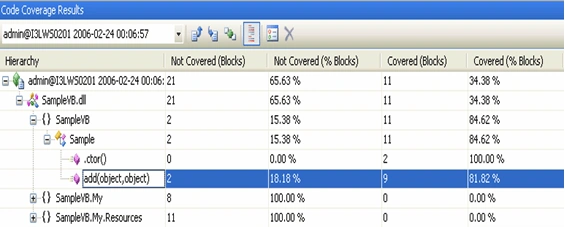
- The rows within the namespace class represent its methods. The columns in this table display coverage statistics for individual methods, for classes, and for the entire namespace.
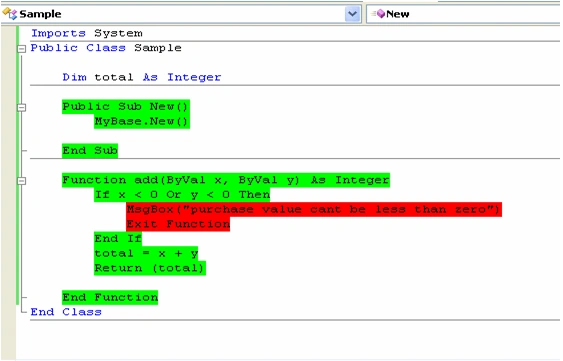
- Double-click the row for the Add(). The source-code file opens to the Add(). In this file you can see code highlighting. Lines highlighted green were exercised in the test run, and lines highlighted red were not. By scrolling, you can see the coverage for the other methods in this file.
9. Testing Private Methods
To generate a unit test for a private method
- Open a source code file that contains a private method.
- Right-click the private method and select Create Unit Tests.
- This displays the Create Unit Tests dialog box. In the visible tree structure, only check box for the private method is selected.
- (Optional) In the Create Unit Tests dialog box, you can change the Output project. You can also click Settings to reconfigure the way unit tests are generated.
- Click OK.
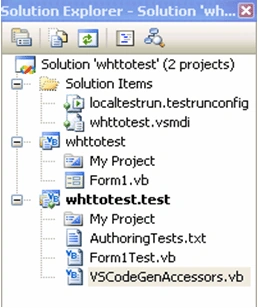
- This creates a new file named VSCodeGenAccessors, which contains special accessor methods that retrieve values of private entities in the class being tested. You can see the new file displayed in Solution Explorer in the test project folder.
- If your test project had no unit tests before this point, a source code file to house unit tests is also created. As with the file that contains private accessors, the file that contains unit tests is also visible in your test project in Solution Explorer.
- Open the file that contains your unit tests and scroll to the test for the private method. Find the statements that are marked with // TODO: comments and complete them by following the directions in the comments. This helps the test produce more accurate results.
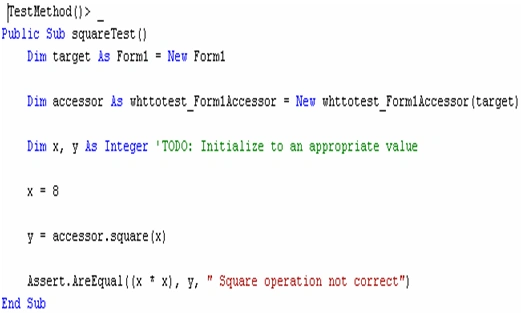
- The unit test for the private method is now ready to run.
If the signature for a private method changes, you must update the unit test that exercises that private method.
Regenerate Private Accessors
- Open the source-code file that contains the private method that has changed.
- Right-click in this private method, point to Create Private Accessor, and select the test project into which to place the updated private accessors file.
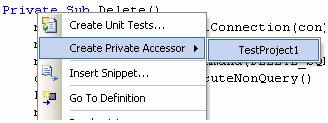
- To the VSCodeGenAccessors file, this adds a new accessor class that contains methods for retrieving values of the entities in the private class being tested.
Note: Do not edit the VSCodeGenAccessors file by hand. - This creates up-to-date private accessors for all the private methods in your code-under-test file, whether private accessors for them existed previously.
10. Manual Testing
A manual test is a description of test steps that a tester performs. You use manual tests in situations where other test types, such as unit tests or Web tests, would be too difficult or too time consuming to create and run. You would also use a manual test when the steps cannot be automated, for example to determine a component's behavior when network connectivity is lost; this test could be performed by manually unplugging the network cable.
10.1. Creating Manual Tests and mapping them to MSVSTS
- Right Click TestProject in Solution Explorer and then click New Test.
The Add New Test dialog box appears. Under Templates is an icon for Manual Test (text format). If you have Microsoft Office 2003 installed, there is also an icon for Manual Test (Word format). - Click Manual Test (Word format).
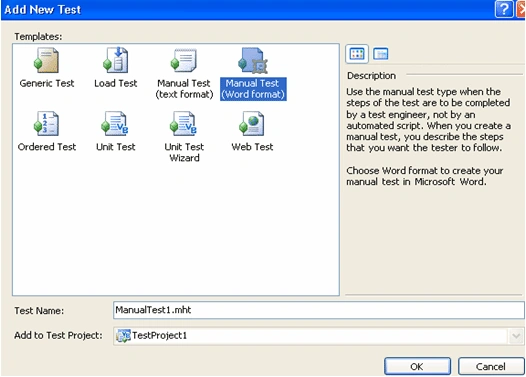
- For Test Name, change the name of the test to MyManualTest. Do not change the extension, .mht.
- A new manual test with the name MyManualTest is added to the test project. The file MyManualTest is visible in Solution Explorer.
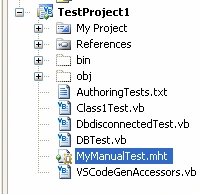
- Click Test, point to Windows, and then click Test View, to display the Test View window. The test MyManualTest is visible in the Test View window.
10.2. To author a manual test
- Follow the instructions in the test template. This means typing information about the test, including a description of the test, identification of the test target (the functionality you want tested), and the steps to be performed.
- Save the manual test file.
- The steps of your manual test are now ready to be run by a tester.
10.3. To execute a manual test
- Click MyManualTest in the Test View window and then click Run Selection.
- A dialog box appears. It explains that the test run will not complete until you have completed all the manual tests in the current test run.
- Click OK.
- The Test Results window shows a row for the test in which its result is displayed as Pending.
- A dialog box appears. It alerts you that the manual test is ready to run.
- Click OK.
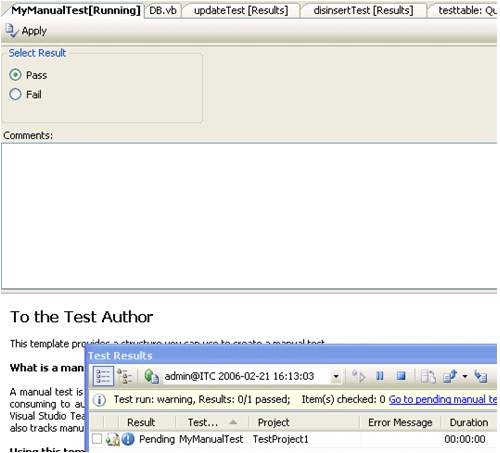
- The test itself is displayed in the main editing pane of the Visual Studio IDE, in a page whose tab is entitled MyManualTest [Running]. The lower section of the test page displays the steps of the test, while the upper section displays an area for the tester to input results. The results area consists of a Comments field and a pair of option buttons Pass and Fail.
- Follow the steps of the test.
- (Optional) While following the steps, type comments in the Comments field.
- When you are finished, click either Pass or Fail to indicate the overall result of the test, and then click Apply.
- The Test Results window displays the result that you chose.
11. Limitations of unit testing with MSVSTS 2005
- Database operations testing: database testing is possible with Unit Testing approach but has certain disadvantages as given below.
- Infinite looping
11.1. Database operations testing: two approaches
The first is to replace the database API that your DAL is talking to with an object of your own creation that mimics the database's interface, but does not actually perform any tasks. This method is often referred to as "mocking" or "stubbing.
The second testing method involves your DAL calling the real database behind the scenes. This usually means that you are performing state-based testing.
11.2. Using mock objects
- No built in framework in MSVSTS: need to install and learn to use NMock or DBMock frameworks.
- Does not test the database for successful operations.
- Testing against mocks tends to be time consuming and counter-productive.
- The mock that to be created tends be so complicated to mimic the database that the maintenance overhead will be too high.
11.3. Using state based testing approach
- No standard frameworks for testing database after performing create, delete, update, and validate operations.
- Need to write code in a TestMethod to check if correct operation was performed.
- Test code tends to become larger than production code.
12. Best Practices
- Avoid creating dependencies between tests such that tests need to run in a particular order. Each test should be autonomous.
- Use test initialization code to verify that test cleanup executed successfully and re-run the cleanup before executing a test if it did not run.
- Also Build Solution if any changes in Test code or source code to ensure accurate results every time.
- Create one test class corresponding to each class within the production code. This simplifies the test organization and makes it easy to choose where to places each test.
- Use Visual Studio to generate the initial test project. This will significantly reduce the number of steps needed when manually setting up a test project and associating it to the production project.
- Verify that all tests run successfully before moving on to creating a new test. That way you ensure that you fix code immediately upon breaking it.
- Maximize the number of tests that can be run unattended. Make absolutely certain that there is no reasonable unattended testing solution before relying solely on manual testing.
13. Conclusion
Overall, the VSTS unit testing functionality is comprehensive on its own. Furthermore, the inclusion of code coverage analysis is invaluable to evaluating how comprehensive the tests are. By using VSTS, you can correlate the number of tests compared to the number of bugs or the amount of code written. This provides an excellent indicator into the health of a project.
This paper provides not only an introduction to the basic unit testing functionality in the Team Test Suite, but also delves into some of the more advanced functionality relating to data driven testing. By beginning the practice of unit testing your code, you will establish a suite of tests that will prove invaluable throughout the life of a product. Team Test makes this easy with its strong integration into Visual Studio and the rest of the VSTS product line.
Hitendra PatelPosted Aug 22, 2007, 6:04 AM
This is the excellent article which I have found on Net. Thanks for all efforts Hitendra
archana sathayePosted Jun 14, 2007, 3:11 PM
This is absolutely amazing article i have come across. easily explained. Thanks for sharing! Archana sathaye
harsh kapoorPosted May 16, 2006, 3:32 AM
Hi Sir, I have read your artical its very knowledgeable. Sir please guide me to shape my career as a White box tester. I have just joined an Organization CMM-I level 5 as a software tester. currently i m getting training on rational, mercury. but i want to shape my career as a white box tester please guide me how to begin i will try my hands parallels. Regards Harsh
Madhu DharwadPosted Apr 19, 2006, 2:05 AM
keep up the good work, There is hardly any help or literature available anywhere which explains Whitebox .NET testing in such a simple & easy to follow steps. This is the most complete article on Whitebox .NET testing that I have read. cheers! madhu
meghaeditedPosted Apr 6, 2006, 8:53 AMEdited Aug 2, 2006, 5:50 AM
Hi I'm a developer working ain a company. I'm working on a project that is basically an n-tier application. I'm using LLBLGen Pro as O/R Mapper. I have generated a unit test to test the business logic layer but I'm facing some kind of problems in that. from the presentation layer, any call to the function comes to business logic layer via web service. thereafte it produces the desired result and connects to database and gives back the output to presentation layer. actaully in LLBLGen Pro, there is a facility to connect through any database that is the adapter configuration. I'm using this technique to connect my database. right now I'm connecting with oracle 10g but the user may use any database. my problem is how shall i provide the database connection to the unit test to connect, and alos how sahll i provide the values to the unit test as all the data coming will be dynamic nothing user defined. please guide me in that response!