Introduction
I am going to reuse the sample code developed by “Martin Knudsen”. The entire credit for developing the application goes to Martin Knudsen.
This project is about Today’s menu, the author developed this one as a learning material for students.
The sample project utilizes some of the most commonly used Android Wear components. So it’s always good to have some understanding about android widgets such as BoxInsetLayout, WearableListView, FrameLayout, LinearLayout etc.
TodayMenu shows screen in four fragments, the main fragment shows the list of choices which is nothing but food items. The second one shows the statistics of the selected food items. The third one accepts or takes in a voice input nothing but a food item name and temporarily saves in SQLite database. The last fragment shows two buttons, one to reset the statistics and the other to rest food choices.
Please take a look into the following link to have some understanding about Android Wear
TodayMenu Application UI
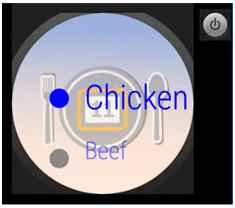
Before we dig into the TodayMenu application functionality, let us take a quick look into the application UI screens.
Database custom class
We have a class name Database which extends itself from SQLiteOpenHelper. There are two methods that we are overriding i.e onCreate and onUpdate. The following is the code snippet of onCreateoverride. We are executing SQL script to create tables for menu and choices.
- @Override
- public void onCreate(SQLiteDatabase db) {
- db.execSQL("CREATE TABLE menu ( id INTEGER PRIMARY KEY AUTOINCREMENT," +
- "name TEXT, weekday INTEGER);");
- db.execSQL("CREATE TABLE choices ( id INTEGER PRIMARY KEY AUTOINCREMENT," +
- "name TEXT);");
- }
Here’s the code snippet for
onUpgrade override. If the old version was 1 and the new version is 2, then we are executing a SQL script to create new table for user defined choices. The onUpgrade gets executed based on the app version. If you want to add functionality for your application which requires database changes, here’s the place where you can handle.
- @Override
- public void onUpgrade(SQLiteDatabase db, int oldVersion, int newVersion) {
- if (oldVersion==1 && newVersion==2)
- db.execSQL("CREATE TABLE choices ( id INTEGER PRIMARY KEY AUTOINCREMENT," +
- "name TEXT);");
- }
This class ‘
Database’ has few other methods that deal with reading choices, adding food, etc. We will soon take a look into those.
MainActivity XML and Code
Now let us take a look into the main
activity xml and the associated code. Below is the code snippet of the
activity.xml. You can notice a
BoxInsetLayout is being used so the same UI can be displayed on rounded or square watches. It composes
GridViewPager and
DotsPageIndicator.
- <android.support.wearable.view.BoxInsetLayout
- xmlns:android="http://schemas.android.com/apk/res/android"
- android:layout_height="match_parent"
- android:layout_width="match_parent">
-
- <!-- This is the gridviewpager, it makes sure we can swipe between different views -->
- <android.support.wearable.view.GridViewPager
- xmlns:android="http://schemas.android.com/apk/res/android"
- android:id="@+id/pager"
- android:layout_width="match_parent"
- android:layout_height="match_parent" />
-
- <!-- This is the DotsPageIndicator, it makes sure we can use the small
- dots on the bottom of the screen to indicate the current page of the app is displayed -->
-
- <android.support.wearable.view.DotsPageIndicator
- android:id="@+id/page_indicator"
- android:layout_width="wrap_content"
- android:layout_height="wrap_content"
- android:layout_gravity="center_horizontal|bottom">
- </android.support.wearable.view.DotsPageIndicator>
-
- </android.support.wearable.view.BoxInsetLayout>
The following is the code snippet of main activity
onCreate override. We will be digging in to understand how the
GridViewPager is being set with the data. You can see below, how a
SampleGridPagerAdapter instance is set to the activity GridViewPager. Also the
DotsPageIndicator is set with the pager instance so it gives a visual feedback on the fragment the user is in.
- @Override
- protected void onCreate(Bundle savedInstanceState) {
- super.onCreate(savedInstanceState);
- setContentView(R.layout.activity);
-
- final Resources res = getResources();
- final GridViewPager pager = (GridViewPager) findViewById(R.id.pager);
- pager.setOnApplyWindowInsetsListener(new OnApplyWindowInsetsListener() {
- @Override
- public WindowInsets onApplyWindowInsets(View v, WindowInsets insets) {
- final boolean round = insets.isRound();
- int rowMargin = res.getDimensionPixelOffset(R.dimen.page_row_margin);
- int colMargin = res.getDimensionPixelOffset(round ?
- R.dimen.page_column_margin_round : R.dimen.page_column_margin);
- pager.setPageMargins(rowMargin, colMargin);
- pager.onApplyWindowInsets(insets);
- return insets;
- }
- });
-
- pager.setAdapter(new SampleGridPagerAdapter(this, getFragmentManager()));
- pagerGlobal = pager;
- DotsPageIndicator dotsPageIndicator = (DotsPageIndicator) findViewById(R.id.page_indicator);
- dotsPageIndicator.setPager(pager);
- Database db = new Database(this);
- db.readChoices();
- }
Something interesting happens when the Main activity gets loaded. i.e. we also read choices. Here’s the code snippet which deals with reading choices and it’s within the Database class. Firstly, we issue a SELECT query to fetch all choices order by id. If the count is 0 which means there are no user input choices, so we will be looping through the choices list and insert into our choices table. Else, we are iterating over the choices, gather all of them and set the same to a static string array
Choices.ELEMENTS.
- public String[] readChoices() {
-
- SQLiteDatabase database = getReadableDatabase();
- Cursor cursor = database.rawQuery("SELECT name FROM choices ORDER BY id",null);
- int count = cursor.getCount();
-
- if (count==0)
- {
- for (String choice : Choices.ELEMENTS_RESET)
- database.execSQL("INSERT INTO choices (name) VALUES ('"+choice+"')");
- Choices.ELEMENTS = new String[Choices.ELEMENTS_RESET.length];
- System.arraycopy(Choices.ELEMENTS_RESET, 0, Choices.ELEMENTS, 0,
- Choices.ELEMENTS_RESET.length);
- cursor.close();
- return Choices.ELEMENTS_RESET;
- }
- else
- {
- String[] elements = new String[count];
- int index = 0;
-
- while (cursor.moveToNext())
- {
- elements[index] = cursor.getString(0);
- index++;
- }
-
- Choices.ELEMENTS = elements;
- cursor.close();
- return elements;
- }
- }
Here’s the code snippet of
Choices class. We have the initial list of choices and also the user defined or input choices.
- public class Choices {
- public static String[] ELEMENTS_RESET = { "Chicken", "Beef", "Pork", "Lamb","Duck","Turkey" };
- public static String[] ELEMENTS;
- }
It’s time to have a look into
SampleGridPagerAdapter logic. It’s a custom class extends itself from
FragmentGridPagerAdapter. The following is the code snippet for the same. As of now, we are dealing with four fragments. Within the constructor, we create a new instance of each of the fragments that we are going to display on a
GridViewPager. There’s an override method
getFragment that you can see below returns the fragment instance based on the column. As and when the user swipes from left to right, these fragments get displayed on the wearable device.
GridViewPager Adaper
The following is the code snippet of GridViewPager Adapter.
- public class SampleGridPagerAdapter extends FragmentGridPagerAdapter {
-
- MenuFragment menuFragment;
- ClearFragment clearFragment;
- StatsFragment statsFragment;
- SpeechFragment speechFragment;
-
- public SpeechFragment getSpeechFragment()
- {
- return speechFragment;
- }
-
- public ClearFragment getClearFragment()
- {
- return clearFragment;
- }
-
- public StatsFragment getStatsFragment()
- {
- return statsFragment;
- }
-
- public MenuFragment getMenuFragment()
- {
- return menuFragment;
- }
-
- public SampleGridPagerAdapter(Context ctx, FragmentManager fm) {
- super(fm);
- menuFragment = new MenuFragment();
- clearFragment = new ClearFragment();
- statsFragment = new StatsFragment();
- statsFragment.setContext(ctx);
- speechFragment = new SpeechFragment();
- }
-
- public void notifyStatsSetChanged() {
- statsFragment.updateUI();
- }
-
- public void listViewDataSetChanged() {
- menuFragment.resetList();
- }
-
-
- @Override
- public Fragment getFragment(int row, int col) {
- if (col==0)
- return menuFragment;
- else if (col==1)
- return statsFragment;
- else if (col==2)
- return speechFragment;
- else
- return clearFragment;
- }
-
- @Override
- public int getRowCount() {
- return 1;
- }
-
- @Override
- public int getColumnCount(int rowNum) {
- return 4;
- }
- }
Let us now dig into each of the above fragments to understand more about the inner working. The following is the code snippet of
MenuFragment which extends itself from Fragment and
implements WearableListView.ClickListener. The
onCreateView override has a code to inflate the layout so we can fine the
WearableListView and set its adapter with the list of choices.
Menu Fragment
Here's the code snippet of Menu fragment.
- public class MenuFragment extends Fragment implements WearableListView.ClickListener {
-
- WearableListView listView;
-
- @Override
- public View onCreateView(LayoutInflater inflater, ViewGroup container,
- Bundle savedInstanceState) {
- View view = inflater.inflate(R.layout.select, container, false);
-
- listView =(WearableListView) view.findViewById(R.id.wearable_list);
-
- if (listView!=null)
- {
- listView.setAdapter(new Adapter(getActivity().getApplicationContext(), Choices.ELEMENTS));
-
- listView.setClickListener(this);
- listView.setGreedyTouchMode(true);
- }
- return view;
- }
- ….
- }
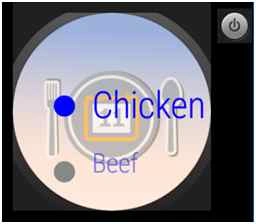
The following is the snapshot of the “
TodayMenu” app main screen. You can see below its showing up the Menu fragment containing a
ListView.
Here’s the code snippet where we are handing the wearable
listview onClick event.
- Firstly, we need to get the index of the selected listview item, we are obtaining the same from a “Tag” object coming next, you will see details on how we set the tag.
- Get the food choice based on the tag value.
- Create an instance of Database class and make a call to addFood so we can save our choice.
- An Intent instance is created to show a success confirmation to the user.
- In the end, we are going to update the stats fragment UI so when the user navigates, she/he can see the updated statistics of the choices the user has selected.
- @Override
- public void onClick(WearableListView.ViewHolder v) {
- Integer tag = (Integer) v.itemView.getTag();
- int index = tag.intValue();
-
- String chosen = Choices.ELEMENTS[index];
- Database db = new Database(getActivity());
- db.addFood(chosen);
-
- Intent intent = new Intent(getActivity().getApplicationContext(), ConfirmationActivity.class);
- intent.putExtra(ConfirmationActivity.EXTRA_ANIMATION_TYPE,
- ConfirmationActivity.SUCCESS_ANIMATION);
- intent.putExtra(ConfirmationActivity.EXTRA_MESSAGE,getResources()
- .getString(R.string.saved)+" "+chosen);
- startActivity(intent);
- ((SampleGridPagerAdapter) MainActivity.getPager().getAdapter()).notifyStatsSetChanged();
- }
The following is the code snippet of Menu fragment list view adapter. The adapter takes two parameters, one is the context and the other is a dataset instance. The dataset has all the list of choices to be displayed. There are two main overrides that we need to take care of i.e
onCreateViewHolder and
onBindViewHolder.
Within the
onCreateViewHolder method, all we have to do is return an instance of
WearableListView.ViewHolder.
Create a new instance of
ItemViewHolder with the view. A
LayoutInflator instance is used to inflate the layout
R.layout.list_item. The
onBindViewHolder method internally gets called where we get the ViewHolder instance and then get the
TextView so that we can set appropriate text from the dataset by position. Also you can notice we are making a call to set the tag object with the position value so we can use the same in
onClick event. This is done so we can get the right choice and save in database.
- private static final class Adapter extends WearableListView.Adapter {
- private String[] mDataset;
- private final Context mContext;
- private final LayoutInflater mInflater;
-
- public Adapter(Context context, String[] dataset) {
- mContext = context;
- mInflater = LayoutInflater.from(context);
- mDataset = dataset;
- }
-
- public static class ItemViewHolder extends WearableListView.ViewHolder {
- private TextView textView;
- public ItemViewHolder(View itemView) {
- super(itemView);
- textView = (TextView) itemView.findViewById(R.id.name);
- }
- }
-
- @Override
- public WearableListView.ViewHolder onCreateViewHolder(ViewGroup parent,
- int viewType) {
- return new ItemViewHolder(mInflater.inflate(R.layout.list_item, null));
- }
-
- @Override
- public void onBindViewHolder(WearableListView.ViewHolder holder,
- int position) {
- ItemViewHolder itemHolder = (ItemViewHolder) holder;
- TextView view = itemHolder.textView;
- view.setText(mDataset[position]);
- holder.itemView.setTag(position);
- }
-
- @Override
- public int getItemCount() {
- return mDataset.length;
- }
- }
Now let us see how to reset the list of choices. The following is the code snippet for the same. First we need to get the choice length and copy all the choices temporarily into a string array so we can reset the
Choices.ELEMENTS and the
ListView component by setting the adapter and refreshing the same by making a call to invalidate method.
- public void resetList() {
- int len = Choices.ELEMENTS_RESET.length;
- String[] newElements = new String[len];
- System.arraycopy(Choices.ELEMENTS_RESET, 0, newElements, 0, len);
- Choices.ELEMENTS = newElements;
- listView.setAdapter(new Adapter(getActivity().getApplicationContext(), Choices.ELEMENTS));
- listView.invalidate();
- }
Now let us take a look into the
StatsFragment, where it shows the detailed statistics about the food choices the user chooses. The following is the partial code snippet of StatsFragment. We are making use of a
LinearLayout where we have one
TextView with a text set to “Statistics”. Coming next you will see how we are adding one more TextView component to LinearLayout so that we can show the real statistics to user.
- <LinearLayout
- android:layout_height="wrap_content"
- android:layout_width="wrap_content"
- android:layout_gravity="center"
- android:orientation="vertical"
- android:id="@+id/statslayout">
-
- <TextView
- android:layout_height="wrap_content"
- android:layout_width="wrap_content"
- android:gravity="center_horizontal"
- android:textSize="24sp"
- android:layout_gravity="center_horizontal"
- android:textColor="@color/blue"
- android:text="@string/statistics"/>
- </LinearLayout>
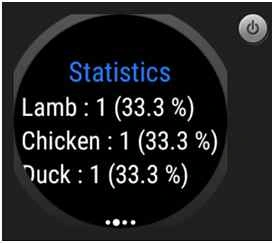
Here’s the snapshot of the statistics fragment.
 Updating Statistics UI
It’s time to see how the statistics information is being shown to the user. Within the
StatsFragment onCreate override, we are making a call to update the UI. The following is the code snippet for the same. Here’s what we do.
- Create an instance of Database and get the latest statistics from SQLite DB. Hold the same in ArrayList of Item type.
- Get the child count for the LinearLayout instance so that we can remove and add a view so the user can see the up to date refreshed view.
- The next few set of lines, we are looping through all the statistics; create a TextView instance and then set text, color, font, etc. and add the same to LinearLayout instance.
- public void updateUI() {
- Database db = new Database(context);
- ArrayList<Item> items = db.getStats();
- Collections.sort(items);
-
- int children = parent.getChildCount();
- if (children>1)
- {
- parent.removeViews(1, children-1);
- }
-
- for (Item item : items) {
- TextView text = new TextView(getActivity());
-
- String p = String.format("%.1f", item.getPercent());
- text.setText(item.getName() + " : "+item.getFreq()+ " ("+p+" %)");
- text.setTextColor(Color.WHITE);
- text.setTextSize(22);
- text.setLayoutParams(new LayoutParams(
- LayoutParams.WRAP_CONTENT,
- LayoutParams.WRAP_CONTENT));
- parent.addView(text);
- }
- }
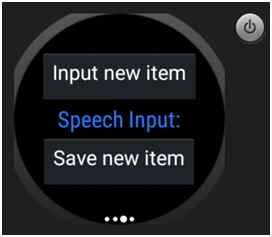
Let us take a look into the speech fragment and see the inner workings. The speech being highly important part of Android wear, the main functionality of this fragment being, accept new speech input from user and save the same as choices. The Speech fragment implements
onClickListener, so it can handle user click. Here’s the code snippet for
onCreateView override.
Within the
onCreateView, first we get the view instance by inflating the speech layout. So we can find speech and add item buttons and attach
onClick events for the same. Also do not forget to reset the
textinput.
- @Override
- public View onCreateView(LayoutInflater inflater, ViewGroup container,
- Bundle savedInstanceState) {
- View view = inflater.inflate(R.layout.speech, container, false);
- Button button = (Button) view.findViewById(R.id.speechButton);
- button.setOnClickListener(this);
- button = (Button) view.findViewById(R.id.addItemButton);
- button.setOnClickListener(this);
- textView = (TextView) view.findViewById(R.id.speechText);
- textInput = "";
- return view;
- }
Here’s the snapshot of the speech fragment.
Handling the Speech Fragment onClick event
Let’s see how to handle the
onClick event for speech and add item buttons. Here’s the code snippet where a call to
displaySpeechRecognizer method is made to start the speech recognizer to accept the voice input.
- @Override
- public void onClick(View v) {
- if (v.getId()==R.id.speechButton) {
- displaySpeechRecognizer();
- }
- else if (v.getId()==R.id.addItemButton) {
- if (textInput.length()>0)
- addData();
- else {
- Toast toast = Toast.makeText(getActivity().getApplicationContext(),
- "No input to add",Toast.LENGTH_LONG);
- toast.show();;
- }
- }
- }
Here’s the code snippet for displaying the speech recognizer. We have to create an Intent instance with the appropriate Intent action so the activity can be started with the intent and speech code.
- private void displaySpeechRecognizer() {
- Intent intent = new Intent(RecognizerIntent.ACTION_RECOGNIZE_SPEECH);
- intent.putExtra(RecognizerIntent.EXTRA_LANGUAGE_MODEL,
- RecognizerIntent.LANGUAGE_MODEL_FREE_FORM);
- startActivityForResult(intent, SPEECH_CODE);
- }
The next important thing after receiving the voice input is to add the input text. Here’s the code snippet for the same. First we show a confirmation screen by making use of an Intent but we add the
textinput through
MenuFragment.
Please note - Adding a new choice can be done within the speech fragment itself. But we should not forget to refresh the MenuFragment ListView UI.
- public void addData() {
- Intent intent = new Intent(getActivity(), ConfirmationActivity.class);
- intent.putExtra(ConfirmationActivity.EXTRA_ANIMATION_TYPE,
- ConfirmationActivity.SUCCESS_ANIMATION);
- intent.putExtra(ConfirmationActivity.EXTRA_MESSAGE,getResources()
- .getString(R.string.choiceAdded));
- startActivity(intent);
- MenuFragment frag = ((SampleGridPagerAdapter) MainActivity.getPager()
- .getAdapter()).getMenuFragment();
- frag.addData(textInput);
- }
The Clear Fragment is the final or last fragment that gets displayed on the
GridViewPager. It extends from a Fragment class and implements
OnClickListener. The following is the code snippet
ofonCreateView method override, where you can see we are setting the
onClickListerner to handle the user click.
- @Override
- public View onCreateView(LayoutInflater inflater, ViewGroup container,
- Bundle savedInstanceState) {
- View view = inflater.inflate(R.layout.clear, container, false);
-
- Button button = (Button) view.findViewById(R.id.clearDataButton);
- button.setOnClickListener(this);
- button = (Button) view.findViewById(R.id.clearChoicesButton);
- button.setOnClickListener(this);
-
- return view;
- }
Here’s the snapshot of the clear fragment.
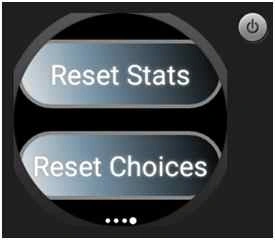
It’s time to take a look into the
onClick override and try to understand how we are actually handling the Clear Data and Clear Choices button click. On each of the button clicks, we are showing a custom dialog so the user can take suitable action.
MyDialogFragment is a custom class extends itself from
DiaglogFragment and overrides
onCreateDialog. It has two methods named
positiveClick and
negativeClick with no implementation and allows one to override. Below you can see how we handle the
positiveClick method to clear data by making a call to
clearData method.
- @Override
- public void onClick(View v) {
- if (v.getId()==R.id.clearDataButton) {
- MyDialogFragment dialog = new MyDialogFragment() {
- @Override
- protected void positiveClick() {
- super.positiveClick();
- clearData();
- }
-
- @Override
- protected void negativeClick() {
- super.negativeClick();
- }
- };
- Bundle bundle = new Bundle();
- bundle.putString("title",getResources().getString(R.string.deleteStatsTitle));
- bundle.putString("message",getResources().getString(R.string.deleteStatsMessage));
- dialog.setArguments(bundle);
- dialog.show(this.getFragmentManager(),"test");
- }
- else if (v.getId()==R.id.clearChoicesButton) {
- DialogFragment newFragment = MyWearDialog.newInstance();
- newFragment.show(getFragmentManager(), "dialog");
- }
- }
It’s time to see the
clearData code and understand the code behind. In Database class, we have an implementation to clear the menu items and then we show a confirmation activity with the success animation.
Finally there is one important thing we need to do, that is – Notify the
SampleGridPagerAdapter by making a call to
notifyStatsSetChanged method on its adapter.
- public void clearData() {
- Database db = new Database(getActivity());
- db.clearData();
- db.close();
-
- Intent intent = new Intent(getActivity(), ConfirmationActivity.class);
- intent.putExtra(ConfirmationActivity.EXTRA_ANIMATION_TYPE,
- ConfirmationActivity.SUCCESS_ANIMATION);
- intent.putExtra(ConfirmationActivity.EXTRA_MESSAGE,
- getResources().getString(R.string.statsDeleted));
- startActivity(intent);
- ((SampleGridPagerAdapter) MainActivity.getPager().getAdapter()).notifyStatsSetChanged();
- }
Now let us see how we handle the clear choices button click event. On clear choices button click, you can see there is a code to show a
DialogFragment. We are making use of
MyWearDialog, which is nothing but a custom dialog fragment as it extends itself from a
DiaglogFragment. Here’s the code snippet of
MyWearDialog which handles the “OK” and “Cancel” button click events. You can see below the cancel just dismisses the
dialog. On click of ‘OK’ button make a call to
clearChoices which makes use of Database instance to clear all choices.
Please note – After clearing choices, one should never forget to refresh the GridViewPager by notifying the same.
- @Override
- public void onClick(View v) {
- if (v.getId()==R.id.cancel_btn) {
- dismiss();
- }
- else if (v.getId()==R.id.ok_btn) {
- clearChoices();
- dismiss();
- }
- }
-
- public void clearChoices() {
- Database db = new Database(getActivity());
- db.clearChoices();
- db.close();
-
- ((SampleGridPagerAdapter)MainActivity.getPager().getAdapter()).listViewDataSetChanged();
-
- Intent intent = new Intent(getActivity(), ConfirmationActivity.class);
- intent.putExtra(ConfirmationActivity.EXTRA_ANIMATION_TYPE,
- ConfirmationActivity.SUCCESS_ANIMATION);
- intent.putExtra(ConfirmationActivity.EXTRA_MESSAGE,getResources()
- .getString(R.string.choicesDeleted));
- startActivity(intent);
- }
Please take a look into the following article to know more about how to debug apps on wearables.
References
This article uses code sample developed by "Maritn Knudsen". Feel free to take a look into the following Github link. All attribution to the author is made starting from the beginning of the article.


Sr KarthigaPosted Feb 14, 2016, 7:53 AM
Good one sir
Nilesh JadavPosted Oct 19, 2015, 1:16 AM
Good Share !!
Ankit BansalPosted Oct 19, 2015, 12:43 AM
nice one..thanks for sharing with us..
Santhakumar MunuswamyPosted Oct 18, 2015, 2:14 AM
Good Article