

This chapter is taken from book "Programming Windows Phone 7" by Charles Petzold published by Microsoft press. http://www.charlespetzold.com/phone/index.html
Silverlight 3 introduced a new UIElement property named Projection that allows setting non-affine transforms on graphical objects, text, controls, and media. Non-affine transforms do not preserve parallelism, the type of non-affine transform allowed in Silverlight 3 is still represented by a matrix multiplication, and it still has restrictions on what it can do. Straight lines are always transformed to straight lines, and a square is always transformed into a simple convex quadrilateral. By "quadrilateral" I mean a four-sided figure (also called a tetragon or quadrangle); by "simple" I mean that the sides don't intersect except at their vertices; by "convex" I mean that the internal angles at each vertex are less than 180 degrees.
This type of non-affine transform is very useful for creating taper transforms, where opposite sides of a square or rectangle taper somewhat in one direction. Objects appear to be somewhat three dimensional because part of the object seems further away from our eyes- an effect called a perspective projection.
In a sense, the Projection property gives Silverlight a little bit of "pseudo 3D." It's not a real 3D system because there's no way to define objects in 3D space, no concept of cameras, lights, or shading, and-perhaps most crucially-no clipping of objects based on their arrangement in 3D space.
Still, working with the Projection transform requires the programmer to begin thinking about three dimensions and especially about 3D rotation. Fortunately, the developers of Silverlight have made common and simple use of the Projection property fairly easy.
You can set this Projection property to one of two objects: You can be mathematical and flexible by using Matrix3DProjection, or you can do as I'll do here and take the easy way out with PlaneProjection. Although PlaneProjection defines twelve settable properties, you can pretty much limit yourself to six of them.
The three crucial properties of PlaneProjection are RotationX,RotationY, and RotationX, which you can set to angle values to cause rotation around the X axis (which extends in a positive direction from left to right), the Y axis (which extends from top to bottom), and the Z axis (which comes out of the screen towards the viewer).
You can anticipate the direction of rotation using the right-hand rule: Point your thumb in the direction of the positive axis. (For X, that's to the right, for Y it's down, for Z, it's toward you.) The curve that your other fingers make indicates the direction of rotation for positive rotation angles. Negative angles rotate in the opposite direction.
A composite rotation depends on the order in which the individual rotations are applied. When you use PlaneProjection, you are sacrificing some flexibility in these rotations. PlaneProjection always applies RotationX first, then RotationY, and finally RotationZ, but in many cases you only need set one of these properties. As with RenderTransform, Projection doesn't affect layout. The layout system always sees an untransformed and unprojected element.
RotationX, RotationY,
and RotationZ are all backed by dependency properties, so they can all be
animation targets, as demonstrated by the PerspectiveRotation program. The
content area contains a
TextBlock with a PlaneProjection object set to its Projection property, and three buttons:
<Grid
x:Name="ContentPanel"
Grid.Row="1"
Margin="12,0,12,0">
<Grid.RowDefinitions>
<RowDefinition
Height="*"
/>
<RowDefinition
Height="Auto"
/>
</Grid.RowDefinitions>
<Grid.ColumnDefinitions>
<ColumnDefinition
Width="*"
/>
<ColumnDefinition
Width="*"
/>
<ColumnDefinition
Width="*"
/>
</Grid.ColumnDefinitions>
<TextBlock
Name="txtblk"
Grid.Row="0"
Grid.Column="0"
Grid.ColumnSpan="3"
Text="ROTATE"
FontSize="{StaticResource
PhoneFontSizeHuge}"
Foreground="{StaticResource
PhoneAccentBrush}"
HorizontalAlignment="Center"
VerticalAlignment="Center">
<TextBlock.Projection>
<PlaneProjection
x:Name="planeProjection"
/>
</TextBlock.Projection>
</TextBlock>
<Button
Grid.Row="1"
Grid.Column="0"
Content="Rotate
X"
Click="RotateXClick"
/>
<Button
Grid.Row="1"
Grid.Column="1"
Content="Rotate
Y"
Click="RotateYClick"
/>
<Button
Grid.Row="1"
Grid.Column="2"
Content="Rotate
Z"
Click="RotateZClick"
/>
</Grid>
Three storyboards defined in the Resources collection are defined to animate the RotationX, RotationY, and RotationZ properties of the PlaneProjection object:
<phone:PhoneApplicationPage.Resources>
<Storyboard
x:Name="rotateX">
<DoubleAnimation
Storyboard.TargetName="planeProjection"
Storyboard.TargetProperty="RotationX"
From="0"
To="360" Duration="0:0:5"
/>
</Storyboard>
<Storyboard
x:Name="rotateY">
<DoubleAnimation
Storyboard.TargetName="planeProjection"
Storyboard.TargetProperty="RotationY"
From="0"
To="360" Duration="0:0:5"
/>
</Storyboard>
<Storyboard
x:Name="rotateZ">
<DoubleAnimation
Storyboard.TargetName="planeProjection"
Storyboard.TargetProperty="RotationZ"
From="0"
To="360" Duration="0:0:5"
/>
</Storyboard>
</phone:PhoneApplicationPage.Resources>
The buttons simply start the corresponding storyboards:
void
RotateXClick(object sender,
RoutedEventArgs args)
{
rotateX.Begin();
}
void RotateYClick(object
sender, RoutedEventArgs args)
{
rotateY.Begin();
}
void RotateZClick(object
sender, RoutedEventArgs args)
{
rotateZ.Begin();
}
Here's rotation around the Y axis:
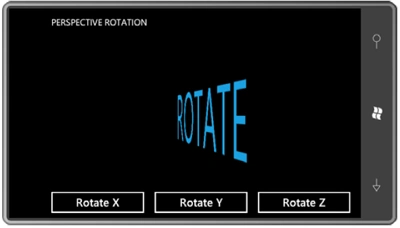
The animations are slow enough that you can click multiple buttons and see the interactions. It almost looks as if the text is tumbling through the weightlessness of space.
In 2D space, rotation is relative to a point; in 3D space, rotation is relative to a line, commonly referred to as an "axis of rotation." But the PlaneProjection class prefers to treat this center of rotation using three numbers-the properties CenterOfRotationX, CenterOfRotationY, and CenterOfRotationZ. In effect, these three numbers define a 3D point that remains unchanged during rotation. CenterOfRotationX does not affect rotation around the X axis, and similarly for the other two properties.
The CenterOfRotationX and CenterOfRotationY properties are relative coordinates based on the size of the element being rotated, where (0, 0) is the upper-left corner. The default values are 0.5, indicating the center of the element.
If you set CenterOfRotationX to 0, the RotationY property causes the element to rotate around its left side. If CenterOfRotationY is set to 1, then the RotationX property causes the element to be rotated around its bottom.


Join the conversation! Your thoughts help the community grow.