

Introduction
- Arduino UNO
- Breadboard
- 3mm LED (2x)
- Jumper Wire
- Resistor (1k Ohms)
First, we will try to blink a LED at a constant interval. And then we will use two LEDs and turn them on one after another. Within that, we will learn how to write basic Arduino code.
Part 1
In this part, we will turn on a LED with 5 Volts and try to learn basic electronics.
So, first, we will set up the layout.
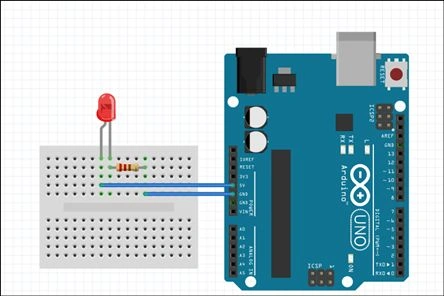 Here, we have a Red 3mm LED. And its positive lead goes to the 5 Volt pin of Arduino and the negative lead goes to GND (ground). For all of this, we have put a 1k Ohm resistor to the negative lead since we want Arduino GND to be the least amount of voltage. However, we are trying to increase the resistance between 5 Volts to 0 Volts (GND).
Note: We don't need any sketch (or code) to demonstrate this as Arduino UNO is constantly ing 5 Volts to that pin. The 5V pin is among those pins you can't code for.
Part 2
We will now improvise the preceding connection and try to blink the LED.
So, the connection would be like:
Here, we have a Red 3mm LED. And its positive lead goes to the 5 Volt pin of Arduino and the negative lead goes to GND (ground). For all of this, we have put a 1k Ohm resistor to the negative lead since we want Arduino GND to be the least amount of voltage. However, we are trying to increase the resistance between 5 Volts to 0 Volts (GND).
Note: We don't need any sketch (or code) to demonstrate this as Arduino UNO is constantly ing 5 Volts to that pin. The 5V pin is among those pins you can't code for.
Part 2
We will now improvise the preceding connection and try to blink the LED.
So, the connection would be like:
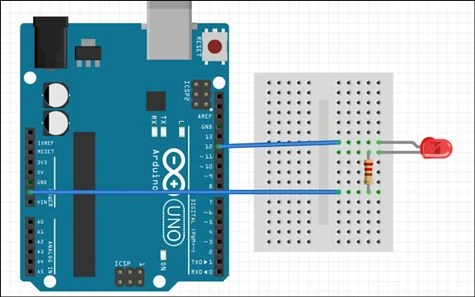 And the code will be like:
Simply, we are trying to blink a LED, in other words, turn it on and off for a second. And that continues until you turn your Arduino off.
- int LED = 12; // PIN 12
- void setup()
- {
- pinMode(LED, OUTPUT);
- }
- void loop()
- {
- digitalWrite(LED, HIGH); // Light UP
- delay(1000); // Wait for 1 second.
- digitalWrite(LED, LOW); // Light Down
- delay(1000); // Wait for 1 second
- }
Rahul Kumar SaxenaPosted May 12, 2015, 11:42 PM
Good One..
Gopi ChandPosted May 12, 2015, 3:12 PM
Good going..keep sharing on this..
Gowtham RajamanickamPosted May 12, 2015, 1:13 PM
good...
NitinPosted May 12, 2015, 12:48 PM
good one
Santhakumar MunuswamyPosted May 12, 2015, 12:30 AM
Thanks for good work
Abhishek JaiswalPosted May 11, 2015, 4:32 PM
Good one, keep going! :)
Mahesh ChandPosted May 11, 2015, 1:46 PM
Very nice! Good to see some hardware and IoTs coding.