

Why do we want to learn this MultiColumnComboBox? Basically, most of the Dropdowns or Comboboxes help populate only one column of data but this MultiColumnComboBox helps us to display multi-column data in a single row, like a grid with/without images. That's quite interesting, right? Okay, let's move forward to see these features with an example.
Prerequisites
- Visual Studio
- SQL Server
- Basic knowledge of ASP.NET MVC
- Basic knowledge of Entity Framework
- Basic knowledge of jQuery
- Basic knowledge of CSS
Article Flow
- Create a table in the database with dummy values
- Create an ASP.NET MVC Empty project
- Configure Entity Framework with database and application
- Create a Controller and View
- Enable Kendo UI Features
- Implement MultiColumnComboBox
- Custom Template with MultiColumnComboBox
Create a table in the database with dummy values
First, we will create a table in SQL Server to populate a Kendo UI MultiColumnComboBox with data in ASP.NET MVC5. I have created a table "Employee" with the following design.
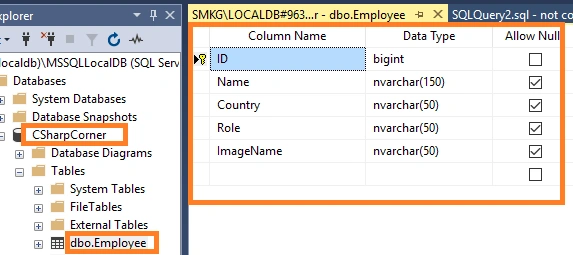
Execute the below query to create a table with the above design.
- CREATE TABLE [dbo].[Employee](
- [ID] [bigint] IDENTITY(1,1) NOT NULL,
- [Name] [nvarchar](150) NULL,
- [Country] [nvarchar](50) NULL,
- [Role] [nvarchar](50) NULL,
- [ImageName] [nvarchar](50) NULL,
- CONSTRAINT [PK_Employee] PRIMARY KEY CLUSTERED
- (
- [ID] ASC
- )WITH (PAD_INDEX = OFF, STATISTICS_NORECOMPUTE = OFF, IGNORE_DUP_KEY = OFF, ALLOW_ROW_LOCKS = ON, ALLOW_PAGE_LOCKS = ON) ON [PRIMARY]
- ) ON [PRIMARY]
- GO
And, insert a few employee records like below.
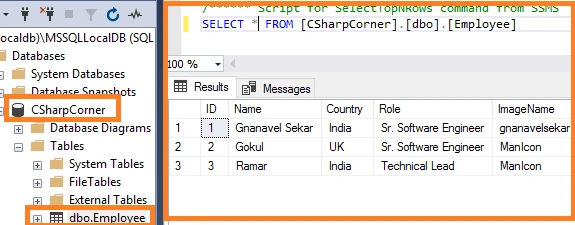
Execute the below query to get the same records.
- USE [CSharpCorner]
- GO
- SET IDENTITY_INSERT [dbo].[Employee] ON
- GO
- INSERT [dbo].[Employee] ([ID], [Name], [Country], [Role], [ImageName]) VALUES (1, N'Gnanavel Sekar', N'India', N'Sr. Software Engineer', N'gnanavelsekar')
- GO
- INSERT [dbo].[Employee] ([ID], [Name], [Country], [Role], [ImageName]) VALUES (2, N'Gokul', N'UK', N'Sr. Software Engineer', N'ManIcon')
- GO
- INSERT [dbo].[Employee] ([ID], [Name], [Country], [Role], [ImageName]) VALUES (3, N'Ramar', N'India', N'Technical Lead', N'ManIcon')
- GO
- SET IDENTITY_INSERT [dbo].[Employee] OFF
- GO
Create an ASP.NET MVC Empty project
To create ASP.NET MVC empty project, follow the below steps one by one. Here, I have used Visual Studio 2017.
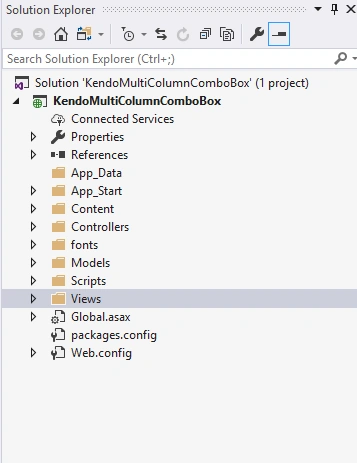
Now, write the logic in a Controller to load the employee(s) from a database using Entity Framework. Add the below code to load it.
Let's call the LoadEmployee action method to bind the data to MultiColumnComboBox Datasource.

- Select New Project -> Visual C# -> Web -> ASP.NET Web Application and enter your application name. Here, I named it as "KendoMultiColumnComboBox".
- Now, click OK.
- Then, select Empty MVC template and click OK to create the project.
- Once you click OK, the project will be created with the basic architecture of MVC.
- If you are not aware of how to create an Empty ASP.NET Web Application, please visit Step 1 and Step 2 to learn. Once you complete these steps, you will get the screen as below.
Configure Entity Framework with database and application
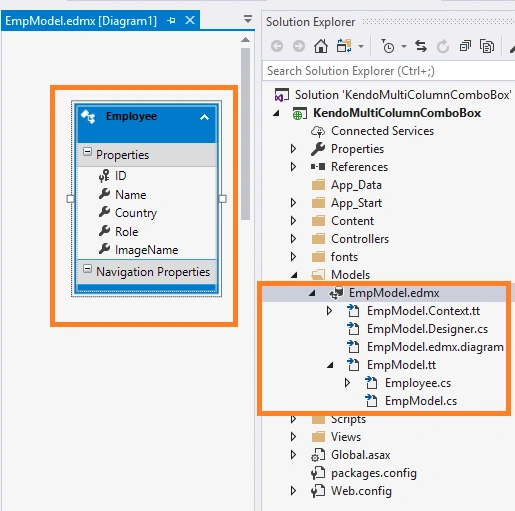
Here, I have already discussed how to configure and implement a database first approach. In the meantime, choose our created table with entity framework. Once we finish our configuration with SQL table "Employee" from CSharpCorner database and with our application, we will get the below screen as the succeeding configuration.
Create a Controller and View
Now, create an empty Controller and View. Here, I created a Controller with the name of "KendoUIController". Whenever we create an empty Controller, it is created with an empty Index action method. And, create an empty View of this action method "Index".
Enable Kendo UI Features
Here, we are going to enable the Kendo UI features with our application by adding the below CSS and JS in our shared _Layout or Index View.
- <link rel="stylesheet" href="https://kendo.cdn.telerik.com/2018.3.1017/styles/kendo.common-material.min.css" />
- <link rel="stylesheet" href="https://kendo.cdn.telerik.com/2018.3.1017/styles/kendo.material.min.css" />
- <link rel="stylesheet" href="https://kendo.cdn.telerik.com/2018.3.1017/styles/kendo.material.mobile.min.css" />
- <script src="https://kendo.cdn.telerik.com/2018.3.1017/js/jquery.min.js"></script>
- <script src="https://kendo.cdn.telerik.com/2018.3.1017/js/kendo.all.min.js"></script>
- public ActionResult LoadEmployee()
- {
- CSharpCornerEntities cSharpCornerEntities = new CSharpCornerEntities();
- var employees = cSharpCornerEntities.Employees.ToList();
- return Json(employees, JsonRequestBehavior.AllowGet);
- }
Implement MultiColumnComboBox
And now, create a div in the View which will act as MultiColumnComboBox, Here I have mentioned id div is employees
- <div id="example" class="col-lg-3">
- <div class="demo-section k-content">
- <input id="employees" style="width: 100%;" />
- </div>
- </div>
Now, enable the Kendo UI MultiColumnComboBox features to div("employees")
- $("#employees").kendoMultiColumnComboBox();
- $(document).ready(function() {
- dataSource = new kendo.data.DataSource({
- transport: {
- read: {
- url: "/KendoUI/LoadEmployee",
- dataType: "json",
- }
- },
- });
- });
Detailed Description
- transport-> Kendo UI transport helps us to do the CRUD operation (that means read, update, delete and create).
- read - > It is used to read the respective type data from mentioned url.
- url -> kendo read takes a place to read the data from this mentioned url. Here, we metioned to read from LoadEmployee action under KendoUI controller
- dataType: What type of data it should support reading
Now, bind this dataSource to KendoMultiColumnComboBox.
- $("#employees").kendoMultiColumnComboBox({
- dataTextField: "Name",
- dataValueField: "ID",
- height: 400,
- columns: [{
- field: "Name",
- title: "Name",
- width: 120
- }, {
- field: "Role",
- title: "Role",
- width: 160
- }, {
- field: "Country",
- title: "Country",
- width: 90
- }],
- footerTemplate: 'Total #: instance.dataSource.total() # items found',
- filter: "contains",
- filterFields: ["Name", "Country", "Role"],
- dataSource: dataSource
- });
Detailed Description
- $("#employees").kendoMultiColumnComboBox({ -> Enable kendoMultiColumnComboBox features to employees div
- dataTextField: "Name", -> It represents what we want to display in dropdown, Name is the property/column name
- dataValueField: "ID", -> ID is the value field While selecting the dropdown value
- height -> Total height of the control
- columns: [ -> It's to represent what are the field needs to be displayed, Here we mentioned the column names are Name, Role, and Country
- field -> It represents which column data should appear here
- title -> Our custom name or display name for the respective column
- width - It represents the width of the respective column
- footerTemplate-> To create Custom logic. Here we mentioned to display the total count of record. This always will appear in the bottom of the control
- Instance.dataSource.Total() -> It helps to find the total count of record available in KendoMultiColumnComboBox data source
- filter: "contains", -> There has many filters, like equal to, contains, etc.,
- filterFields: ["Name", "Country", "Role"], -> filters only applied to these fields
- dataSource: dataSource- > Jason Data loaded here
Run your application.
Custom Template with MultiColumnComboBox
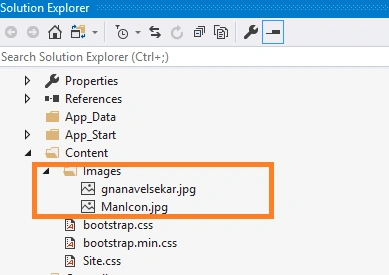
I have told you already that we do our own customization using the template. Here, we are going to display the employee name with the name and for that, I am going to store the images in server directory and store that name in the database table (You can view database dummy values in the second image).
Now add the field in column multicolumncombobox with the template
- columns: [
- {
- field: "Name", title: "Emp Name", template: "<div class='customer-photo'" +
- "style='background-image: url(../Content/Images/#:data.ImageName#.jpg);'></div>" +
- "<span class='customer-name'>#: Name #</span>", width: 170
- },
- ]
Detailed Description
- Template -> to add our customization
- #:data.ImageName# -> Loading the Imagename
- # -> We can read the datasource data using the # followed by the column name and end with the #
and add the CSS for the template.
- < style type = "text/css" >
- .customer - photo
- {
- display: inline - block;
- box - shadow: inset 0 0 1 px #999, inset 0 0 10px rgba(0,0,0,.2);
- margin: 0 10px 0;
- width: 20px;
- height: 20px;
- border-radius: 50%;
- background-size: 100%;
- background-repeat: no-repeat;
- vertical-align: middle;
- }
- </style>

Run your application.
Complete View
- @ {
- ViewBag.Title = "Index";
- Layout = "~/Views/Shared/_Layout.cshtml";
- } < link rel = "stylesheet"
- href = "https://kendo.cdn.telerik.com/2018.3.1017/styles/kendo.common-material.min.css" / > < link rel = "stylesheet"
- href = "https://kendo.cdn.telerik.com/2018.3.1017/styles/kendo.material.min.css" / > < link rel = "stylesheet"
- href = "https://kendo.cdn.telerik.com/2018.3.1017/styles/kendo.material.mobile.min.css" / > < script src = "https://kendo.cdn.telerik.com/2018.3.1017/js/jquery.min.js" > < /script> < script src = "https://kendo.cdn.telerik.com/2018.3.1017/js/kendo.all.min.js" > < /script> < br / > < div id = "example"
- class = "col-lg-3" > < div class = "demo-section k-content" > < input id = "employees"
- style = "width: 100%;" / > < /div> < /div> < style type = "text/css" > .customer - photo {
- display: inline - block;
- box - shadow: inset 0 0 1 px #999, inset 0 0 10px rgba(0,0,0,.2);
- margin: 0 10px 0;
- width: 20px;
- height: 20px;
- border-radius: 50%;
- background-size: 100%;
- background-repeat: no-repeat;
- vertical-align: middle;
- }
- </style>
- <script>
- $(document).ready(function () {
- dataSource = new kendo.data.DataSource({
- transport: {
- read: {
- url: "/KendoUI/LoadEmployee",
- dataType: "json",
- }
- },
- });
- $("#employees").kendoMultiColumnComboBox({
- dataTextField: "Name",
- dataValueField: "ID",
- height: 400,
- columns: [{
- field: "ContactName",
- title: "Emp Name",
- template: "<div class='customer-photo'" + "style='background-image: url(../Content/Images/#:data.ImageName#.jpg);'></div>" + "<span class='customer-name'>#: Name #</span>",
- width: 170
- },
- //{ field: "Name", title: "Name", width: 120 },
- {
- field: "Role",
- title: "Role",
- width: 160
- }, {
- field: "Country",
- title: "Country",
- width: 90
- }
- ],
- footerTemplate: 'Total #: instance.dataSource.total() # items found',
- filter: "contains",
- filterFields: ["Name", "Country", "Role"],
- dataSource: dataSource
- });
- });
- < /script>
Complete Controller
- using KendoMultiColumnComboBox.Models;
- using System;
- using System.Collections.Generic;
- using System.Linq;
- using System.Web;
- using System.Web.Mvc;
- namespace KendoMultiColumnComboBox.Controllers {
- public class KendoUIController: Controller {
- // GET: KendoUI
- public ActionResult Index() {
- return View();
- }
- public ActionResult LoadEmployee() {
- CSharpCornerEntities cSharpCornerEntities = new CSharpCornerEntities();
- var employees = cSharpCornerEntities.Employees.ToList();
- return Json(employees, JsonRequestBehavior.AllowGet);
- }
- }
- }
Refer to the attached project for reference. I have attached the demonstrated project without a package due to the size limit.
Summary
In this article, we discussed how to work with MultiColumnComboBox in our ASP.NET MVC5 web application using Kendo UI and Entity Framework.
I hope it's helpful. Your valuable feedback and comments about this article are always welcome.
Join the conversation! Your thoughts help the community grow.