

Introduction
This article will give you a step-by-step demonstration on how to store any physical object into Azure Blob Storage, like a picture or song. In the previous article, I have discussed on Azure Table Storage CRUD operation. BLOB, Binary Large Object, is a cloud storage service of Microsoft. We can store here any kind of data such as text, image, files etc.
Overview
Azure Blob Storage is used to store the unstructured physical object in Microsoft Cloud. We can access the data over HTTP & HTTPS protocol from anywhere internet connection is available. If we want, we can restrict the access of Blob as public or private. It has the full flavor of cloud elasticity.
You can get more overview of Azure Blob Storage from here.
Concept
Blob storage exposes three resources: your storage account, the containers in the account, and the blobs in a container. You can also add folder into the container. The relation looks like this.
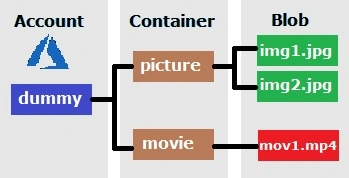
The blob URL looks like this.
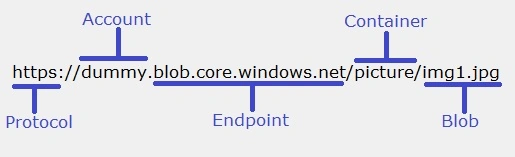
You can customize your endpoint with your domain.
Note
There are some rules to create a container
- Container Name should be in lower case
- Container Name length must be within 3 characters to 63 characters
- Container Name does not support any special character except "-" (dash)
To create this project, I’m using.
- .Net Framework 4.6
- Windows Azure Storage 8.1.1 package
- Visual Studio 2015
- MVC 5.0
The scope of work(SOW)
- Upload Screen - Here I used an HTML form and input type file.
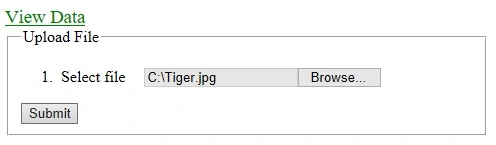
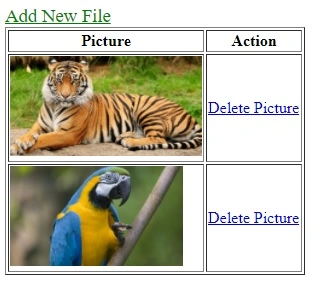
- View and Delete Screen - Here, I use an HTML table to view all files in a container. There is a button to Delete the file from Blob Storage.
Step 1
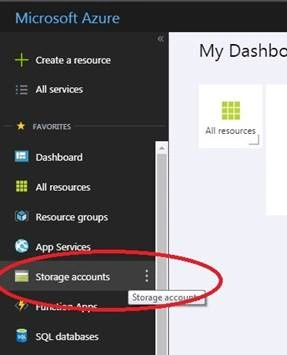
Create Azure Storage Account.
Go to https://portal.azure.com and create Azure Storage Account.
Access Key & Connection String
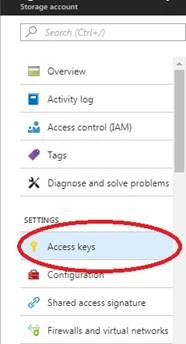
After creating Azure Storage Account, go to that account and copy the access key and connection string of that account. It will be used in our MVC application.
Step 2
Create a new empty MVC application. The step to create a new project is File -> New -> Project…
Go to NuGet package manager console window and install -> “Install-Package WindowsAzure.Storage -Version 8.1.1”.
Step 3
Add “BlobManager” class for access Azure Blob. And use two namespaces.
- WindowsAzure.Storage;
- WindowsAzure.Storage.Blob;
Remove default Constructor from “BlobManager” class. And add a parameterized Constructor with a string parameter. Also, add a private property of “CloudBlobContainer”.
This constructor will create the container if it's not there in Storage and set the permission of the container. We put the Azure Storage Connection String in this constructor, which was declared above.
- public class BlobManager
- {
- private CloudBlobContainer blobContainer;
- public BlobManager(string ContainerName)
- {
- // Check if Container Name is null or empty
- if (string.IsNullOrEmpty(ContainerName))
- {
- throw new ArgumentNullException("ContainerName", "Container Name can't be empty");
- }
- try
- {
- // Get azure table storage connection string.
- string ConnectionString = "Your Azure Storage Connection String goes here";
- CloudStorageAccount storageAccount = CloudStorageAccount.Parse(ConnectionString);
- CloudBlobClient cloudBlobClient = storageAccount.CreateCloudBlobClient();
- blobContainer = cloudBlobClient.GetContainerReference(ContainerName);
- // Create the container and set the permission
- if (blobContainer.CreateIfNotExists())
- {
- blobContainer.SetPermissions(
- new BlobContainerPermissions
- {
- PublicAccess = BlobContainerPublicAccessType.Blob
- }
- );
- }
- }
- catch (Exception ExceptionObj)
- {
- throw ExceptionObj;
- }
- }
- }
Step 4
Add a public method for Upload file into "BlobManager" class.
After uploading the file, it returns an absolute URI as a string. You can save this URI into your Database according to your project’s requirement.
- public string UploadFile(HttpPostedFileBase FileToUpload)
- {
- string AbsoluteUri;
- // Check HttpPostedFileBase is null or not
- if (FileToUpload == null || FileToUpload.ContentLength == 0)
- return null;
- try
- {
- string FileName = Path.GetFileName(FileToUpload.FileName);
- CloudBlockBlob blockBlob;
- // Create a block blob
- blockBlob = blobContainer.GetBlockBlobReference(FileName);
- // Set the object's content type
- blockBlob.Properties.ContentType = FileToUpload.ContentType;
- // upload to blob
- blockBlob.UploadFromStream(FileToUpload.InputStream);
- // get file uri
- AbsoluteUri = blockBlob.Uri.AbsoluteUri;
- }
- catch (Exception ExceptionObj)
- {
- throw ExceptionObj;
- }
- return AbsoluteUri;
- }
Step 5
As same, add another public method to get all blob/files into "BlobManager" class.
- public List<string> BlobList()
- {
- List<string> _blobList = new List<string>();
- foreach (IListBlobItem item in blobContainer.ListBlobs())
- {
- if (item.GetType() == typeof(CloudBlockBlob))
- {
- CloudBlockBlob _blobpage = (CloudBlockBlob)item;
- _blobList.Add(_blobpage.Uri.AbsoluteUri.ToString());
- }
- }
- return _blobList;
- }
Step 6
Add another public method to Delete blob/file into "BlobManager" class.
- public bool DeleteBlob(string AbsoluteUri)
- {
- try
- {
- Uri uriObj = new Uri(AbsoluteUri);
- string BlobName = Path.GetFileName(uriObj.LocalPath);
- // get block blob refarence
- CloudBlockBlob blockBlob = blobContainer.GetBlockBlobReference(BlobName);
- // delete blob from container
- blockBlob.Delete();
- return true;
- }
- catch (Exception ExceptionObj)
- {
- throw ExceptionObj;
- }
- }
Step 7 - File upload screen
Add a Controller named "Home". There will be a default Index Action Result.
- public ActionResult Index(string id)
- {
- return View();
- }
Then right-click on Index and add empty View for file upload screen.
- @using (Html.BeginForm("Index", "Home", FormMethod.Post, new { enctype = "multipart/form-data" }))
- {
- <fieldset>
- <legend>Upload File</legend>
- <ol>
- <li>
- <label style="margin-right:15px;">Select file </label>
- <input type="file" name="FilePath" value="" />
- </li>
- </ol>
- <input type="submit" value="Submit" />
- </fieldset>
- }
Write an HttpPost Action Result into Home Controller for submit the data.
Note: according to my code, if we select different file with the same name, it will replace the previous Blob. To avoid this problem you can set the file name.
- [HttpPost]
- public ActionResult Index(HttpPostedFileBase uploadFile)
- {
- foreach (string file in Request.Files)
- {
- uploadFile = Request.Files[file];
- }
- // Container Name - picture
- BlobManager BlobManagerObj = new BlobManager("picture");
- string FileAbsoluteUri = BlobManagerObj.UploadFile(uploadFile);
- return RedirectToAction("Get");
- }
Step 8 - View and Delete
Add another Action Result into Home Controller. Where we can get all Blobs/Files from Azure Storage.
- public ActionResult Get()
- {
- // Container Name - picture
- BlobManager BlobManagerObj = new BlobManager("picture");
- List<string> fileList = BlobManagerObj.BlobList();
- return View(fileList);
- }
The view of Get Action Result looks like this.
- @model List<string>
- <table border="1">
- <thead>
- <tr>
- <th>Picture</th>
- <th>Action</th>
- </tr>
- </thead>
- <tbody>
- @foreach (string SingleObj in Model)
- {
- <tr>
- <td>
- <img src="@SingleObj" alt="@SingleObj"
- style="height:100px; width: auto;" />
- </td>
- <td>
- <span>
- @Html.ActionLink("Delete Picture", "Delete", "Home", new { uri = SingleObj }, new { })
- </span>
- </td>
- </tr>
- }
- </tbody>
- </table>
Add Delete action result into the Home controller.
- public ActionResult Delete(string uri)
- {
- // Container Name - picture
- BlobManager BlobManagerObj = new BlobManager("picture");
- BlobManagerObj.DeleteBlob(uri);
- return RedirectToAction("Get");
- }
Exception Handling
You can handle the error by Storage Exception class.
Find the error list here.
Conclusion
I give a walkthrough on how to upload, view, and delete a file into Azure Blob Storage. According to the content type of Blob, you can display it on the webpage. Now, you can experiment with your project with your project’s requirement.
Dhruv JoshiPosted Mar 30, 2021, 4:41 AM
I am getting 403 forbidden access error on the line - blobContainer.CreateIfNotExists())What could be the solution?
PreetiPosted Jun 28, 2020, 5:34 AM
Not able to access blob through code. Giving Error "Public access is not permitted on this storage account." When I try to change access fro portal it says "Unable to change container access permissions: StorageError:Public access is not permitted on this storage account"
JosephsPosted Sep 15, 2019, 11:20 PM
Can you share Download provision for this
sharul sharmaPosted Jun 5, 2019, 11:58 PM
How to show blob file in browser instead of downloading and is extension is .docx
DavidPosted Jun 5, 2019, 3:02 PM
How i download blob if i need?
sharul sharmaPosted Jun 3, 2019, 4:37 AM
Can we preview blobstorage files in my browser instead of download because my download works fine but problem in preview files
Emanuele LeoniPosted Dec 17, 2018, 5:34 AM
Very helpful article.
JosephsPosted Sep 14, 2018, 1:28 AM
Can you share Download method for this?
Asanda KhuzwayoPosted Sep 9, 2018, 7:34 AM
Thank you !!!!!!!!
Debasish SahooPosted Apr 19, 2018, 3:07 AM
Very good,keep it up. i have one question that is this a storage for store all type of files or only media file .another think soubhik please give me some idea about "Public Read Access" of Blob Containers and how can i Set Container Public Access Level and what is there different mode